
| Page: |
| Home > Help Needed / General Tech Chat > measuring head volume. added more pics... @24.5 cc now. | |||||||
 1751 Posts Member #: 10190 Post Whore belgium |
13th Mar, 2016 at 10:00:51pm
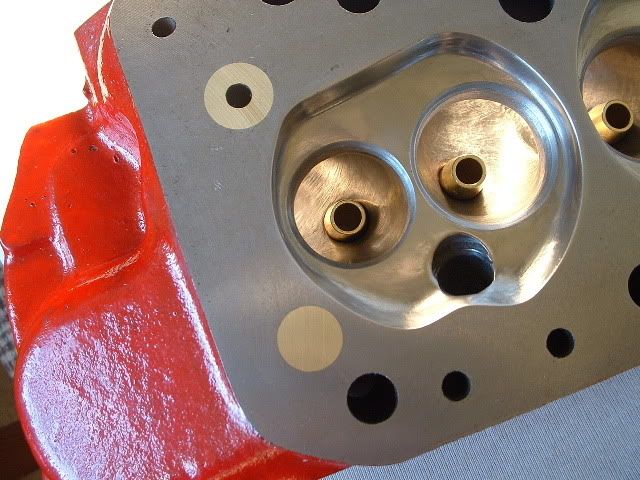
hy. been grinding somewhat on my cilinder head. i used to measure volume of the chambers by putting a plate on it that i closed up with grease and filling the chambers with liquid trough a hole in the plate. like that i could read how many cc of water went into it.
Edited by Rammie2000 on 21st Mar, 2016. you can do anything if you set your mind to it...
|
||||||
 2096 Posts Member #: 9894 Post Whore Dorking |
13th Mar, 2016 at 10:55:34pm
Not that I'm aware of. I use that technique. |
||||||
 4642 Posts Member #: 20 My sister is so fit I won't show anyone her picture Lake District |
13th Mar, 2016 at 11:20:12pm
What you're already doing is fine and accurate.
|
||||||
|
1751 Posts Member #: 10190 Post Whore belgium |
14th Mar, 2016 at 04:48:38am
Okey chears. you can do anything if you set your mind to it...
|
||||||
|
696 Posts Member #: 10034 Post Whore Birmingham |
14th Mar, 2016 at 09:04:32am
I do it like that. Try with the head at an angle with the hole at the top. Also add a drop of washing up liquid. |
||||||
|
2096 Posts Member #: 9894 Post Whore Dorking |
14th Mar, 2016 at 10:48:06am
I have used thinners makes it easier. |
||||||
 510 Posts Member #: 1592 Smart Guy! mainland europe near ze germans |
14th Mar, 2016 at 12:44:49pm
You can do it without a plate if you set the head dead level and use alcohol (spritus, vodka). Has less surface tension than water and does not form as big a bulge and you can eyeball it fine. Imho easier, less messy and more repeatable.
Edited by Sir Yun on 14th Mar, 2016. That sir, is not rust, it is the progressive mass reduction system
|
||||||
|
1751 Posts Member #: 10190 Post Whore belgium |
14th Mar, 2016 at 02:47:17pm
why washing up liquid?
On 14th Mar, 2016 PhilR said:
I do it like that. Try with the head at an angle with the hole at the top. Also add a drop of washing up liquid. you can do anything if you set your mind to it...
|
||||||
|
1751 Posts Member #: 10190 Post Whore belgium |
14th Mar, 2016 at 02:48:44pm
On 14th Mar, 2016 Sir Yun said:
You can do it without a plate if you set the head dead level and use alcohol (spritus, vodka). Has less surface tension than water and does not form as big a bulge and you can eyeball it fine. Imho easier, less messy and more repeatable. Water causes rust , thinner does not but unkike vodka you can't really drink it i rather drink the vodka..... On 14th Mar, 2016 jonny f said:
I have used thinners makes it easier. what makes it easier with thinners? you can do anything if you set your mind to it...
|
||||||
 1030 Posts Member #: 1291 Post Whore Suffolk / Birmingham |
14th Mar, 2016 at 03:45:12pm
No one uses water! Use diesel. |
||||||
|
696 Posts Member #: 10034 Post Whore Birmingham |
14th Mar, 2016 at 06:06:25pm
If you're just measuring into an open, level chamber I agree that water is a daft choice. Thinners (or diesel) lie flatter in the chamber so its easier to see when you've reached the top.
|
||||||
|
1751 Posts Member #: 10190 Post Whore belgium |
16th Mar, 2016 at 06:55:38am
My toughts to phill.
Edited by Rammie2000 on 16th Mar, 2016. you can do anything if you set your mind to it...
|
||||||
|
1751 Posts Member #: 10190 Post Whore belgium |
16th Mar, 2016 at 06:58:08am
Edited by Rammie2000 on 16th Mar, 2016. you can do anything if you set your mind to it...
|
||||||
|
696 Posts Member #: 10034 Post Whore Birmingham |
16th Mar, 2016 at 08:14:00am
How much did you ask them to cut? Before you grind any more, measure the total head thickness at all 4 corners to make sure it hasn't been cut on a slant. I've had 2 different shops clamp heads down onto the valve guides, so weren't flat. It should be fairly obvious if they're paying attention, but they both just cut deep enough to hide the mistake. Edited by PhilR on 16th Mar, 2016. |
||||||
|
1751 Posts Member #: 10190 Post Whore belgium |
16th Mar, 2016 at 09:18:24am
Its 69.16 mm all round so there we are good. Cant remember how much it was before. I asked the to cut minimal.
you can do anything if you set your mind to it...
|
||||||
|
696 Posts Member #: 10034 Post Whore Birmingham |
16th Mar, 2016 at 10:43:06am
Standard head is 2.750" tall so it's lost around 0.69mm; maybe already skimmed before you had it?
Edited by PhilR on 16th Mar, 2016. |
||||||
|
1030 Posts Member #: 1291 Post Whore Suffolk / Birmingham |
16th Mar, 2016 at 11:31:49am
Edited by slater on 16th Mar, 2016. |
||||||
|
1751 Posts Member #: 10190 Post Whore belgium |
16th Mar, 2016 at 12:09:43pm
thnx did they work well opend up to the front?
you can do anything if you set your mind to it...
|
||||||
|
696 Posts Member #: 10034 Post Whore Birmingham |
16th Mar, 2016 at 02:15:59pm
Rammie, don't grind the valves. It takes forever, and after a very short time, both surfaces will become concave, which you'll have to correct (even though they'll seal).
Edited by PhilR on 16th Mar, 2016. |
||||||
|
1751 Posts Member #: 10190 Post Whore belgium |
16th Mar, 2016 at 02:42:40pm
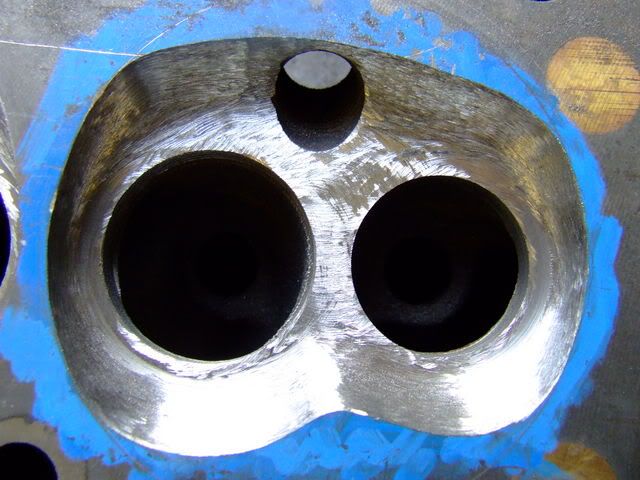
interesting. well part of the beak is gone at the top from that first one so will need to do simular to the rest. but it is stil mostly there on the bottom. can take slightly more of it away at the inlet valve so it becomes more like a beak shape there. and take the rest to the front.
you can do anything if you set your mind to it...
|
||||||
|
4642 Posts Member #: 20 My sister is so fit I won't show anyone her picture Lake District |
16th Mar, 2016 at 03:37:09pm
For measuring the chambers drill two holes in the Perspex plate you're sticking to the face, one to fill through, the other should be towards the outer edge of the chamber. Now when you fill the chamber the air has the other hole to escape from allowing a consistent and accurate result. As above, water is fine when doing this method. Other liquids such as thinners will dissolve the grease holding your Perspex in place and render your results useless.
|
||||||
|
4642 Posts Member #: 20 My sister is so fit I won't show anyone her picture Lake District |
16th Mar, 2016 at 03:39:07pm
Also you must have the patience of a saint if you're doing all that with a Dremel !
|
||||||
|
1751 Posts Member #: 10190 Post Whore belgium |
16th Mar, 2016 at 05:02:19pm
i use the perpex methode. the left chambre is modded as it is now. ill make it bigger to the spark plug site.
On 16th Mar, 2016 Turbo Phil said:
For measuring the chambers drill two holes in the Perspex plate you're sticking to the face, one to fill through, the other should be towards the outer edge of the chamber. Now when you fill the chamber the air has the other hole to escape from allowing a consistent and accurate result. As above, water is fine when doing this method. Other liquids such as thinners will dissolve the grease holding your Perspex in place and render your results useless. What's the current chamber size now you've modified it, as in the picture above ? It is possible to go deeper in the chamber but you do start to lose the short side radius, not good for low lift flow. Phil. you can do anything if you set your mind to it...
|
||||||
|
696 Posts Member #: 10034 Post Whore Birmingham |
16th Mar, 2016 at 06:28:36pm
For the beak, I suspect you may have to carve it out to get the cc you want, so not to worry if that's the case. The last head I did, I completely cut I out.
|
||||||
|
1751 Posts Member #: 10190 Post Whore belgium |
20th Mar, 2016 at 05:25:03pm
you can do anything if you set your mind to it...
|
||||||
| Home > Help Needed / General Tech Chat > measuring head volume. added more pics... @24.5 cc now. | |||||||
|
|||||||


| Page: |