
| Page: |
| Home > Help Needed / General Tech Chat > Bodywork advice needed please. | |||||||
 314 Posts Member #: 1311 Senior Member Yeovil, Somerset |
26th Nov, 2006 at 11:38:34am
Any adice would be realy apreciated please
|
||||||
 1030 Posts Member #: 1291 Post Whore Suffolk / Birmingham |
26th Nov, 2006 at 11:49:46am
What id do is chop it all out, Weld a patch in the corner of the floor pan, then do the heel board then do the bit between arch and heelboard from inside the car. Not an easy task to do it properly and neatly but thats minis for ya! |
||||||
|
Forum Mod 10980 Posts Member #: 17 ***16*** SouthPark, Colorado |
26th Nov, 2006 at 02:55:45pm
All very easy repairs (especially as you have no rear pockets) once you've taken the rear subframe and outer sill off, and got the shell up at 45-degrees or on its side.
On 17th Nov, 2014 Tom Fenton said:
Sorry to say My Herpes are no better Ready to feel Ancient ??? This is 26 years old as of 2022 https://youtu.be/YQQokcoOzeY |
||||||
|
314 Posts Member #: 1311 Senior Member Yeovil, Somerset |
26th Nov, 2006 at 05:39:08pm
Been in the garage most of the day and managed to take out the closing panels and the rotton bits of the rear seat, the new panels fit pretty well so hopefully if i get chance this week will get them fitted ready to remove the heelboard.
|
||||||
|
314 Posts Member #: 1311 Senior Member Yeovil, Somerset |
29th Nov, 2006 at 09:21:05pm
Both sides are now cut out at last and new panels cut to size
|
||||||
|
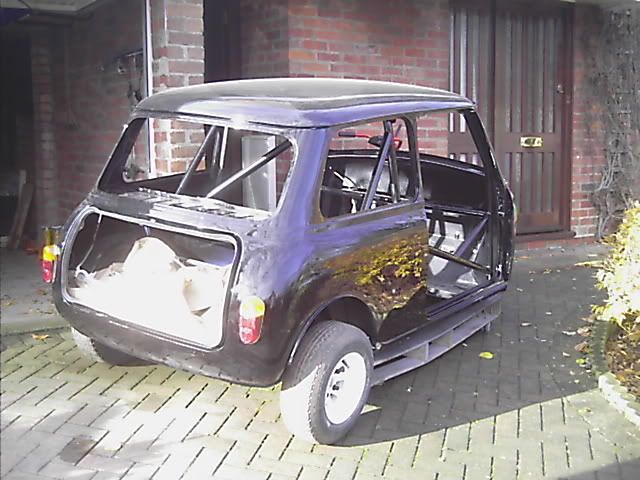
314 Posts Member #: 1311 Senior Member Yeovil, Somerset |
2nd Dec, 2006 at 02:34:36pm
Just some updated pics of some of the bodywork ive been sorting over the last few weeks :). Seems to be going pretty well considering i havnt done any body work for a long long time.
|
||||||
 455 Posts Member #: 953 Senior Member London |
2nd Dec, 2006 at 03:27:30pm
. Edited by Bodge Job on 31st Mar, 2007. |
||||||
|
314 Posts Member #: 1311 Senior Member Yeovil, Somerset |
2nd Dec, 2006 at 03:31:22pm
It was all painted with anti rust primer before i started with the filler and was then painted again with normal primer once i was happy with the finish.
|
||||||
 28 Posts Member #: 1397 Member Nr. Oxford |
2nd Dec, 2006 at 05:18:32pm
also, you can spray it all with zinc primer before you do any welding. it improves conductivity making a better weld and wont burn off and will protect the bare metal that you cant paint once its welded together.
Pictures here >>> Photobucket
|
||||||
|
314 Posts Member #: 1311 Senior Member Yeovil, Somerset |
4th Dec, 2006 at 06:59:11pm
As you can see from the last pic the rear end of the mini is currently supported along the back of thr rear floorpan by a large plank of wood on 2 axel stands.
|
||||||
|
314 Posts Member #: 1311 Senior Member Yeovil, Somerset |
10th Dec, 2006 at 12:43:50pm
Latest updates
|
||||||
|
1030 Posts Member #: 1291 Post Whore Suffolk / Birmingham |
10th Dec, 2006 at 02:54:48pm
Thats the way! whole panels at a time is much easyer
|
||||||
|
314 Posts Member #: 1311 Senior Member Yeovil, Somerset |
10th Dec, 2006 at 03:35:19pm
Its getting the lips on the old panel off thats proving to be the tricky bit where the healboard lip sits under the floor pan, not easy
|
||||||
|
2514 Posts Member #: 1217 I like nice quiet girly Minis Cheltenham, Gloucestershire |
10th Dec, 2006 at 05:33:22pm
Careful with the alignment when refitting the heal borad or else it'll never drive straight again.
Every day is a school day ...........
On 27th of Sep, 2007 at 12:45pm Jimster said:
why do you you think I got a girlfriend with small hands? |
||||||
|
314 Posts Member #: 1311 Senior Member Yeovil, Somerset |
10th Dec, 2006 at 05:59:32pm
The plan was to use a fully built subframe with heal board attached via the front mounts and bolt the subframe in using the mounts in the boot. Once offered up check the alignment between front and rear wheels to ensure the frame sits true before welding it in place.
|
||||||
|
2514 Posts Member #: 1217 I like nice quiet girly Minis Cheltenham, Gloucestershire |
10th Dec, 2006 at 06:54:10pm
That approach is good but you might find that it's all a little on the heavy and difficult to control side, hence why I may up a frame that was much lighter and easier to work with.
Every day is a school day ...........
On 27th of Sep, 2007 at 12:45pm Jimster said:
why do you you think I got a girlfriend with small hands? |
||||||
|
314 Posts Member #: 1311 Senior Member Yeovil, Somerset |
10th Dec, 2006 at 07:56:15pm
Its gonna be interesting which ever route i take and think ill be needing some good luck lol
|
||||||
|
314 Posts Member #: 1311 Senior Member Yeovil, Somerset |
17th Dec, 2006 at 12:31:35pm
well the subframe is now is place and bolted into the boot mounts and onto the heel board, everything lines up quite nicely (so it seems anyway) so just got to check all the positioning and get the heel board fixed in place
|
||||||
|
2514 Posts Member #: 1217 I like nice quiet girly Minis Cheltenham, Gloucestershire |
17th Dec, 2006 at 02:07:00pm
On 17th of Dec, 2006 at 12:31pm Minimad69 said:
Not an easy job offering up a fully built subframe into place on your own :- but i some how managed it  hate to say I told you so .... that is why I made up the alignment frame ... LOL You'll be ok ................ just measure twice ... then twice more .... then again to be sure. I always find a cup of tea the best cure when it's all going to pieces ....... The last one I did in one try, went straight into place .... the one before that I spent nearly a whole day measuring / taking / moving ... measureing ... etc. beforeI was happy with it .... Good luck Every day is a school day ...........
On 27th of Sep, 2007 at 12:45pm Jimster said:
why do you you think I got a girlfriend with small hands? |
||||||
|
314 Posts Member #: 1311 Senior Member Yeovil, Somerset |
17th Dec, 2006 at 04:26:54pm
didnt have the metal to hand to make up a frame so had to do it the difficult way but got there in the end.
|
||||||
|
Site Admin  15302 Posts Member #: 337 Fearless Tom Fenton, Avon Park 2007 & 2008 class D winner & TM legend. |
17th Dec, 2006 at 05:20:48pm
I'd personally seam weld that heelboard in all the way across from the inside, also make sure that the tags onto the inner sills either end are fixed to something solid and also fully seam welded.
On 29th Nov, 2016 madmk1 said:
On 28th Nov, 2016 Rob Gavin said:
I refuse to pay for anything else Like fuel 😂😂 |
||||||
|
314 Posts Member #: 1311 Senior Member Yeovil, Somerset |
17th Dec, 2006 at 05:33:32pm
i plan on seam welding both ends of the heelboard where the subframe mounts are inside and outside to give it as much strength as possible, also where the tunnel is in the middle.
|
||||||
|
2514 Posts Member #: 1217 I like nice quiet girly Minis Cheltenham, Gloucestershire |
17th Dec, 2006 at 08:42:49pm
Made a nice job of that fella ..... A+
Every day is a school day ...........
On 27th of Sep, 2007 at 12:45pm Jimster said:
why do you you think I got a girlfriend with small hands? |
||||||
|
314 Posts Member #: 1311 Senior Member Yeovil, Somerset |
17th Dec, 2006 at 08:54:23pm
cheers Roger. Only prob i had really was that the heelboard i bought didnt fit the profile in the floor pan properly
|
||||||
| Home > Help Needed / General Tech Chat > Bodywork advice needed please. | |||||||
|
|||||||


 , camera died though so no pics of the repair yet


| Page: |