|
Home > How To > Beginners guide to mig welding - a fools guide as its written by one
|
rosco454
611 Posts
Member #: 5222
Post Whore
Northumberland
|
|
Hi all,
Since im on here all the time and have little to no technical knowledge to offer most of the time I thought a decent welding guide might be useful on the forum so here goes nothing.....
Firstly im by no means a pro welder,more of a keen idiot who happens to own a welder,I have only been mig welding for a year or so maybe welding once a week at most so im by no means an expert.Hopefully the guide ive knocked together will give anyone starting out a helping hand and steer them in the right direction.The guide assumes you know nothing about mig welding as I had no clue whatsoever when I started so im probably stating the obvious in places.Its a bit of an essay so get the kettle on!
Equipment required;
Obvious one,a mig welder of some sort.
Preferably about 130 amps or above with a 30 amp minimum setting,this will go low enough for bodywork but will have enough power to do occasional thicker stuff and certainly handle anything you will be doing on a mini.I would say avoid gasless if possible,ive only used it once personally but it burns hotter and the welds look messy and take more cleaning up.Generally as with most things the more you spend the better the machine,some of the really cheap welders are awful so try to buy the best machine available that suits your budget.
Gas.
I use argoshield light for welding mild steel (argon/co2 mix from boc) but any other co2/argon mix is pretty much the same and plain co2 can be used as well.Refillable bottles are best and unless you only have a minute amount of welding to do then I would avoid the small disposable ones.
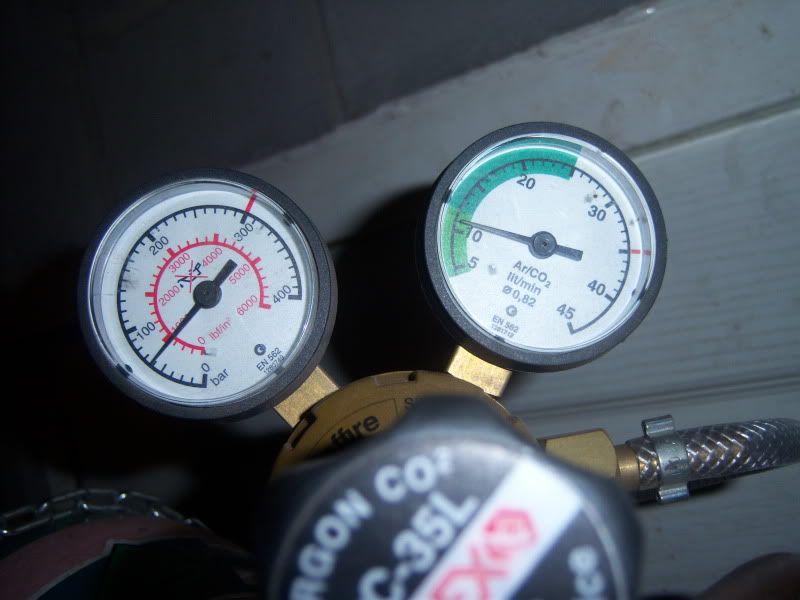
Regulator.
Appropriate to the type of gas cylinder being used,most that fit the disposable bottles dont have a gauge so gas flow is set by ear.Most decent ones for refillable bottles have 2 gauges,one for cylinder contents and one for gas flow.
Wire.
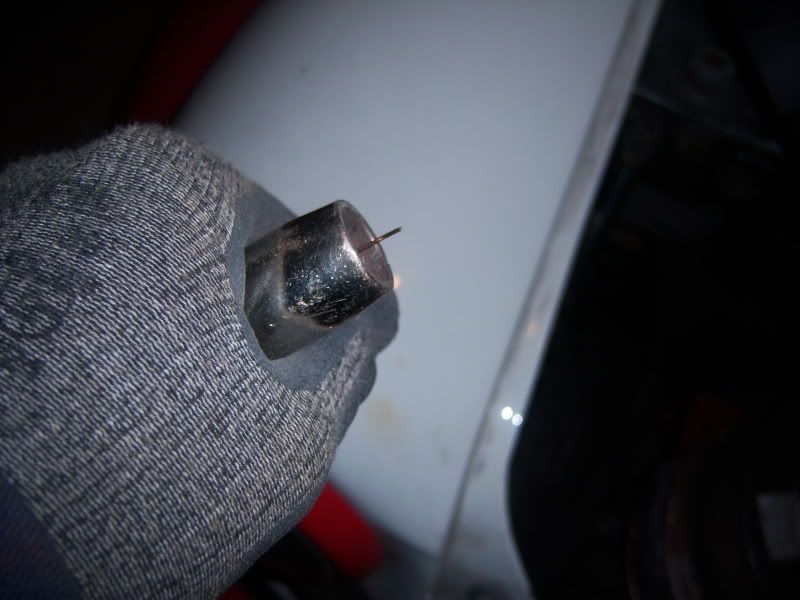
Mild steel wire in a size to suit what you are welding.Normally 0.6mm for bodywork and 0.8mm for anything above about 2mm thick.Contact tips need to be sized to suit the wire.
Now onto the essential health and safety bit;
Mask.
A reactive mask makes things a lot easier as you can see whats going on before you strike an arc,buy the best you can afford as you only get one set of eyes.You want a mask with a shade range of around 9-13 for normal mig welding.
Gloves.
Welding gauntlets are fine,some people wear a tig glove on their torch hand for a better feel.Whatever you go for they will get spoilt pretty quickly once your off and running.
Hood.
If your going to be welding underneath a car a welding hood is a good idea as balls of metal fizzing down your neck/in your ear is unpleasant to say the least.
Boots.
Decent work boots so you dont burn through you best trainers.
Overalls.
Flameproof overalls in a size that gives enough room to stretch to reach awkward areas.Make sure you dont tuck them into your boots and invite hot metal in there as well as it tends to make you dance around the garage like an idiot.
Breathing mask.
Welding gives off all sorts of nastys so some small breathing masks are money well spent.
Fire extinguisher.
I wouldn't weld without one in easy reach,I have a co2 and a powder as water and foam are not good to be spraying around near electrical gear.
Setting up;
If the health and safety bit hasnt sent you to sleep then read on and get your machine set up.If its not already fully assembled just follow the instructions and away you go,once the machine is complete you can start getting it set up.
Install the wire.
Take the side panel off your welder and there will be a spindle at one end of the case and a feed motor at the other.Unscrew whatever retaining mechanism there is on the spindle and pop your reel of wire on.You welders instruction will tell you if the wire should feed from the bottom or the top of the reel.Next the wire needs to be fed through the rollers and into the liner,this is normally done by releasing the tensioner to allow the wire through the rollers and into the liner (make sure you use the right groove in the feed roller for the size of wire your using).
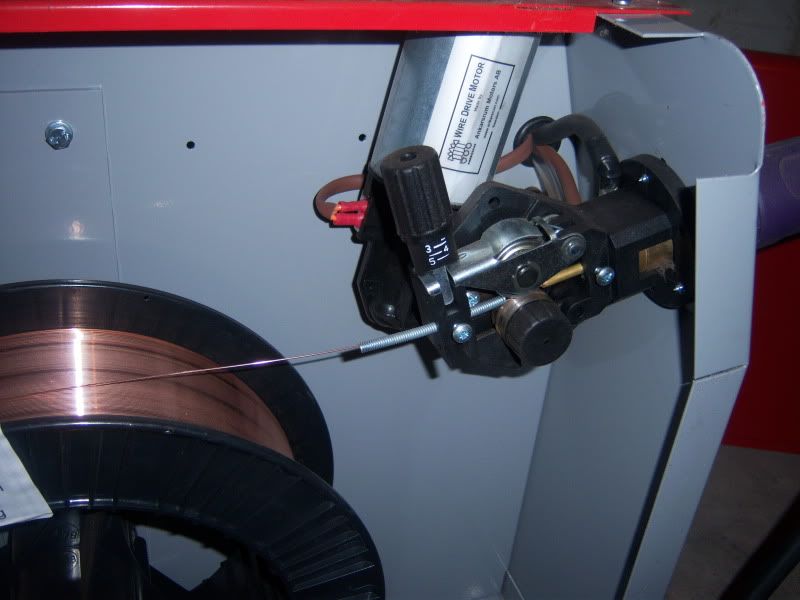
To set the tension of the wire,tighten the tensioner until the wire can be made to slip with light pressure from your thumb and forefinger at the torch end.The wire should stick out about 8-10mm from the end of the shroud.
If you have bought a second hand welder etc watch out for the wire rusting if its been stood a while,not only does it weld like crap but it clogs up the rollers and eats the liner as well.
Plumbing in the gas.
Get all your pipework in place to suit the gas bottles you are using and check there are no leaks.If your setting it by ear the it needs to be a gentle hiss when held near your ear,go careful on the trigger so you dont send a foot of wire shooting down your lughole!If your setting it on the gauge then it should be somewhere close to 10 litres per minute.
Edited by rosco454 on 19th Feb, 2011.
On 20th Jan, 2011 apbellamy said:
I have a bit of a fetish for tools
|
rosco454
611 Posts
Member #: 5222
Post Whore
Northumberland
|
|
First efforts;
Once the welder is setup and you have all your safety gear sorted out then your ready to have a first try.Don’t just jump in and spray pigeon shit all over your car,get some scrap to practice on first (your friendy local fabricators will have a bin of offcuts you can rummage through for a fiver/box of biscuits for tea time).To get you started its easiest to get some 2-3mm sheet as it takes away the fear of blowing holes and you can concentrate on whats going on.I would recommend using cold rolled (bright) sheet as opposed to hot rolled (black) as it cleans up easier and I find it gives a nicer weld but that could just be me.
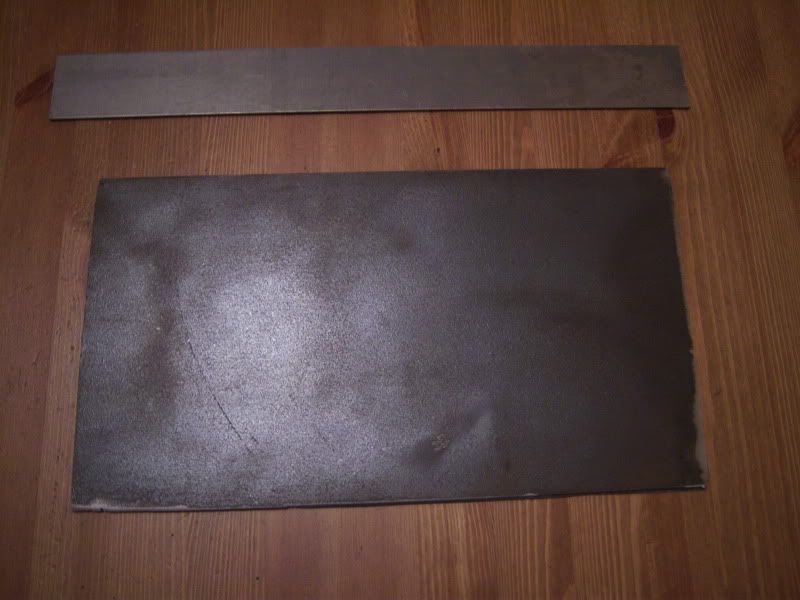
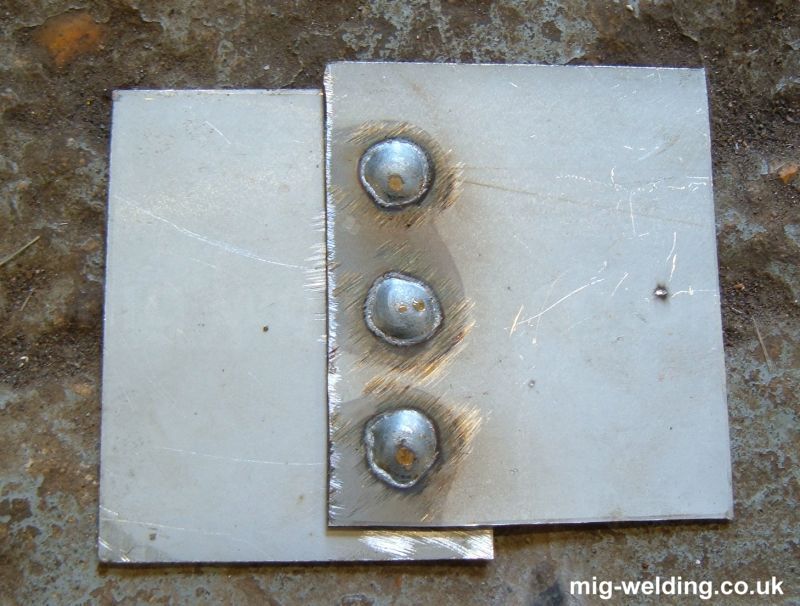
In the photo below the section of black plate took 10 mins to clean up and killed a flap wheel,it took 2 mins to do four of the small bright bits on both sides so it does take a lot longer.Its important to always clean your work back to bare metal or you will be pissing in the wind trying to get decent welds on it.

Once you have your metal cleaned up and the earth clamp is on get cracking with your first efforts.There are four variables (gas flow,travel speed,power & wire speed),on your first go it is more than likely you will get at least one if not most of them wrong in relation to the others.Most time consuming part of mig to learn is getting your settings spot on for the work you are doing.
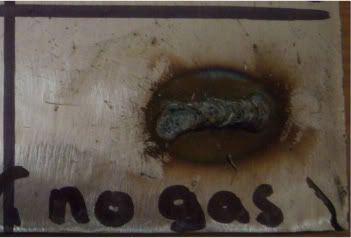
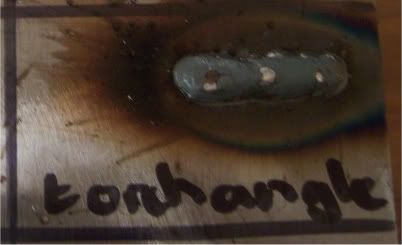
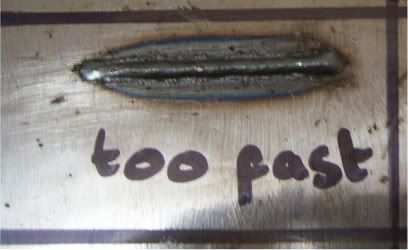
I have tried to get a pic of what happens when your settings are wrong,the welder I use is fairly forgiving so it was actually quite difficult to get a good example of a bad weld if that makes sense?Because of that the photos show the results slightly exaggerated.I have kept the settings the same for the pics and intentionality misadjusted one setting at a time.
Gas.
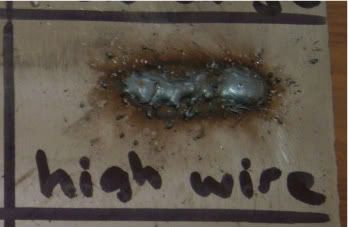
Easiest variable to get right is gas flow/shielding as you shouldnt have any problems if its set at 10lpm.You will know straight away if your gas flow is low (or you forgot to turn it on like I have several times!),the weld will spit like mad and end up looking like an aero bar,there will be spatter everywhere and there will often be hole blown in the end for good measure.
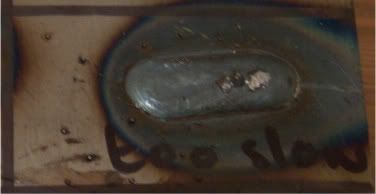
If you set the gas too high,not only are you wasting it but the shield will most likely be blown away leading to a sooty looking weld.This can also happen if you have the torch at too much of an angle (should be around 15-20 or so degrees from vertical) to the metal you are welding as the gas deflects away from the weld as shown below.Often has a bit of spatter in front of the weld as well.
Travel speed/motions.
I have a reasonably fast travel speed with a weaving motion but lots of people use a method of moving the torch in little circles as they move up the weld.You can either push or pull the weld,both do what they say on the tin and there are arguments for both but I use the push method.
As for travel speed you will have to have a play around and see what works for you,at work we have a few pro welders and 2 of them are like lightening and one is like watching the others in slow motion but all produce good welds so there is no right and wrong as long as your speed matches the rest of your settings.Go too fast and you will get a tall skinny weld that just sits on the top of the metal with little/no penetration.
To slow and you will end up with a low wide bead that probably penetrates too much and possibly on the verge of dropping through.
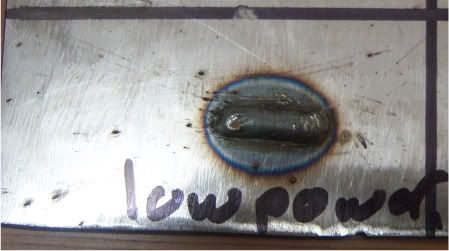
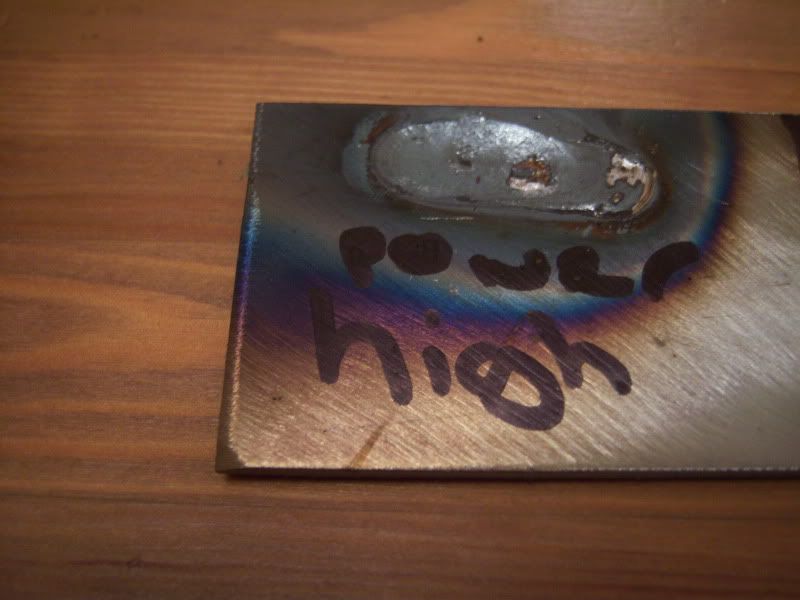
Power.
Self explanatory here,too much and you will blow holes,too little and the weld wont penetrate the metal.You need to experiment on scrap similar to the job you are doing to get this right at first but pretty quickly you can guess pretty closely what you will need.
Low power for the metal thickness and the weld just sits on top of the parent metal.
High power and the weld pentrates far too much and if your miles high you will just blow holes.
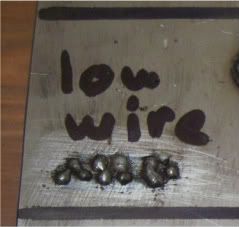
Wire speed.
If your wire speed is set too low you will get very little welding happing but a lot of burn back (ball on the end of the wire burns backwards towards the contact tip).The arc will be off and on and you will probably hear spells of silence interrupted by the occasional pop and the result will look something like this.
If its too high you will here a sound like a machine gun having an fit.You will most likely feel the torch being pushed away from your workpeice and there will be spatter/bits of unburned wire going everywhere.There is often brown soot as the weld is violent and disturbs the gas shield.
Edited by rosco454 on 19th Feb, 2011.
On 20th Jan, 2011 apbellamy said:
I have a bit of a fetish for tools
|
rosco454
611 Posts
Member #: 5222
Post Whore
Northumberland
|
|
Getting it right;
Once you have go the settings close enough to put down a decent bead of weld you can work on getting the right amount of penetration.Mig is the easiest type of welding to make a weld that looks good put is weak as water.
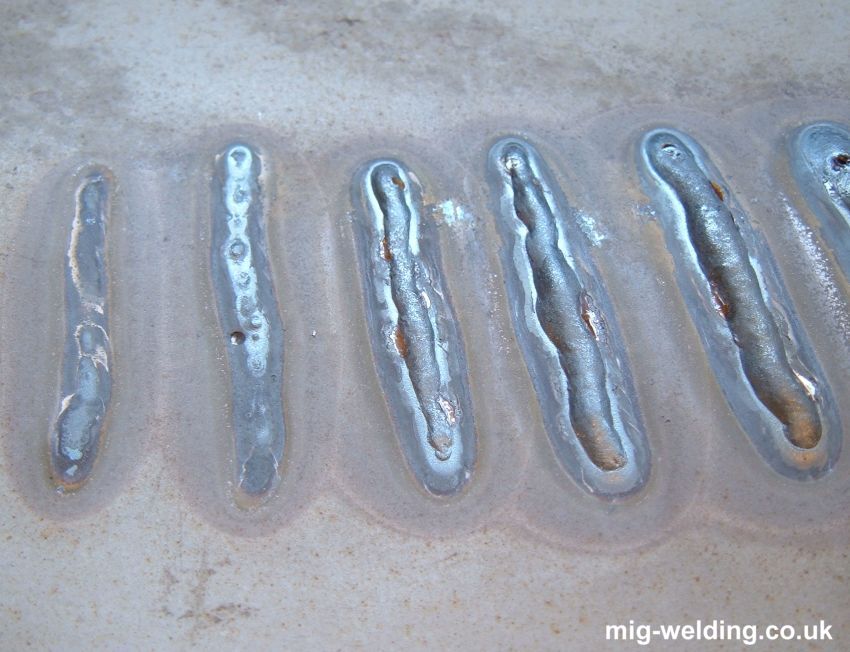
In these pictures (kindly shared by Malcolm of ) you can see various welds produced using increasing power settings from left to right.They all look pretty presentable to the untrained eye.
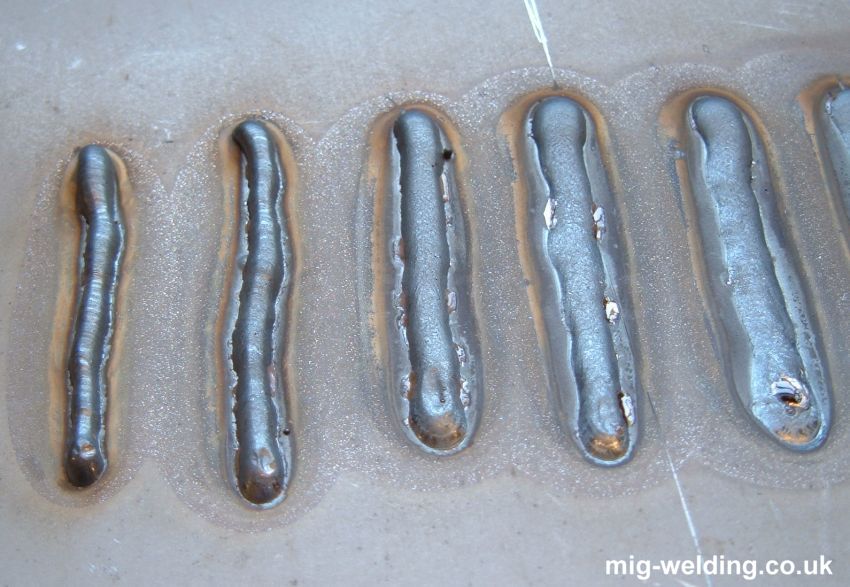
However turn it over and you can see how much/little the welds have penetrated through the metal.
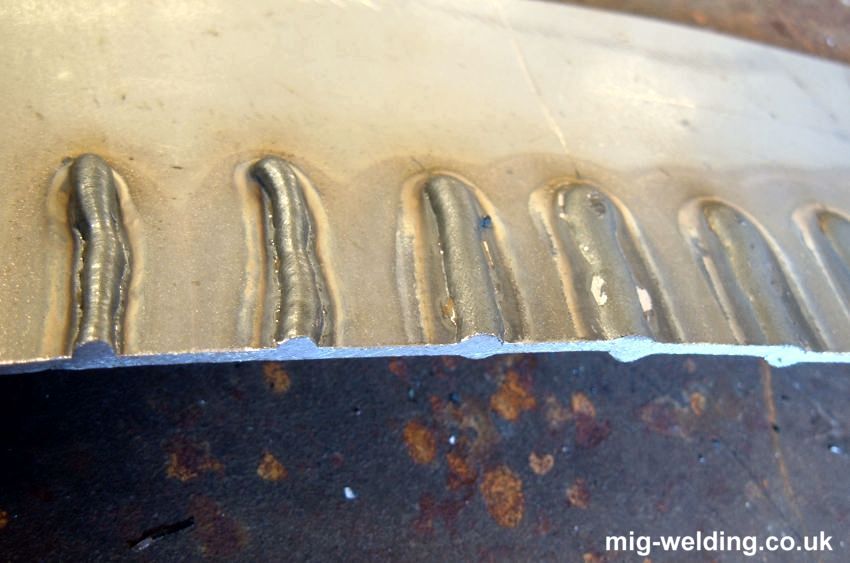
Here are the same welds sectioned so its easier to see what going on,you can see the welds on the left have not penetrated enough and those on the right have penetrated too much.The middle one is just right.
Onto the actual work;
Once you can get the above consistently then your ready to start joining stuff together.Take plenty of time getting the fit of the joint right and then its just a case of putting down the same weld as on the scrap.(excuse the lack of cleaning up before welding)
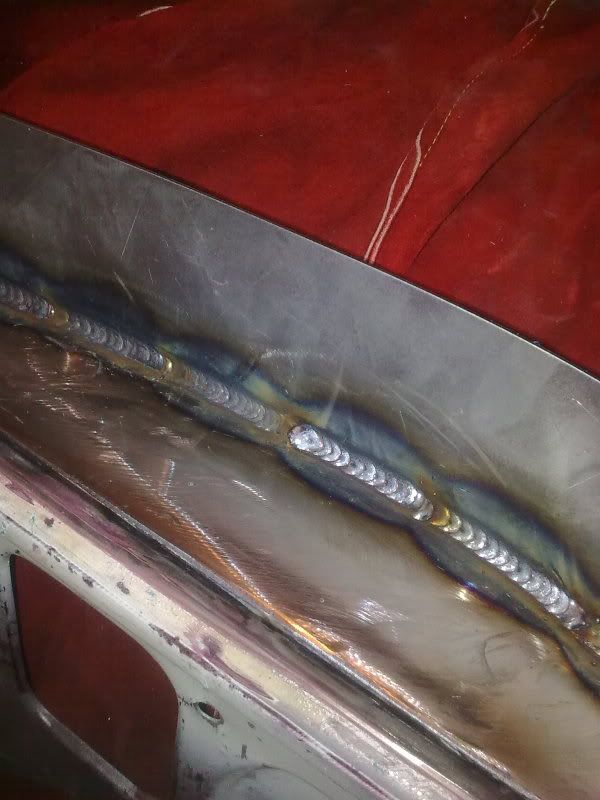
Since your on here most of your work is going to be on tinfoil like mini panels.For this I use a "pulse weld" technique thats good on thin metal.Basically you weld for a second or so then pause for half a second the weld a second etc.It avoids blowing holes as your not putting continuous heat into the job but is better than just a load of tack welds as the metal stays molten so there is less chance of lots of pinholes in the weld.The way I do it is to tack the pieces up with tack about 40mm apart or so,runs sa string of pulse welds between two tacks then move elsewhere and do the same to avoid putting too much heat in any one spot.
With a bit of practice you can get it looking pretty good as well,this was done on two pieces of 1-1.2mm sheet using highish amps for that thickness - about 50-60 and a fast travel speed.
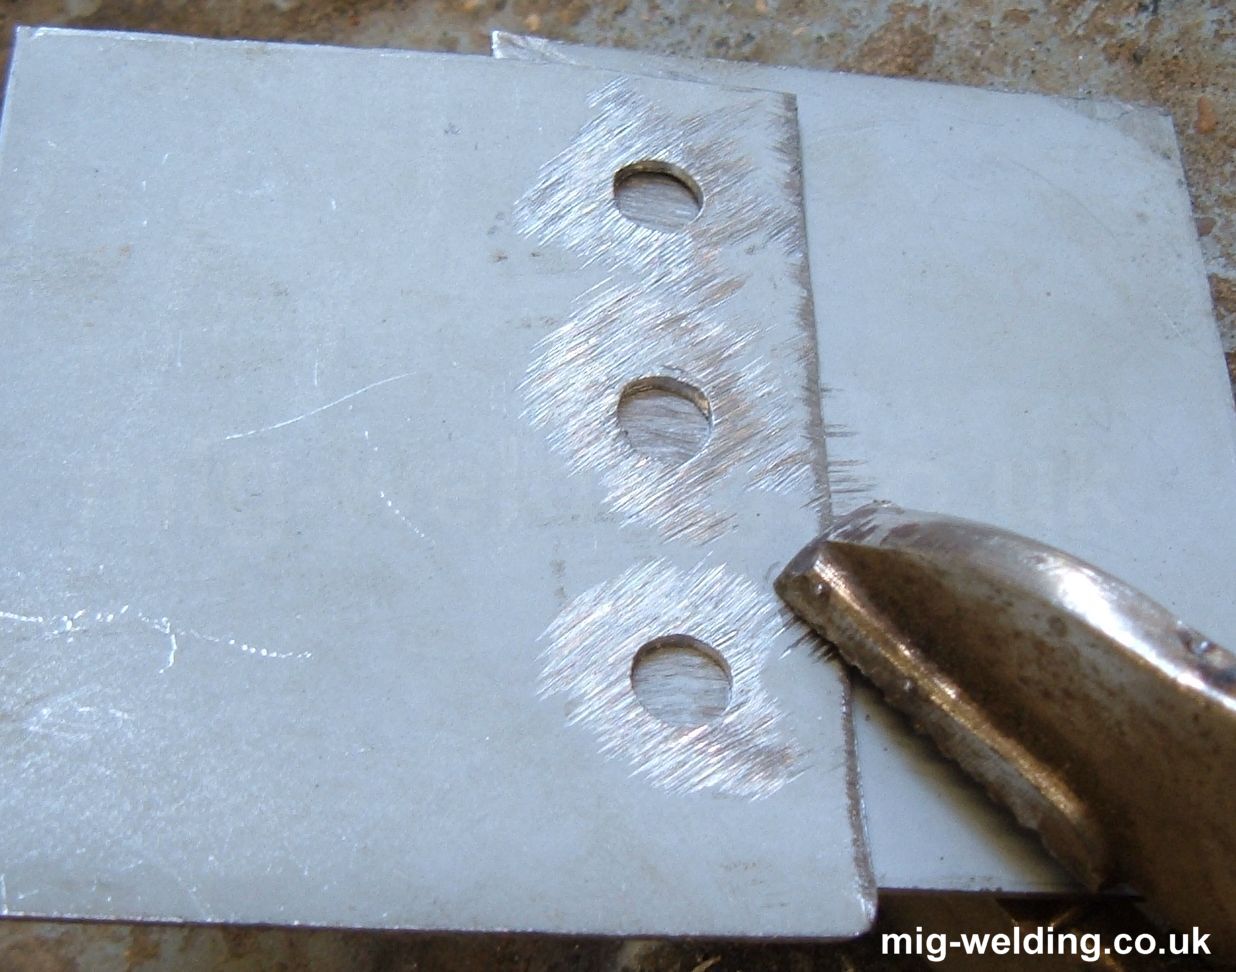
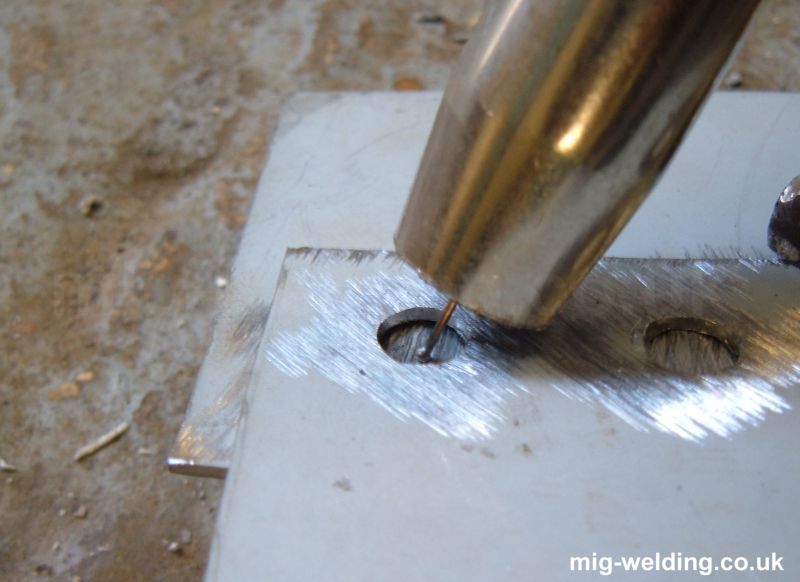
The other mig technique useful on a mini is plug welding,this is where two sheets are joined together one on top of the other as an alternative to spot welds.Basically holes are drilled on one panel where the spot welds would be,the two panels are then clamped together and an arc is struck onto the bottom panel through the hole in the upper panel.The arc has to be struck on the lower panel as if isnt the hole will just fill with weld and not penetrate the lower panel at all.
Again pics courtesy of as I forgot to take any like a plum!
And that about it to be honest,or at least thats about the limit of what I can be bothered to write  That covers all the basics so all thats left to do is get stuck in.Once you get the hang of the settings then your away,its such a handy skill to have and can save you a fortune. That covers all the basics so all thats left to do is get stuck in.Once you get the hang of the settings then your away,its such a handy skill to have and can save you a fortune.
Lastly thanks you to Malcolm from for the kind use of his pictures.The mig welding site has a good forum and tutorials that I taught myself from so its well worth getting yourself signed up over there as well if you want to learn.
Cheers Ross.
On 20th Jan, 2011 apbellamy said:
I have a bit of a fetish for tools
|
Brett

9502 Posts
Member #: 1023
Post Whore
Doncaster, South Yorkshire
|
|
well written and great photos, spot on!
Yes i moved to the darkside 
Instagram @jdm_brett
|
AlexB
Site Admin

6297 Posts
Member #: 1
The boring bloke who runs this place.
Berkshire
|
|
Brilliant thread - thanks very much for this really useful article!
I've got no excuse to get welding now! 
|
Kean

2406 Posts
Member #: 341
aka T2clubby
South Staffs
|
|
Superb writeup, excellent photos also!
Nice one
|
Rick.SPI

1596 Posts
Member #: 8027
Post Whore
Thrapston, Kettering, Northants NN14
|
|
this is bloody exelent. i myself cannot weld very well at all, dont know how to set up etc but after reading this i think i know what to try etc... might have to getmyself my own welder and get some practise in. :)
thanks for the guide, very useful and will no doubt help me in the future.
On 17th Feb, 2011 apbellamy said:
I popped my first one out the other day...
|
bennyy
2233 Posts
Member #: 9037
Post Whore
Doncaster, yorkshire
|
|
A great guide, welding is all about giving it a go, practise practise practise. personal preference, unless I am welding things under 2.5mm I use stick, much stronger welds, although it is a little harder than mig.
Audi s4 b5 - 470bhp & 486ft lbs
On 15th Mar, 2012 wil_h said:
Yes, Carl says he gets requests for rimming all the time
On 30th Apr, 2012 Brett said:
yeah stick the bit in and give it a wobble
|
rosco454
611 Posts
Member #: 5222
Post Whore
Northumberland
|
|
Thanks for the response,glad to be able to give some useful info out for a change!
Cheers Ross.
On 20th Jan, 2011 apbellamy said:
I have a bit of a fetish for tools
|
stevieturbo
3597 Posts
Member #: 655
Post Whore
Northern Ireland
|
|
On that one....you appear to have stopped and started a couple of times.
Although it does look continuous for a few inches ?
is it realistic to expect to be able to do a continuous bead on thin sheet like that ?
I usually do blob blob blob lol with multiple stops and starts. Can never seem to get a good smooth flow going on thin metal
I guess my problem is, probably use too much current ? I just find blowing holes far too easy lol
And what sort of travel speed would you use ?
Edited by stevieturbo on 19th Feb, 2011.
9.85 @ 145mph
202mph standing mile
speed didn't kill me, but taxation probably will
|
rosco454
611 Posts
Member #: 5222
Post Whore
Northumberland
|
|
On that one it was tacked about every 60mm or so then weld the stretch between the tacks.On large panels its best to move around so you weld one stretch then go elsewhere and weld another area while this first one cools down.As the repair I did used slightly thicker steel and had to be trimmed to size I just welded every other stretch down the door and then came back to the start and did the same again filling in the gaps.
The weld in the photo was done using a pulse technique - on/off/on/off but was done quickly so that the off part was only as long as I took to move the torch so next to nothing.This works really well as it gives a good continuous weld between the tacks.Also a good tip is to grind the tacks down or you end up with either pinholes if you only weld to the tack or a high spot if you go back over it.
Do you mean one continuous weld all the way along?The main issue would be the amount of heat you would put into the job in one go,the panel would end up like bent like a banana.You could do stretches of continuous weld between tacks but would have to stop move around to minimise heat in one area (I did my other to like that and it was no problem).
For your welds you could be using too much current or you could be going a bit slow,the slower you go the more metal is molten and gravity wants to do its thing.As I say the hardest part is getting the hang of the settings and how they work together,I did lots of practice of old scrap until I had the hang of it.Once you have the settings right you have done the hard work and its just a case of getting the weld down.
It might be an idea if anyone is having trouble they can post a pic or two and I can see if I can help out.Im not an expert as I say but there are lots of good welders on here and hopefully between use we can help out.
Cheers Ross.
On 20th Jan, 2011 apbellamy said:
I have a bit of a fetish for tools
|
bennyy
2233 Posts
Member #: 9037
Post Whore
Doncaster, yorkshire
|
|
Steve you are either using too much power or going to slow, you need to avoid putting too much metal into the area or you ll blow through, if I was doing the above weld I would tack the metal every 50mm, join the 1st and 2nd tack up, then join the 3rd and 4th up, then 5th and 6, then go back and join the 2nd and 3rd, then 4 and 5 etc etc.
Audi s4 b5 - 470bhp & 486ft lbs
On 15th Mar, 2012 wil_h said:
Yes, Carl says he gets requests for rimming all the time
On 30th Apr, 2012 Brett said:
yeah stick the bit in and give it a wobble
|
stevieturbo
3597 Posts
Member #: 655
Post Whore
Northern Ireland
|
|
On 19th Feb, 2011 rosco454 said:
The weld in the photo was done using a pulse technique - on/off/on/off but was done quickly so that the off part was only as long as I took to move the torch so next to nothing.
Thats what I meant. That is what I do, otherwise I'd blow holes.
By continuous, I do mean finger on the trigger for the length of the weld
9.85 @ 145mph
202mph standing mile
speed didn't kill me, but taxation probably will
|
Jay#2

2500 Posts
Member #: 648
Post Whore
Northern Ireland (ex AUS)
|
|
Thanks for this! At the risk of being sigged I have a problem with penetration.
On 7th Nov, 2008 Nic said:
naeJ
m
!!!!!!sdrawkcab si gnihtyreve ?droabyekym ot deneppah sah tahw ayhwdd
|
bennyy
2233 Posts
Member #: 9037
Post Whore
Doncaster, yorkshire
|
|
On 19th Feb, 2011 Jay#2 said:
Thanks for this! At the risk of being sigged I have a problem with penetration.
Love it lol, what do you mean by penetration? Lack of penetration or too much? Lack of penetration, turn up the power or slow down, mig is not good for 'deep penetration'.
Too much penetration, turn down the power as long as it will go, avoid long runs keep the temperature down, steel is very good material to weld on, very forgiving and not a big chance of HAZ cracking.
Audi s4 b5 - 470bhp & 486ft lbs
On 15th Mar, 2012 wil_h said:
Yes, Carl says he gets requests for rimming all the time
On 30th Apr, 2012 Brett said:
yeah stick the bit in and give it a wobble
|
Carl S
Forum Mod

1927 Posts
Member #: 1761
Stalker
Bristol
|
|
Excellent job Ross.
Edit - Ah I see it's already been made a sticky :)
Edited by Carl S on 19th Feb, 2011.
|
Kean
2406 Posts
Member #: 341
aka T2clubby
South Staffs
|
|
On 19th Feb, 2011 Jay#2 said:
Thanks for this! At the risk of being sigged I have a problem with penetration.
Try lifting her legs higher up.
|
Paul R

4018 Posts
Member #: 1757
Back to Fucking Tool status
Swindon
|
|
I have been using this guide to help me learn to weld, I will not post pics just quite yet as it was first attempt earlyer and im still waiting on my welding mask (have one of the guff non reactive masks currently. I have made a few reasonable welds so far using this post 
Drives
-Ford S-max Mk2 Ecoboost
-Rover 100 VVC #2 - track project
Searching is all you need on TurboMinis
|
|
Home > How To > Beginners guide to mig welding - a fools guide as its written by one
|
|
Users viewing this thread:
none. (+ 1 Guests)
|
|
|
