
| Page: |
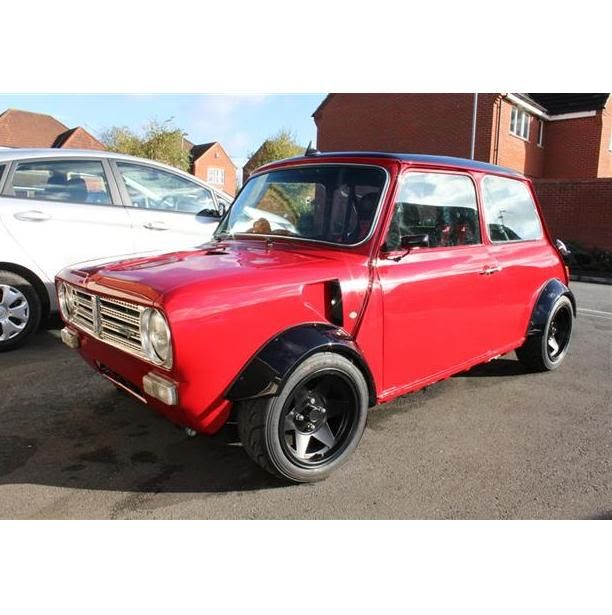
| Home > Show Us Yours! > My Sc12 now 'sprinttex blower' fuel injected A+ 1293 Aircon project updated | |||||||
|
744 Posts Member #: 7912 Post Whore Australia oi oi oi! |
18th Jul, 2011 at 11:45:16am
I will slowly update this when i have time.
Edited by NickG on 21st Sep, 2012. |
||||||
|
1083 Posts Member #: 8932 Post Whore |
18th Jul, 2011 at 01:11:03pm
Looks good, interested to see how you get on with this. |
||||||
|
3006 Posts Member #: 2500 Post Whore Buckinghamshire |
18th Jul, 2011 at 01:31:42pm
I,d like to ftr aircon to my car, but I know nothing about aircon so I would need step by step instructions, I think !
|
||||||
|
744 Posts Member #: 7912 Post Whore Australia oi oi oi! |
18th Jul, 2011 at 01:47:40pm
There are a few kits in Australia, most are jap spec and pretty much plug and play. Few holes to drill
Edited by NickG on 18th Jul, 2011. |
||||||
|
Forum Mod 10980 Posts Member #: 17 ***16*** SouthPark, Colorado |
18th Jul, 2011 at 11:50:22pm
ok, you have to tell me what that AC compressor is off....
On 17th Nov, 2014 Tom Fenton said:
Sorry to say My Herpes are no better Ready to feel Ancient ??? This is 26 years old as of 2022 https://youtu.be/YQQokcoOzeY |
||||||
 4890 Posts Member #: 1775 Post Whore Chester |
19th Jul, 2011 at 08:50:21pm
Looks like a great project good luck nickg I run a supercharger and I don't care the TB is on the wrong side.
|
||||||
|
744 Posts Member #: 7912 Post Whore Australia oi oi oi! |
19th Jul, 2011 at 11:37:19pm
Hey turbodave that is a mini compressor from a spi jap mini.
|
||||||
|
744 Posts Member #: 7912 Post Whore Australia oi oi oi! |
19th Jul, 2011 at 11:38:21pm
Thanks Graham, following what you have done and what apbelemy have done with a bit of a twist should be a great car. |
||||||
|
744 Posts Member #: 7912 Post Whore Australia oi oi oi! |
19th Jul, 2011 at 11:38:25pm
only a small update, so today i did not get upto much had a busy day with music.
Edited by NickG on 20th Jul, 2011. |
||||||
|
4890 Posts Member #: 1775 Post Whore Chester |
20th Jul, 2011 at 12:30:11pm
Nick that charger is looking great, they dont stay like that tho... what size is the pipe? I run 5 or 6 mm pipe for mine. I run a supercharger and I don't care the TB is on the wrong side.
|
||||||
 10023 Posts Member #: 1456 Mongo Barnsley, South Flatcapshire |
20th Jul, 2011 at 12:34:02pm
That a bloody nice boost gauge! If something is worth doing, it's worth doing half of. |
||||||
 460 Posts Member #: 843 Senior Member Stoke-on-Trent. Duck. |
20th Jul, 2011 at 12:41:17pm
Great work, you've done a great job spraying the engine bay considering everything else was still in there! |
||||||
 16540 Posts Member #: 4241 King Gaycharger, butt plug dealer, Sheldon Cooper and a BAC but generally a niceish fella if you dont mind a northerner Rotherham, South Yorkshire |
20th Jul, 2011 at 12:41:37pm
What's the fitting for on the underside of the inlet On 11th Feb, 2015 robert said:
i tried putting soap on it , and heating it to brown , then slathered my new lube on it 
|
||||||
|
4890 Posts Member #: 1775 Post Whore Chester |
20th Jul, 2011 at 01:22:07pm
Well spotted... interested too. I run a supercharger and I don't care the TB is on the wrong side.
|
||||||
|
Forum Mod  1927 Posts Member #: 1761 Stalker Bristol |
20th Jul, 2011 at 01:29:56pm
Idle air bypass at a guess?
|
||||||
|
744 Posts Member #: 7912 Post Whore Australia oi oi oi! |
20th Jul, 2011 at 01:46:31pm
On 20th Jul, 2011 John said:
That a bloody nice boost gauge! cost me enough lol! http://www.classicinstruments.com/ i wanted a stock kinda look. Pottsy yes never again, next time ill drop the engine out! apbellamy, graham.. below the boost take off? thats the backfire valve i think? something to do with if it backfires through the carbie? or do you mean the that bracket below the booster take off? i assume for the carbie cable, i'm not sure the kit i have is the early one. yes graham, i used about 5 or 6m also :) braided looks nice. i think ill stay with that if i can get it cheap enough. carl yep there are a few aircon bits around in australia. loads imported the spi minis as front cuts, so with a bit of calling around you can get a kit. i have a another lot of bits compressor, brackets for compressor, alternator brackets pretty much what you see in the photo, but the cabin stuff i have no spare. it's getting harder to find as no one is importing the front cuts anymore, so if you want aircon i would move quick before it is all gone. i will be putting more aircon photo's up as i get into that stage, in detail so you can all say the bits i have. ---- carl we have 3 types of aircon set up's i have set up 2 in this photo but ill be using the condenser from set up 3. set up 1 is everything inside the cabin looks very retro 80's but it's easy way to have aircon. look at the photo below, this is the original kit where you don't have to cut, it's to big & i wish i never bought this condenser type, i just cant fit it under the back of the van but a normal mini you can fit it next to the battery box it's a perfect size! because my traveler has the spare wheel & other bits of metal poking out, I needed a thiner condenser. I will be going custom anyways with the pipes, i have the small condenser from a later model spi mini. photo's to come and will run most things in under the floor boot. so this is the old carbie set up or first SPI mini kits from japan, as i said huge & busy! mine wont even look like it has aircon  and i can remove the engine with out having to degas every time. and i can remove the engine with out having to degas every time.
ps rover alternators are huge! 
Uploaded with ImageShack.us this is pretty much how AC plugs up, nothing to it. 
Uploaded with ImageShack.us Edited by NickG on 20th Jul, 2011. |
||||||
|
744 Posts Member #: 7912 Post Whore Australia oi oi oi! |
22nd Jul, 2011 at 09:02:07am
Today I got in & really made some headway on the car, i was thinking about it to much to do music.. so got up early did some studio work.
Edited by NickG on 26th Jul, 2011. |
||||||
|
Forum Mod 10980 Posts Member #: 17 ***16*** SouthPark, Colorado |
22nd Jul, 2011 at 12:31:04pm
Nice progress. On 17th Nov, 2014 Tom Fenton said:
Sorry to say My Herpes are no better Ready to feel Ancient ??? This is 26 years old as of 2022 https://youtu.be/YQQokcoOzeY |
||||||
 568 Posts Member #: 1200 Post Whore Bristol |
1st Aug, 2011 at 11:38:33pm
did you make the top alterator bracket from scratch or is it modified from something else? |
||||||
|
744 Posts Member #: 7912 Post Whore Australia oi oi oi! |
3rd Aug, 2011 at 12:23:11pm
that top bracket is a original mini part :) it comes with the aircon kit, it would not be hard to make one up the same though, if you have the know how. |
||||||
|
744 Posts Member #: 7912 Post Whore Australia oi oi oi! |
3rd Aug, 2011 at 12:29:47pm
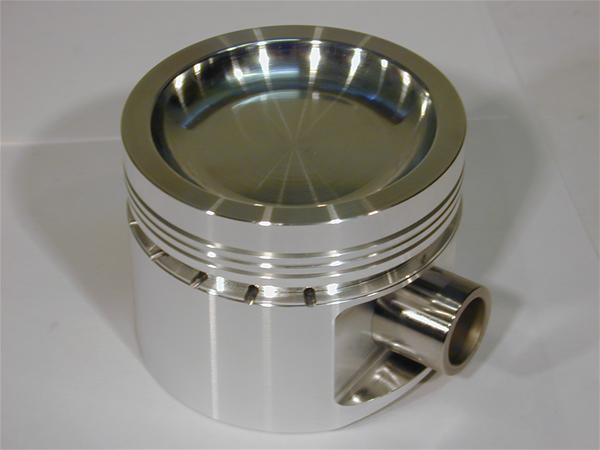
ok, so i have been busy, i thought i would post up some photos, recently i have had of my tank modified for injection, it sits a little lower then my tank it self not by much, has the been all set up for injection properly now Edited by NickG on 3rd Aug, 2011. |
||||||
|
4890 Posts Member #: 1775 Post Whore Chester |
3rd Aug, 2011 at 10:17:43pm
some nice welding.. looking good I run a supercharger and I don't care the TB is on the wrong side.
|
||||||
|
744 Posts Member #: 7912 Post Whore Australia oi oi oi! |
9th Aug, 2011 at 11:18:24am
little tasty update My new SU :lol: more photo's to come soon |
||||||
 (2)[/url] by [url=https://www.flickr.com/photos/150672766@N03/]Rod Sugden[/url], on Fli) 5988 Posts Member #: 2024 Formally Retired Rural Suffolk |
9th Aug, 2011 at 11:30:01am
On 3rd Aug, 2011 NickG said:
I will use 2 right angled brass fittings and two pipes, will be nice & neat and less lines to run as my fuel reg will be on the heel board of the rear subframe. Nick, not sure exactly what you mean by that, can you explain a bit more ? There are very good reasons for having the regulator (on an injection system) right next to the injectors (usually on the end of the injector fuel rail). Progress looks good otherwise, way faster than me :) Schrödinger's cat - so which one am I ??? |
||||||
|
744 Posts Member #: 7912 Post Whore Australia oi oi oi! |
9th Aug, 2011 at 11:33:37am
Hey rod, I decided to mount mine in the engine bay now next to the rail pretty much.. Was only doing it that way tring to make it look neater/stealth.
|
||||||
| Home > Show Us Yours! > My Sc12 now 'sprinttex blower' fuel injected A+ 1293 Aircon project updated | |||||||
|
|||||||


| Page: |