
| Page: |
| Home > FAQ / Knowledge > Building an RTS clutch - Photo Heavy | |||||||
 824 Posts Member #: 2065 Post Whore Wiltshire |
14th Aug, 2011 at 10:16:35pm
Now I know that there is a thread on here, named clutch thoughts by Robert. And he is the true inventor of this!
On 7th Nov, 2011 apbellamy said:
Shaft seems nice and snug On 24th Mar, 2012 apbellamy said:
no no no no, you need more boost! you can never ever come on here and say I have enough boost, that's just silly. On 29th Mar, 2010 Star Mag said:
these give no problems with good head |
||||||
 10020 Posts Member #: 1456 Mongo Barnsley, South Flatcapshire |
14th Aug, 2011 at 10:21:25pm
Good write up fella! If something is worth doing, it's worth doing half of. |
||||||
|
545 Posts Member #: 2928 Post Whore peterborough |
14th Aug, 2011 at 10:23:41pm
nice, this come in very handy....
Jack Jones |
||||||
 141 Posts Member #: 7472 Advanced Member stockton on tees |
15th Aug, 2011 at 08:54:05am
I will be using this write up very soon excellent job Andy |
||||||
 361 Posts Member #: 114 Senior Member Porto/Portugal |
15th Aug, 2011 at 11:09:53am
Excellent, thank you :)
Pedro Silva
|
||||||
 514 Posts Member #: 2104 Post Whore Essex - UK |
11th Sep, 2012 at 02:55:06pm
possibly a silly question but what was the length of the bolts used? or what would be best to use and trim to size
|
||||||
|
126 Posts Member #: 10212 Advanced Member Sleaford Lincolnshire |
22nd Dec, 2012 at 10:58:10pm
180mm or 190mm parts used ? |
||||||
|
Forum Mod  4823 Posts Member #: 154 Post Whore Midlands |
22nd Dec, 2012 at 11:32:28pm
topped it, very nice and useful write up chap! :) On 20th Oct, 2015 Tom Fenton said:
Well here is the news, you are not welcome here, FUCK OFF. |
||||||
 1170 Posts Member #: 8636 Post Whore Surrey |
17th Mar, 2013 at 11:34:28pm
Great info
Reading up on RTS Clutches On 21st Sep, 2006 Paul S said: Go on, be brave, put it in the car and tell us how it works. Pity your bollocks are in line with the flywheel! On 27th May, 2013 robert said:
putting my testicles on the line for turbo mini owners everywhere ,and they still work ! |
||||||
 517 Posts Member #: 9931 Post Whore brighton |
25th Mar, 2013 at 08:06:01pm
Oh just found it |
||||||
|
517 Posts Member #: 9931 Post Whore brighton |
25th Mar, 2013 at 08:06:03pm
Oh just found it |
||||||
|
517 Posts Member #: 9931 Post Whore brighton |
25th Mar, 2013 at 08:41:48pm
will any body supply me the bolts washers and spacers
|
||||||
 12307 Posts Member #: 565 Carlos Fandango Burnham-on-Crouch, Essex |
25th Mar, 2013 at 09:00:08pm
I have done these in the past but have got through all the ones I had,
On 28th Aug, 2011 Kean said:
At the risk of being sigged... Joe, do you have a photo of your tool? http://www.turbominis.co.uk/forums/index.p...9064&lastpost=1 https://joe1977.imgbb.com/ |
||||||
 1183 Posts Member #: 6926 Post Whore Accrington |
25th Mar, 2013 at 10:45:22pm
this seems very simple, when i have a go at it, im thinking of making extra spacers for other people, but since i read that there are a lot of variants in springs im wondering if its worth doing as they may end up being the wrong length?
|
||||||
|
12307 Posts Member #: 565 Carlos Fandango Burnham-on-Crouch, Essex |
25th Mar, 2013 at 10:47:24pm
I had a load of spacers made (14mm iirc) then trimmed them to suit each application.
On 28th Aug, 2011 Kean said:
At the risk of being sigged... Joe, do you have a photo of your tool? http://www.turbominis.co.uk/forums/index.p...9064&lastpost=1 https://joe1977.imgbb.com/ |
||||||
|
1183 Posts Member #: 6926 Post Whore Accrington |
25th Mar, 2013 at 11:06:01pm
seems a good idea, mild steel or stainless? seen some stainless tube on ebay 11mm OD and 7mm ID seems ideal if i drill out the center |
||||||
|
12307 Posts Member #: 565 Carlos Fandango Burnham-on-Crouch, Essex |
25th Mar, 2013 at 11:07:31pm
stainless can be a pita to work withas it goes hard if you get it hot so i'd go with the mild On 28th Aug, 2011 Kean said:
At the risk of being sigged... Joe, do you have a photo of your tool? http://www.turbominis.co.uk/forums/index.p...9064&lastpost=1 https://joe1977.imgbb.com/ |
||||||
 11046 Posts Member #: 965 Post Whore Preston On The Brook |
26th Mar, 2013 at 12:04:57am
This thread is outdated On 26th Oct, 2004 TurboDave16v said:
Is it A-Series only? I think it should be... So when some joey comes on here about how his 16v turbo vauxhall is great compared to ours, he can be given the 'bird'... On 26th Oct, 2004 Tom Fenton said:
Yep I agree with TD........ |
||||||
|
1183 Posts Member #: 6926 Post Whore Accrington |
26th Mar, 2013 at 09:22:21am
Is there an updated one? |
||||||
|
318 Posts Member #: 9408 Senior Member Tiptree, Essex |
26th Mar, 2013 at 11:32:56am
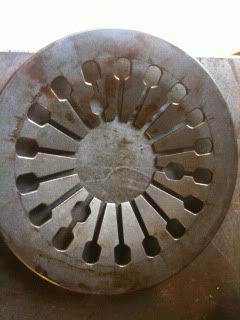
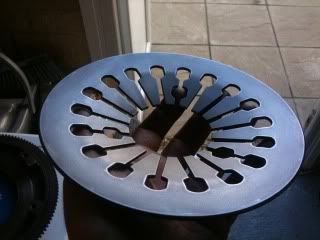
Sorry for being completely ignorant to this- but is it basically a verto clutch with 2 springs sandwiched together?
www.topcatcustom.co.uk |
||||||
|
12307 Posts Member #: 565 Carlos Fandango Burnham-on-Crouch, Essex |
26th Mar, 2013 at 12:06:46pm
yep, 2 springs wedged onto a verto,
On 28th Aug, 2011 Kean said:
At the risk of being sigged... Joe, do you have a photo of your tool? http://www.turbominis.co.uk/forums/index.p...9064&lastpost=1 https://joe1977.imgbb.com/ |
||||||
|
313 Posts Member #: 9367 Senior Member Derby |
4th Apr, 2013 at 08:01:49pm
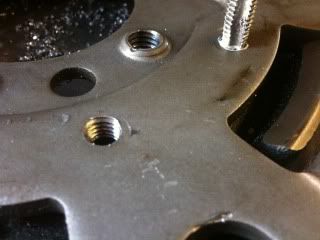
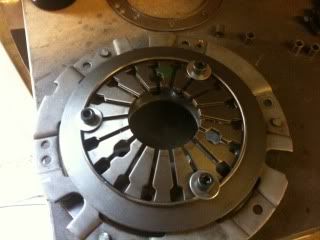
What is the actual size of the bolts? 9 M8x20 and 6 M10x what?
|
||||||
|
12307 Posts Member #: 565 Carlos Fandango Burnham-on-Crouch, Essex |
4th Apr, 2013 at 09:43:47pm
M8x20, and M8x15 for the others, athough I think the 20' are ok for all of them.
On 28th Aug, 2011 Kean said:
At the risk of being sigged... Joe, do you have a photo of your tool? http://www.turbominis.co.uk/forums/index.p...9064&lastpost=1 https://joe1977.imgbb.com/ |
||||||
|
313 Posts Member #: 9367 Senior Member Derby |
4th Apr, 2013 at 09:46:42pm
Great! Do they need to be high tensile? I could get some 12.9's if so.
|
||||||
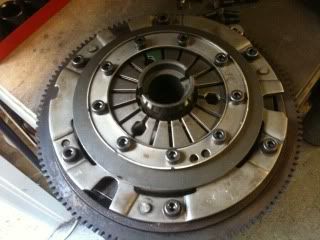
 9502 Posts Member #: 1023 Post Whore Doncaster, South Yorkshire |
4th Apr, 2013 at 10:05:54pm
On 4th Apr, 2013 bakker110 said:
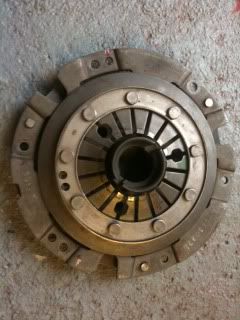
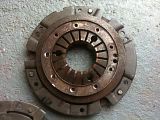
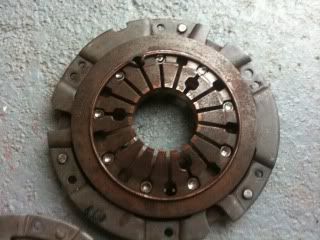
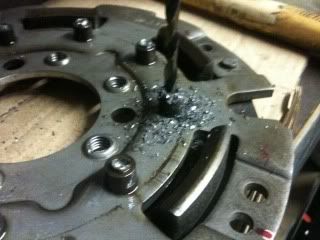
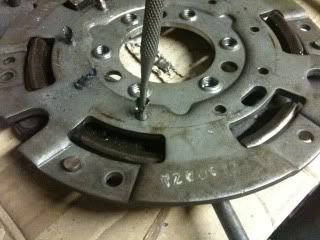
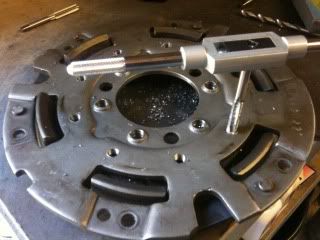
Great! Do they need to be high tensile? I could get some 12.9's if so. Did you say you used about 14mm spacers and trimmed to suit joe? following on from the pms mate, this is a guide based on the AP built clutch 12.9 grade cap heads are perfect and the spacers need to be minimum the lenght of- (the thickness of the steel ring(s) and the thickness of both of the springs ) i tend to do them slightly longer to allow for movement and i mean the tiny-est amounts you can see the stainless steel ring in this pic wrapping around the out side of the 9 rivets 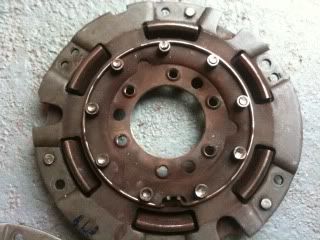
Yes i moved to the darkside |
||||||
| Home > FAQ / Knowledge > Building an RTS clutch - Photo Heavy | |||||||
|
|||||||
 ......................
| Page: |