
| Page: |
| Home > Show Us Yours! > Big Bore Supercharged Estate | |||||||
 324 Posts Member #: 9441 Senior Member South Devon |
28th Jan, 2014 at 09:39:44pm
On 5th Jan, 2014 gr4h4m said:
Nice seats! Those bits should make a nice engine! They are indeed lovely seats, I've had 3 people try and buy the seats off me across various forums since I posted them.  I'm trying to decide between +060" or 73.5MM pistons at the moment. The idea of a 1426 lump is appealing. I'm trying to decide between +060" or 73.5MM pistons at the moment. The idea of a 1426 lump is appealing.
We scrapped an old Rover Metro at work before christmas so I nabbed the seat sliders from it and narrowed them to fit my new seats. 
After doing a trial fit with the sliders on I decided the seat was to high on the crossmember so I did away with it and I'll be making separate sided ones from tube. 

With the crossmember out I got the seats sat in. They suit the space very well and should allow plenty of room for a centre console. 

Rear leg room is looking good as well. 
Mirrors have been on my mind for a while and over the last few months I've been looking out for something interesting to use. I think I've narrowed it down to the two types bellow. I quite like these wing mounted ones but they are quite large and I need to get the car on the ground to check visibility. 

These ones are quite smart as well, not quite as '70s looking at the others but should be easier to see out of. 

I also found an old grill that I might use the slats from for this. 
|
||||||
 1767 Posts Member #: 9165 Previously josh4444 Australia, brisbane |
29th Jan, 2014 at 10:36:29am
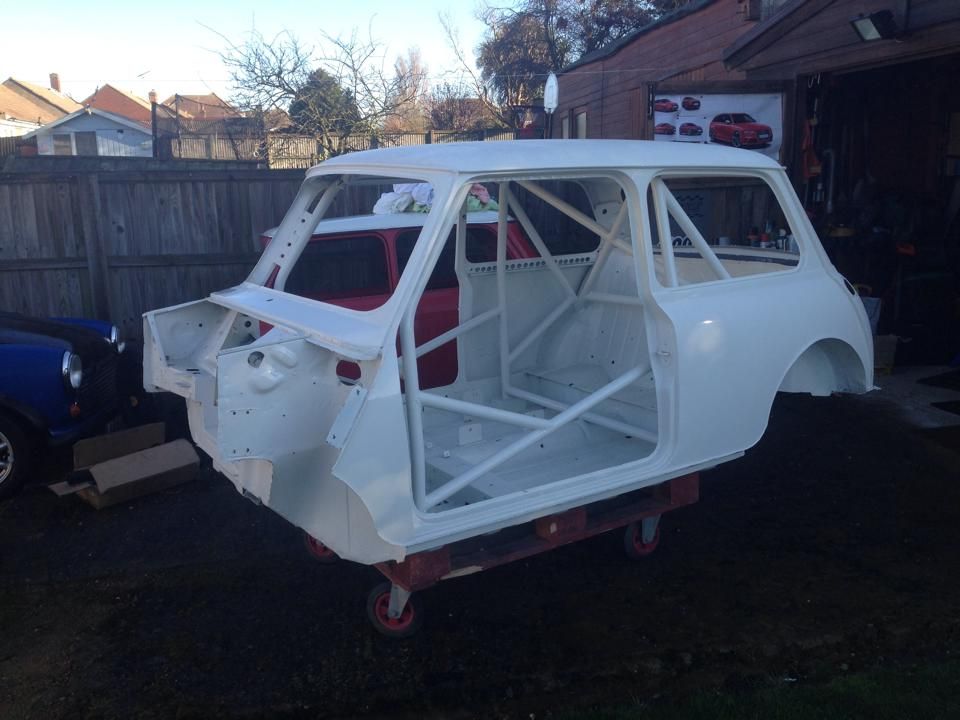
that shell looks nice with out the seams but keeping the gutter is nice
|
||||||
|
324 Posts Member #: 9441 Senior Member South Devon |
29th Jan, 2014 at 11:38:46pm
The roof gutter is definitely going to stay. I've always thought that Minis look bald without them. |
||||||
|
324 Posts Member #: 9441 Senior Member South Devon |
30th Jan, 2014 at 08:34:37pm
I didn't have much time to work on this evening but I thought I'd give mounting the seat sliders a go. I found some M8 threaded inserts on ebay to weld into the lower frame on the seats.
|
||||||
 538 Posts Member #: 9393 Use the search function before buying stuff from me... stoke on trent |
30th Jan, 2014 at 11:41:21pm
Seats look great |
||||||
|
324 Posts Member #: 9441 Senior Member South Devon |
2nd Feb, 2014 at 08:04:22pm
On 30th Jan, 2014 dev 11 said:
Seats look great I think they might be the nicest looking set of reclining seats I've seen for a Mini. Cobra Le Mans are a close second but the last set I was took a drive in weren't at all comfortable. I got the threaded inserts welded into the other seat this afternoon, no pictures though as it's just the same as the previous one. I need to get the pedal box mounted in the car before I can do the final fit of the seats so I started measuring it up and making patterns. 

I cut them out of 4MM steel plate but that's all for today. 

|
||||||
|
324 Posts Member #: 9441 Senior Member South Devon |
9th Feb, 2014 at 07:50:44pm
Today's job was to get the engine bay crossmember completed starting with cutting out holes for the engine steady perches to sit in.
|
||||||
|
324 Posts Member #: 9441 Senior Member South Devon |
13th Feb, 2014 at 10:33:49pm
I smoothed the welds on the crossmember of this evening and rounded the steady bar perches in. It still needs some hand finishing but it's looking good.
|
||||||
 73 Posts Member #: 10315 Advanced Member |
13th Apr, 2014 at 12:34:49pm
Very nice build thread. I too have a supercharged mini but not happy with my set up so looking to do something similar to yours. Blow through instead if suck through. Also enables me to add a cooler and to get the injectors closer to the head.
|
||||||
|
324 Posts Member #: 9441 Senior Member South Devon |
6th May, 2014 at 08:53:00pm
Well I'm back and I've finally solved my belt issues with a Peugeot 106 idler pulley and tensioning pulley. This should be easier to adjust than the other system I had and it looks much tidier.
|
||||||
 690 Posts Member #: 1851 Post Whore Woolavington, Zummerzet |
7th May, 2014 at 05:22:44am
Now that you've solved your belt setup, did you not consider an electric waterpump ?
Metric is for people who can't do fractions. |
||||||
|
324 Posts Member #: 9441 Senior Member South Devon |
7th May, 2014 at 05:32:48pm
On 7th May, 2014 Alex said:
Now that you've solved your belt setup, did you not consider an electric waterpump ? Still looking mighty good ! I did consider it after seeing Evoderby's instal but I don't want to crowd the engine bay too much. |
||||||
 1750 Posts Member #: 10190 Post Whore belgium |
7th May, 2014 at 08:44:55pm
looking nice. you can do anything if you set your mind to it...
|
||||||
 2091 Posts Member #: 9894 Post Whore Dorking |
8th May, 2014 at 08:22:06am
looking good, nice to see an update! |
||||||
|
324 Posts Member #: 9441 Senior Member South Devon |
8th May, 2014 at 08:14:24pm
Thanks guys, it's nice to be back on it.
|
||||||
|
324 Posts Member #: 9441 Senior Member South Devon |
13th May, 2014 at 09:05:45pm
The other 4 mounting tabs are done now so the seat mounting bars can go in soon.
|
||||||
|
324 Posts Member #: 9441 Senior Member South Devon |
19th May, 2014 at 07:49:06pm
I've been making a few bits to mount the pedal box but nothing note worthy yet so until later here's a picture of the estate back on it's wheels.
|
||||||
|
324 Posts Member #: 9441 Senior Member South Devon |
27th May, 2014 at 11:01:49pm
I'm still yoyoing between mount the pedal and mounting the seats. This evening it was the seats turn.
|
||||||
|
324 Posts Member #: 9441 Senior Member South Devon |
28th May, 2014 at 08:07:08pm
I took a little time to bolt my drives seat up just too make sure everything lined up.
|
||||||
|
324 Posts Member #: 9441 Senior Member South Devon |
1st Jun, 2014 at 07:26:21pm
So the seats bars are tack welded into the car and the seat are mounted. I must say it's very comfortable and luckily there's still plenty of clearance to the rear seats when they folded up.
|
||||||
|
1750 Posts Member #: 10190 Post Whore belgium |
1st Jun, 2014 at 08:11:40pm
what are you going to use for engine fixing? i guess that it all has to be solid mounted if you no longer use the second bar on the linkage? you can do anything if you set your mind to it...
|
||||||
 1030 Posts Member #: 1291 Post Whore Suffolk / Birmingham |
2nd Jun, 2014 at 06:22:33am
Doesn't have to be solid, just secure and not flopping all over the place.. |
||||||
|
324 Posts Member #: 9441 Senior Member South Devon |
11th Jun, 2014 at 09:18:32pm
On 1st Jun, 2014 Rammie2000 said:
what are you going to use for engine fixing? i guess that it all has to be solid mounted if you no longer use the second bar on the linkage? As Salter said it doesn't have to be solidly mounted just firmly enough that it wont wobble to much under load. So I've now pulled the mock up engine out and swapped the empty gearbox case for a full working gearbox to get the remote linkage set-up. I also got my engine steadies bolted back up and tack welded the crossmember in. 
You can just about see the 2nd bush on the inside of the cross member here. 
I do like how these steadies sit. 
I found a use for the old record tube vice that I picked up for a couple quid recently and tapped the R/H thread onto the other end of my gear selector rod. 
And welded a 3/4" nut onto the rod as it will essentially be a turnbuckle. 
The selector mechanism has been moved back by around 6" to better suit the new seat position and the linkage is fitted up again. Now I just need to adjust it up and welded the selector mechanism bracket in . 
|
||||||
|
324 Posts Member #: 9441 Senior Member South Devon |
7th Jul, 2014 at 09:01:55pm
After removing the original seat cross-member and fitting the gear selector internally it became apparent I need to to shuffle the handbrake around.
|
||||||
|
324 Posts Member #: 9441 Senior Member South Devon |
9th Jul, 2014 at 08:25:15pm
I made a plate for the latch mech to bolt onto this evening and cut the tailgate frame out to fit it.
|
||||||
| Home > Show Us Yours! > Big Bore Supercharged Estate | |||||||
|
|||||||


| Page: |