Donations towards server fund so far this month.

 
£0.00 / £100.00 per month
Page:
Home > Show Us Yours! > Project "Marginal gains..."

Aubrey_Boy

User Avatar

690 Posts
Member #: 9962
Post Whore

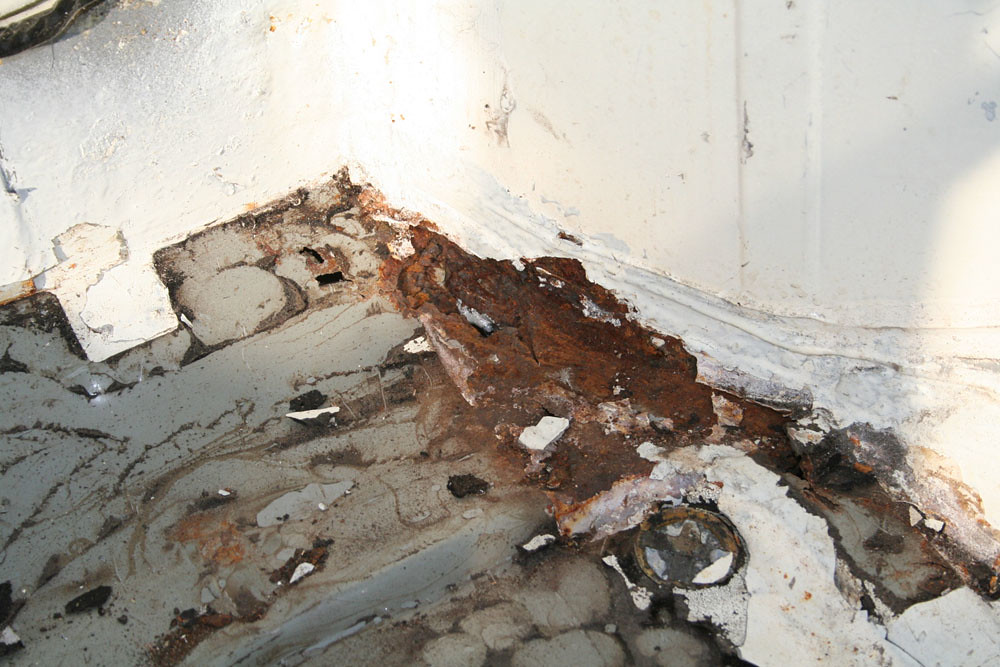
So a little less poncing and a bit more getting down to the structural bits that matter

As is normal with Mini ownership... Areas that you thought were ok just needed to probed a bit deeper to reveal the true extent of the rot, there are lots of areas which have rust in the seams so it's not just a case of replacing small sections and dealing with the seam means dealing with the two effected panels.

Anyway this is how it looked to start with (Originally stripped out to try and find a persistent water leak):


Not too bad but a few warning signs...


But pretty well every joint between the footwell, toeboard, inner arches and front bulkhead ranged between rusted and rotten


A combination of tank tape and thick white mastik which unfortunately feels quite solid when prodded and tapped

And someone kindly glued this plate to the LH inner sill


All pretty normal for a 20 something Mini I guess

So this is where I am at, new Heritage toeboard and part way through renewing the panels which connect to it, both plug 'spot' welds and stitch seam welds hold it together.

It isn't 100% the same as the original toeboard that was removed as it has a raised section next to the LH rack mount, I may yet remove this with a flat section


Thankfully the 'tunnel' to toeboard area was in good condition as it's not part of any simple repair panel


So now it's footwells and refit the subframe to check wheel / tyre clearance having got hold of some suitable wheels

Cheers

Edited by Aubrey_Boy on 18th Oct, 2017.


Jay#2

User Avatar

2500 Posts
Member #: 648
Post Whore

Northern Ireland (ex AUS)

Once again exception quality work. The plate glued to the sill is interesting!

On 7th Nov, 2008 Nic said:
naeJ
m
!!!!!!sdrawkcab si gnihtyreve ?droabyekym ot deneppah sah tahw ayhwdd


Aubrey_Boy

User Avatar

690 Posts
Member #: 9962
Post Whore

Cheers Jay for your kind comments

Finished the RF inner arch and closed off the heater air intake

First refit of the subframe as I have a wheel tyre assembly to check clearances now

First trial fit 185/60 R13, Mini 'special' arches


I think I mentioned before that the tyres are from my Midget project, sat around gathering dust for the last 3 years, they definately look bigger on the Mini though, 60 series or larger really help make classic cars look 'right' in my opinion. I think I first time I saw this size of tyre and it's bigger brother was on rally MK1 & MK2 Escorts. But based purely on looks I prefer 10"


The arches just about cover the 'tread' but as far as allowing any sensible level of bump travel, I think they will struggle so I might need to look elsewhere despite really wanting to use the special arches for the sleeper 70's / 80's look...

Cheers

Edited by Aubrey_Boy on 15th Jul, 2017.


robert

User Avatar

6743 Posts
Member #: 828
Post Whore

uranus

having another look at this, i wonder is there a chance to make a lower front shock mount that would straddle the ball joint and sit the eye as far out towards the wheel as possible ?

Edited by robert on 18th Oct, 2017.

Medusa + injection = too much torque for the dyno ..https://youtu.be/qg5o0_tJxYM


Aubrey_Boy

User Avatar

690 Posts
Member #: 9962
Post Whore

Hi Robert,

I understand what your saying and 100% agree but I am pretty well as far out as I can go...

The positions I have previously shown for the lower coilover mount are where I thought it could go with just a few mm spare to the correct wheel / tyre

The image below shows all the correct parts fitted now in terms of placing the wheel / tyre assy correctly


The upper balljoint is now partly inside the wheel well (red vertical line = centre line) and the red cross shows roughly where the lower mount can be and the coilover not rub on the tyre.

This is obviously caused by using high ET wheels to get what I want.

Still considering what if either I will do

Cheers


Edited by Aubrey_Boy on 15th Jul, 2017.


pinkyandnobrain

User Avatar

720 Posts
Member #: 2588
Post Whore

Pretoria South Africa

Excellent ! Really enjoying this thread. Keep up the good work.

"So wat we gonna do tonight Brain?"
"Same thing we do evernight Pinky!"
"Try to take over the world!"


robert

User Avatar

6743 Posts
Member #: 828
Post Whore

uranus

ah yes i forgot about the +44 wheel .damn.

Medusa + injection = too much torque for the dyno ..https://youtu.be/qg5o0_tJxYM


Aubrey_Boy

User Avatar

690 Posts
Member #: 9962
Post Whore

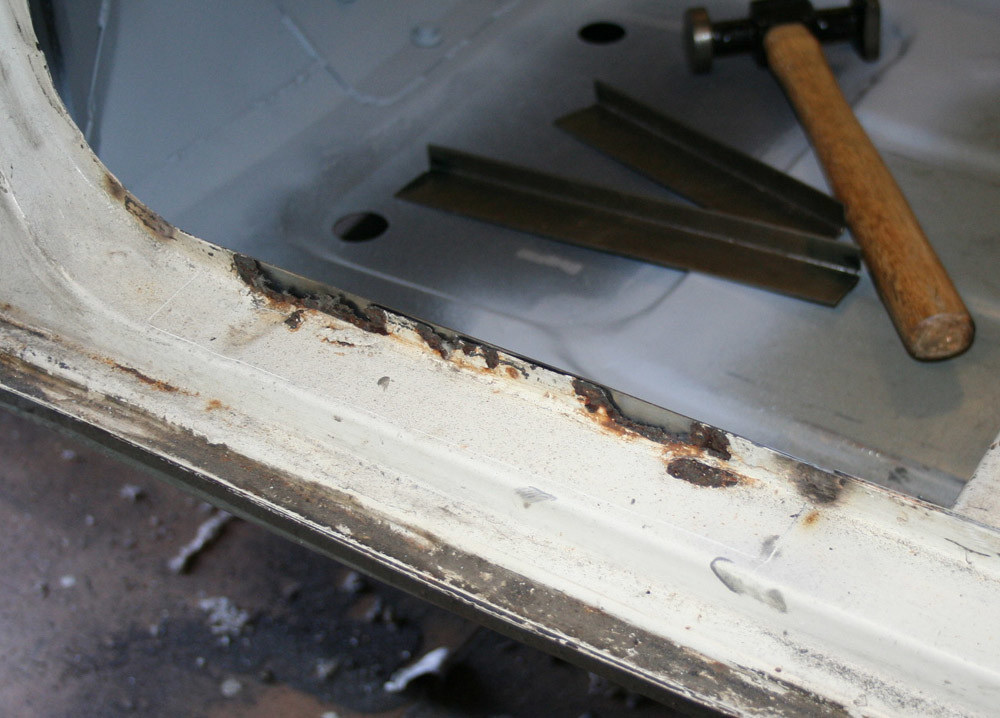
I think I have finished the passenger side footwell / inner arch / inner sill and toeboard connection

Sadly I need to repeat the exercise on the driver side but will hopefully be a bit quicker

In hindsight the lower subframe 'spreader' plate looks too big, I decided to 'seam' weld the panels as well as just plug 'spot' welding never feels like it's enough. Ideally I would conventional spot weld but you can't get to these seams anyway

I always think it looks better in metal than primer, primer looks like its hiding something


Cheers

Edited by Aubrey_Boy on 18th Oct, 2017.


madmk1

User Avatar

5417 Posts
Member #: 6181
Double hard bastard

brookwood woking

Looks good mate!

I have started posting on Instagram also my name on there is turbomk1golf

Nothing is impossible it just costs more and takes longer.

On 1st Nov, 2007 Ben H said:
There is no such thing as 'insignificant weight saving', it all adds up.


Paul R

User Avatar

4018 Posts
Member #: 1757
Back to Fucking Tool status

Swindon

Compomotive will do 13x6's to a et50 ish area iirc, I had a quick look for the tro for 13x6/7's ill have a look for the page, also why 185/60? Iirc dunlop still make the 185/55 which would fit a little nicer or if you want to go all out on a 13x7 toyo r888 225/45r13 is still the same size as the 185/55 in sidewall hight

Drives
-Ford S-max Mk2 Ecoboost
-Rover 100 VVC #2 - track project

Searching is all you need on TurboMinis


Aubrey_Boy

User Avatar

690 Posts
Member #: 9962
Post Whore

Hi Paul,

Thank you for your comments,

Dunlop don't make the 185/55 anymore (nor do any other decent manufacturers) pretty well only shite Camacs available, no thanks......

Why 185/60-13 - I have used them before, they are the biggest tyre I would consider fitting in terms of width and OD, so if they clear all of the full bump / rebound and steer checks I have done then whatever else I end up using should be OK. Also plenty of track day / fast road tyre options.

Compomotive told me that as a 13" ET40 was the highest offset they recall supplying for this fitment in the 'Minilite' style design and even then there can be clearance issues if vented disc setup is used, they just don't make the offset / size you refer to, they are local to me and I've been to them and had a chat about what they will make, we looked through the casting drawings and they may be able to push it to an ET44 but they are certain I will have to do work for caliper clearance even with non vented discs

225/45-13 - Is just too big for me (and crap for gearing) min rim width is 7J and 7.5J is the recommended and its over 30mm wider than the 185/60 R13 on a 5.5J - also the OD is pretty small around 20mm smaller and not where I want to be gearing wise. A 7 or 7.5J wheel is also too far away from where I want to be in terms of both hub & ground level offsets due to the wheel ET required

I will probably start with 185/60's but Plan 'B' is the more common 175/50 R13 (Not great for gearing) but give more clearance all round

MadMK1 thanks for your comments!

Cheers


Edited by Aubrey_Boy on 15th Jul, 2017.


gr4h4m

User Avatar

4890 Posts
Member #: 1775
Post Whore

Chester

some great work there.

I run a supercharger and I don't care the TB is on the wrong side.
VEMS + 12 PSI + Liquid Intercooler = Small Bore FUN!


Paul R

User Avatar

4018 Posts
Member #: 1757
Back to Fucking Tool status

Swindon

I have been looking high and low for where I found it but Its prob worth while giving comp a call *smiley* I know they do it just cant find the link. Theu also do alot of custom jobbies. Also so do image and im sure carl could make you up some nice wheels?

As for the recommended width as 7.5" on the 225/45r13 when I spoke to toyo they said 7" is perfectly fine due to the weight of the car.

I run et36 14x6 on my tro kn vectors 195/45r14 same rolling radius as the 225 tyre.

Drives
-Ford S-max Mk2 Ecoboost
-Rover 100 VVC #2 - track project

Searching is all you need on TurboMinis


Aubrey_Boy

User Avatar

690 Posts
Member #: 9962
Post Whore

Thanks for the comments Graham,

Paul,

I'm only 10 mins from Compomotive and have had a few chats with them.

Spoke to Carl some time ago and based on a quick look at the wheel centre drawings and flanges he thought ET35 was the max he could do, can't remember if that was 5.5J or 6J.

Image were pretty unhelpful and don't make any high (ET40+) 13" options

225 on a 7 or 7.5J on a is too wide IMO, using a 7J wheel the highest offset that would clear based on the backspace I have at the moment is an ET25.

I know there used to be some 195 width tyres in 13" but they just don't make them anymore.

Cheers

Edited by Aubrey_Boy on 15th Jul, 2017.


Paul R

User Avatar

4018 Posts
Member #: 1757
Back to Fucking Tool status

Swindon

Ahh, are you using gti calipers and brakes? Maybe a 14" with a 195/45 tyre would work for you? Have a look at turbophils website there are a few pics of a 14" wheel on there.

Drives
-Ford S-max Mk2 Ecoboost
-Rover 100 VVC #2 - track project

Searching is all you need on TurboMinis


Aubrey_Boy

User Avatar

690 Posts
Member #: 9962
Post Whore

No I'm using solid rotors, they are lighter and allow me to fit the higher offset aftermarket wheels compared with the vented rotors

I'm not a fan of 13" wheels let alone 14" wheels.... and the MO Compomotives seem to add about 1.5kg per wheel based on internet and estimates from Compomotive compared to the 13" I have, most of the weights I have seen for 195/45-14 seem to be about 1.0kg lighter than a 185/60 R13 but overall the 14" could easily come in a little heavier than something that is already too heavy...

Just trying to steadily get more of the bodywork / structure welding done but as a whole it still feels like there is a lot to do and that's only considering the repairs I know about, but if I just keep getting a bit done and as often as I can rather than get bogged down with how much there is to do

So, a bit more done, passenger side door step shows the usual inter-seam rot.


For a previous project I had bought the door step repair sections (MS28?) but they were hopeless as the radii were much greater than the original door step, so you might get away with it if you replaced the whole door step and blend it in as well as possible, but trying to use them to cut sections from just wouldn't work

So I just folded up seem 90 deg repair sections


A bit more on this door step and then a few details on the front lower bulkhead to do before I move onto the drivers side

Cheers

Edited by Aubrey_Boy on 15th Jul, 2017.


shellspeed

User Avatar

580 Posts
Member #: 9580
Post Whore

Surrey

Those pre-formed door step sections are crap. We have to do the one due to the amount of rot but it looked shit. Yours is looking superb though!!


Aubrey_Boy

User Avatar

690 Posts
Member #: 9962
Post Whore

Thanks for your comments

I am definitely learning to spend more time getting any panel or repair piece to fit as well as possible first otherwise if I spend 1/2 hour welding it is followed by 2 hrs of grinding!

Cheers


Aubrey_Boy

User Avatar

690 Posts
Member #: 9962
Post Whore

Finally bit the bullet and started working on the front upper bulkhead

Images to follow

Cheers

Edited by Aubrey_Boy on 17th Oct, 2017.


Aubrey_Boy

User Avatar

690 Posts
Member #: 9962
Post Whore

Oops

Edited by Aubrey_Boy on 17th Oct, 2017.


Kean

User Avatar

2406 Posts
Member #: 341
aka T2clubby

South Staffs

Great skils


Aubrey_Boy

User Avatar

690 Posts
Member #: 9962
Post Whore

Cheers mate,

I think I tried to buy your estate from you a few years ago but you had just sold it when I tried to arrange a viewing...

Are you from Cannock?

Cheers

Edited by Aubrey_Boy on 17th Oct, 2017.


MarkGTT

User Avatar

3249 Posts
Member #: 1194
Post Whore

Shropshire.

Aubrey - where are you based?


Aubrey_Boy

User Avatar

690 Posts
Member #: 9962
Post Whore

Hi Mark,

The cultural oasis that is Brum *happy*...

Edited by Aubrey_Boy on 17th Oct, 2017.


Kean

User Avatar

2406 Posts
Member #: 341
aka T2clubby

South Staffs

Ah yeah, im near Cannock. Will have to have a proper gander when you have it finished. You can always pop over here and do my welding if you like! Free tea!

Home > Show Us Yours! > Project "Marginal gains..."
Users viewing this thread: none. (+ 1 Guests) <- Prev   Next ->
To post messages you must be logged in!
Username: Password:
Page: