|
Home > Show Us Yours! > Supercharged and injected imp, allowed?
|
Chris
18 Posts
Member #: 1328
Member
|
|
Yeah, thats similar to what we do to make pipes etc. We put an internal bag thru the job then bag it as normal with the internal bag coming out thru the side of it.
Under pressure the air goes into the internal bag, therefore inflating it while the rest is still being pressurised!
If u can make pressure easier then thats the way to go :)
|
blown_imp

223 Posts
Member #: 598
Senior Member
Gaol
|
|
Nov 20th
Cutnweld
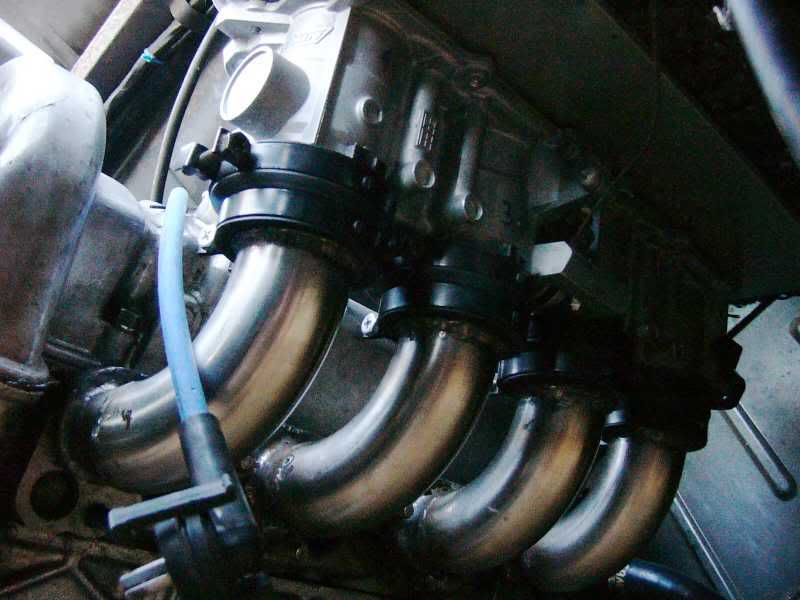
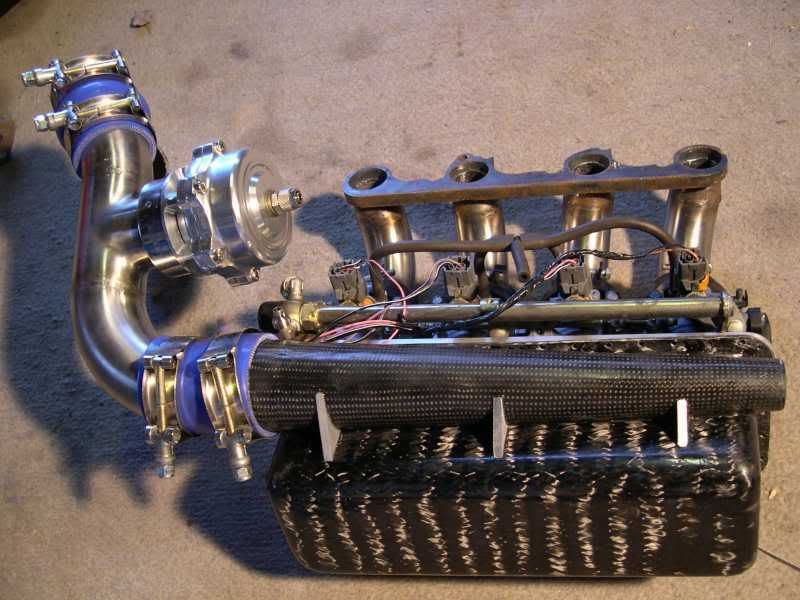
Well today I have almost completed the inlet manifold, one step closer.
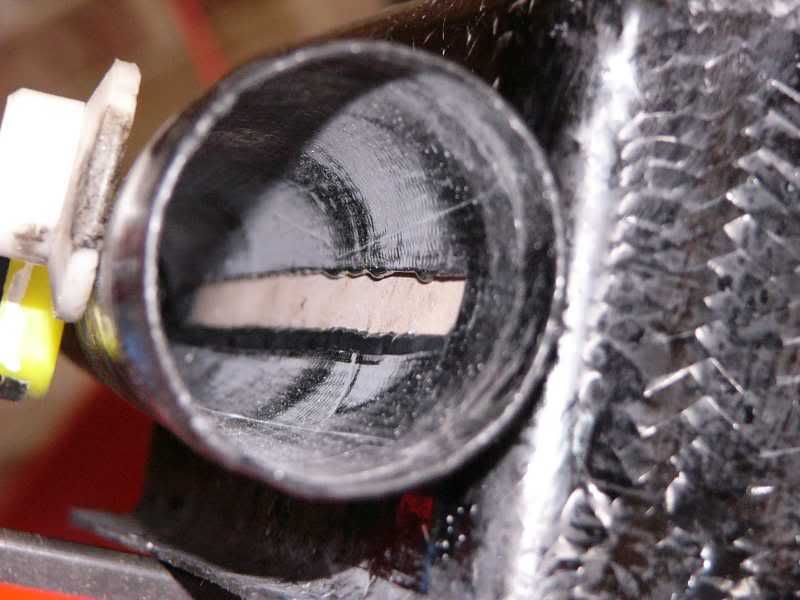
This morning was spent buying some tube 38mm ID and 3mm wall, this would take my 38mm stainless up to 44mm, exactly the same as the throttle bodies. I also got an M4 tap ready to tap out all the holes on the retaining ring that surrounds the plenum chamber.
The mandrel bent intake pipes were thin wall compared to the aluminium motorbike manifold, this means that the ID is just fine but the OD is too small –
The pipes also needed shortening, so first on the list was marking out the cut line and the weld line –
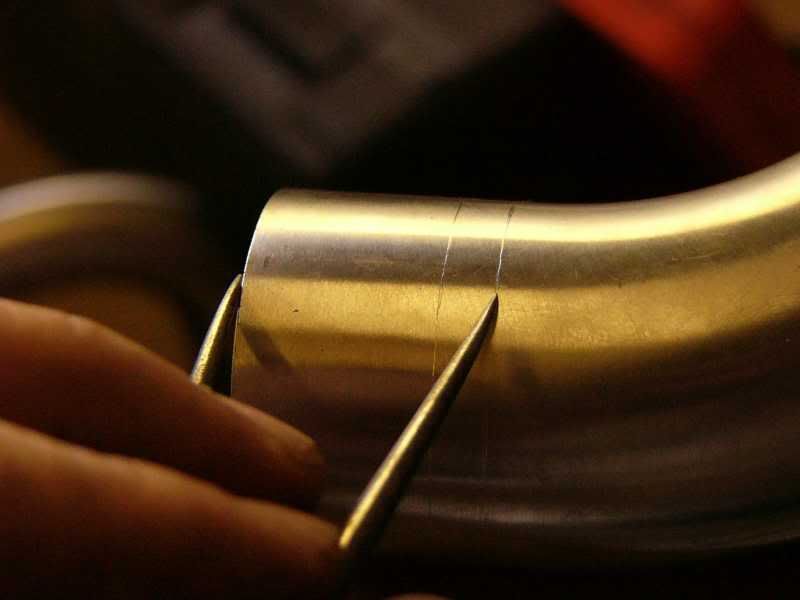
Then cut –
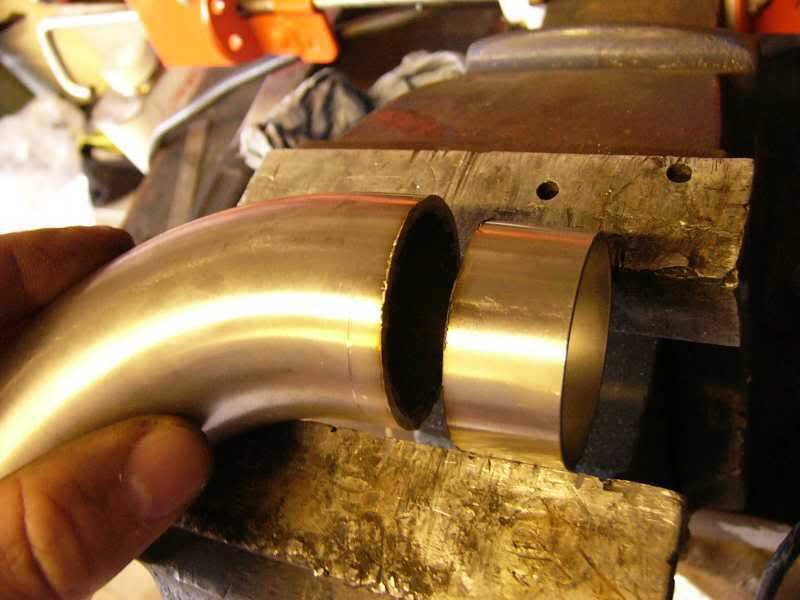
A 1cm piece of pipe was cut ready to increase the OD, the pipe that was obtained this morning was a little too large on the ID, so a section was also removed –
It was then clamped up and tacked on, a weld was then run round the outside –
All four pipes were completed and lined up for the flange, the reducers were trimmed to the flange and tacked on –
Tomorrow I will complete the welding, and then it can be fitted to the car!!!!

Cheers
J
On 5th of Sep, 2006 at 05:47pm mini13 said:
I reckon if his brains were gunpowder he couldn't blow his own hat off...
|
Bat

4559 Posts
Member #: 786
Post Whore
Bermingum
|
|
Hi,
This project really is top banana!
Cheers,
Gavin :)
VEMs Authorised Installer / Re-seller. K head kits now available!
WB/EGT gauges. Click here for customers write-up
Visit www.doyouneedabrain.co.uk
My Mini build diary
|
blown_imp
223 Posts
Member #: 598
Senior Member
Gaol
|
|
Nov 21st
Deep Breath, In annnnd out
The intake manifold is finished, it was a biyatch to weld.
Feeling very drained today, not too sure if its because of the welding fumes or hopping everywhere?
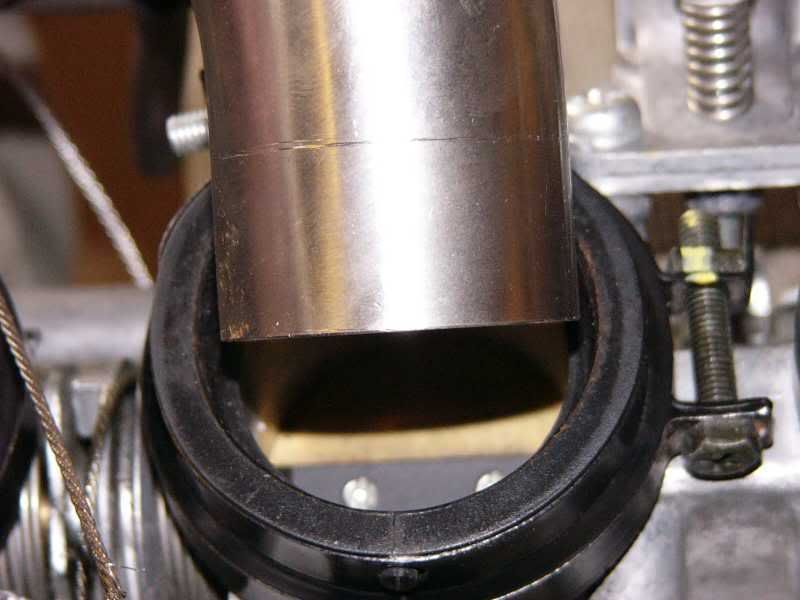
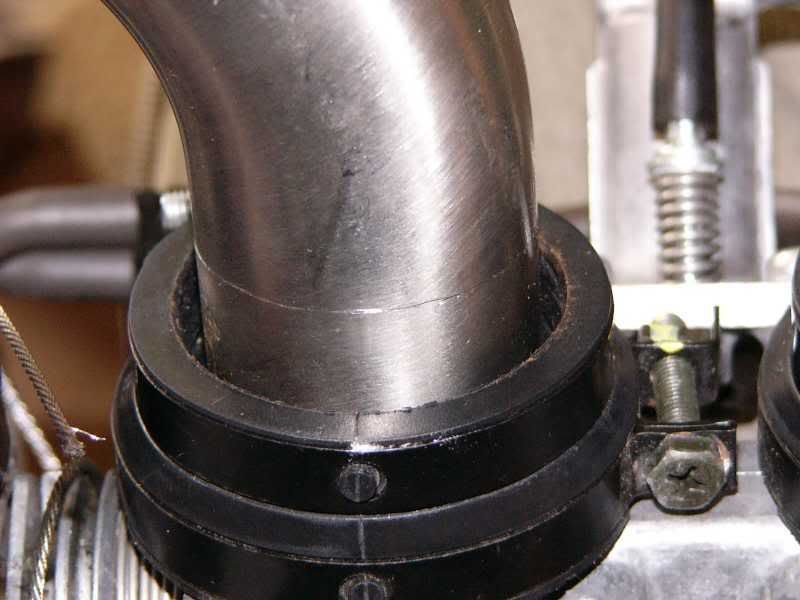
I put it all together and it didn’t fit in :(
So I’ve had to reverse the TB’s to fit in, and it does now, just!
Pictures –
I mocked up the rest of the pipe work to see how she blows –
Tomorrow I am going to do a little to the BX, fit its radio back in etc. The imp will get its hole tapped
J
On 5th of Sep, 2006 at 05:47pm mini13 said:
I reckon if his brains were gunpowder he couldn't blow his own hat off...
|
AL

549 Posts
Member #: 1347
Post Whore
Croydon (South London)
|
|
Looking good. Nearly there now.
|
minimole23
4309 Posts
Member #: 1321
Post Whore
Wiltshire
|
|
just thought i'd say i like the work youre doing.
its nice to see my two favourite cars on the same website.
my dad restored a mk 4 davrian when i was aged between 3 and 10, so i have a soft spot for imps.
It is this that got me hooked on cars im only 18 and have already bought a turbo engine for my mini. It will go in (with tweeks) when i can afford the insurance.
On 7th Oct, 2010 5haneJ said:
yeah I gave it all a good prodding
|
blown_imp
223 Posts
Member #: 598
Senior Member
Gaol
|
|
Well a quick update
Ive got my leg back, well most of it! My calf has pretty much dissapeared, and its pretty painful to walk ::) Ahh well, the more I do it I'm sure the less it'll hurt. Oh and its also got 7 screws not 5!
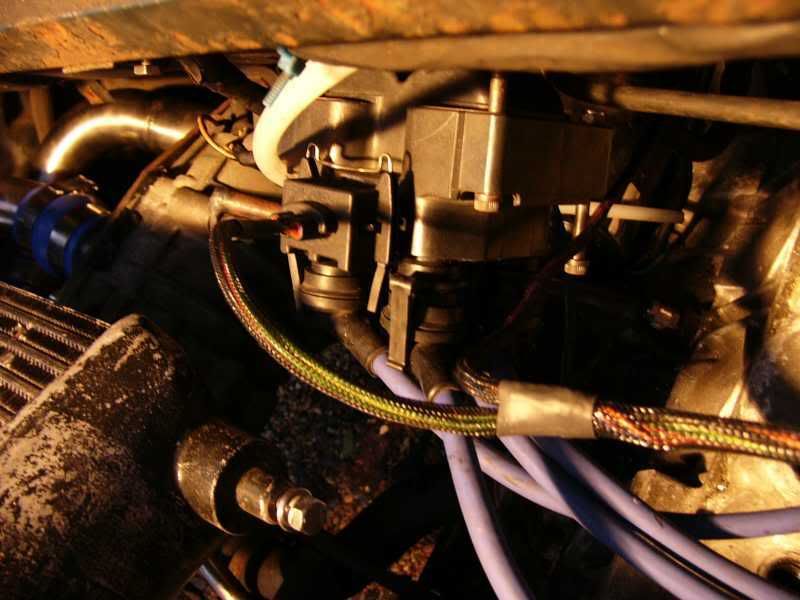
I recently got a real bargain on Ebay, ive heard that superchargers need a pretty big bypass valve due to the constant flow compared to a turbocharger.
This is what I came up with -

It attaches with a v-band clamp so the last of the jubilee clips have now been banished from the engine bay. Check out the size difference between this one and a group A diaphragm valve found on hi-po cosworths -
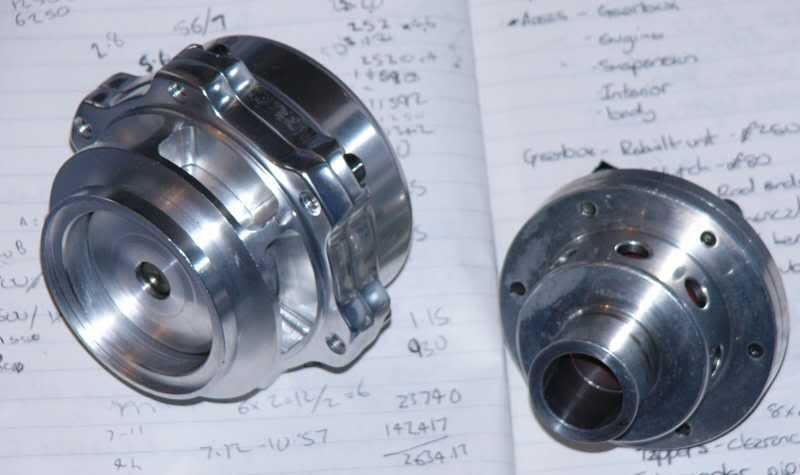
mmmm sweet
Oh and it cost me £4.20!
J
On 5th of Sep, 2006 at 05:47pm mini13 said:
I reckon if his brains were gunpowder he couldn't blow his own hat off...
|
Joe C

12307 Posts
Member #: 565
Carlos Fandango
Burnham-on-Crouch, Essex
|
|
£4.20!!!!!!!!!!!
you jammy fucker! 8)
On 28th Aug, 2011 Kean said:
At the risk of being sigged...
Joe, do you have a photo of your tool?
http://www.turbominis.co.uk/forums/index.p...9064&lastpost=1
https://joe1977.imgbb.com/
|
blown_imp
223 Posts
Member #: 598
Senior Member
Gaol
|
|
it was listed really badly, and i was the only bidder! £4.20 and a fiver postage so £9.20 in total, hope it sounds good! The only thing i will have to do is shorten the spring, its waaaaay too stiff at the moment.
J
On 5th of Sep, 2006 at 05:47pm mini13 said:
I reckon if his brains were gunpowder he couldn't blow his own hat off...
|
clubminiflip

1840 Posts
Member #: 54
Post Whore
nr coventry
|
|
bargain on ebay! chrikey, i dont have much luck these days, blown-imp, i thought your turbo'd imp was nice but this will be one fast machine, cant wait to hear it run!!!! your fabrication & attention to detail is a real credit, always look forward to updates on cars like this, well done, i think the smell of tyres burning will be errrr 'often once its on the road, whether you mean it or bt haha 
SKYLINES ARE LIKE CLITS, EVERY FLANGE SEEMS TO HAVE ONE: see this sticker on my silvia
the Search-section on this forum is blummin superb & simple to use, unlike some other forums, without the search-section & the help of this bunch of chaps on here i'll never be able to !!!Start the day with a 998cc turbo!!! :) i'm getting closer though!
Tom Fenton says: I have it all, make me an offer
|
blown_imp
223 Posts
Member #: 598
Senior Member
Gaol
|
|
The turbocharged imp was a summers worth of fun, but it really wasnt done right, thats how this one came about really. One thing i would really love, is to be able to get the front wheels in the air. This is only going to be possible with a different gearbox though, i already have ideas for that
J
On 5th of Sep, 2006 at 05:47pm mini13 said:
I reckon if his brains were gunpowder he couldn't blow his own hat off...
|
pickmeup

568 Posts
Member #: 1200
Post Whore
Bristol
|
|
looks good, i take it you know pat imp man?, running the mid engined k series imp!
he has taken over my garage with imps! I dont mind though i had an imp for a while :)
|
blown_imp
223 Posts
Member #: 598
Senior Member
Gaol
|
|
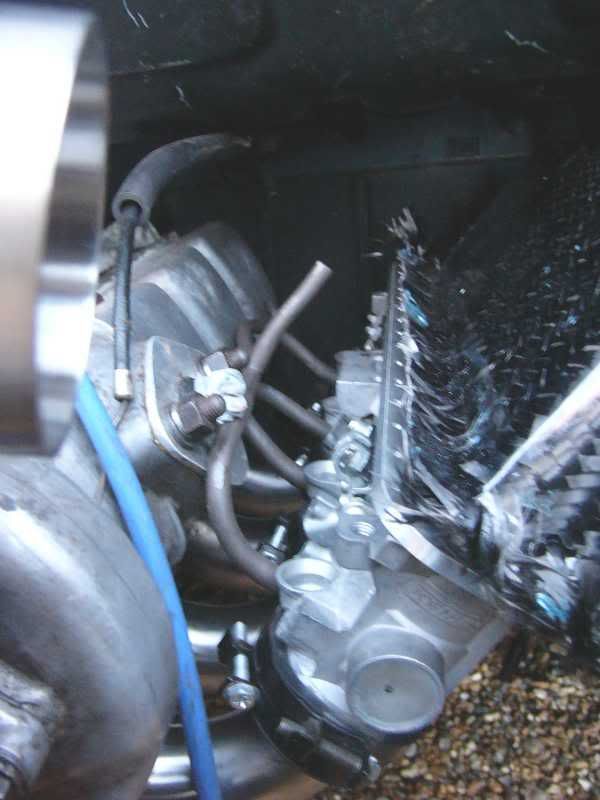
December 6th Like a row of stacked dimes
Hi guys and gals
I’ve been getting bits and pieces done recently, today was ace though, got some really good bits done, and done well too.
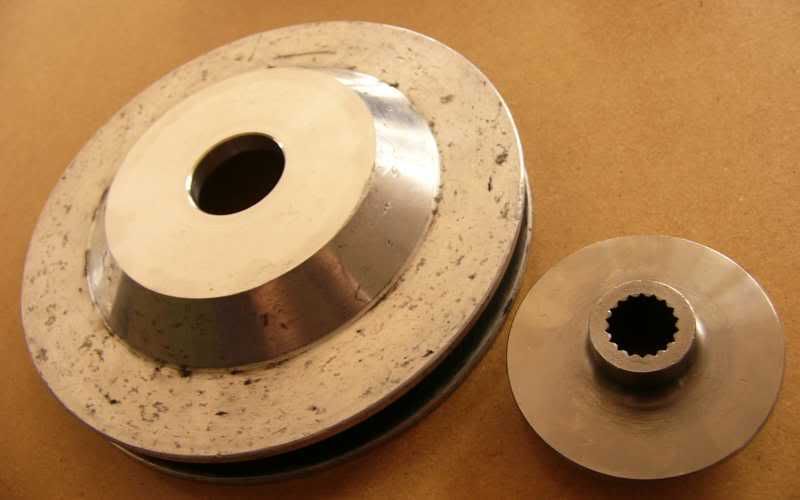
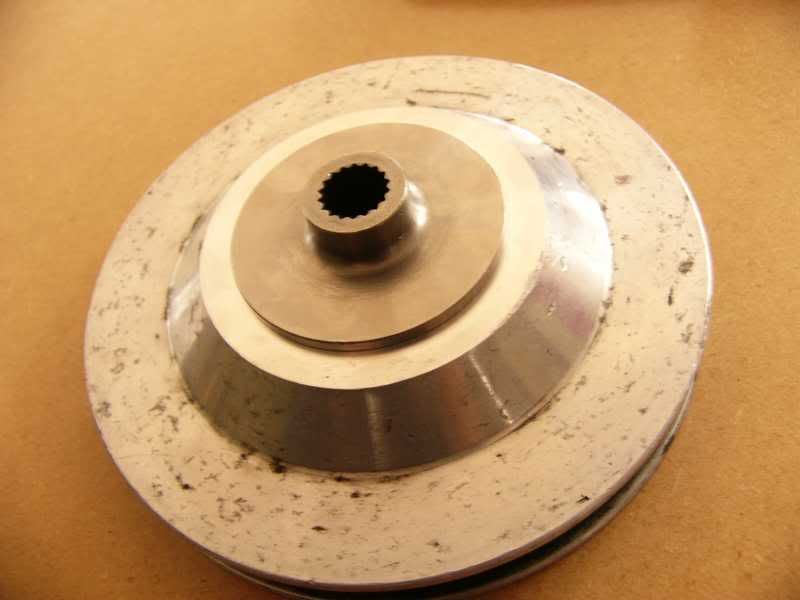
The first bit was the alternator, this has been driving me crazy for a while now, the alternator I have got is a Kawasaki ZZR1100. It is small, will make 35amps, but the connection to the engine on the kwaka is by a rubber muff coupling just like this –

I found the pulley from my old water pump, this is aluminium and the key way was a bit mullered, so perfect for conversion to the alternator. The piece on the alternator with the paddles on it is splined on to the shaft (why are bikes so much better made than cars?), I decided to machine the paddles off and make the pulley a slip fit on, then bolt the two halves together. David Cooper very kindly did this for me as I have a distinct lack of machining facilities.
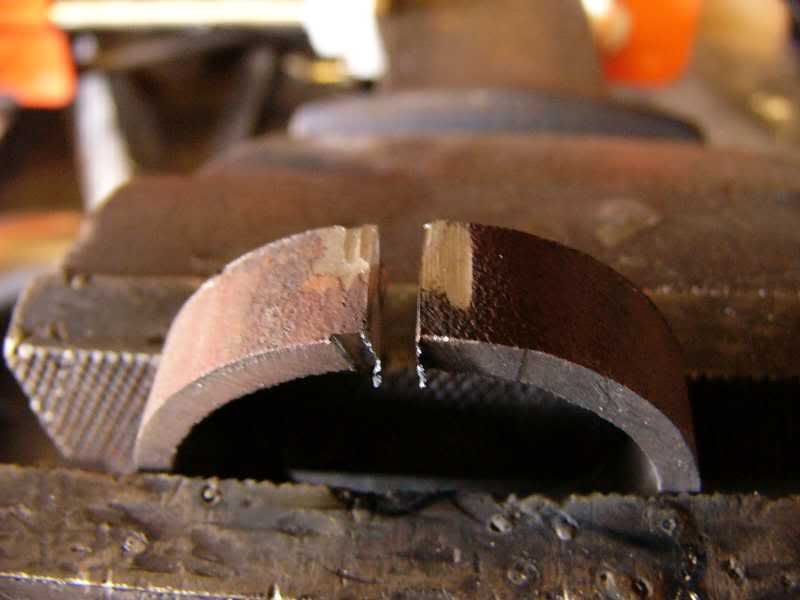
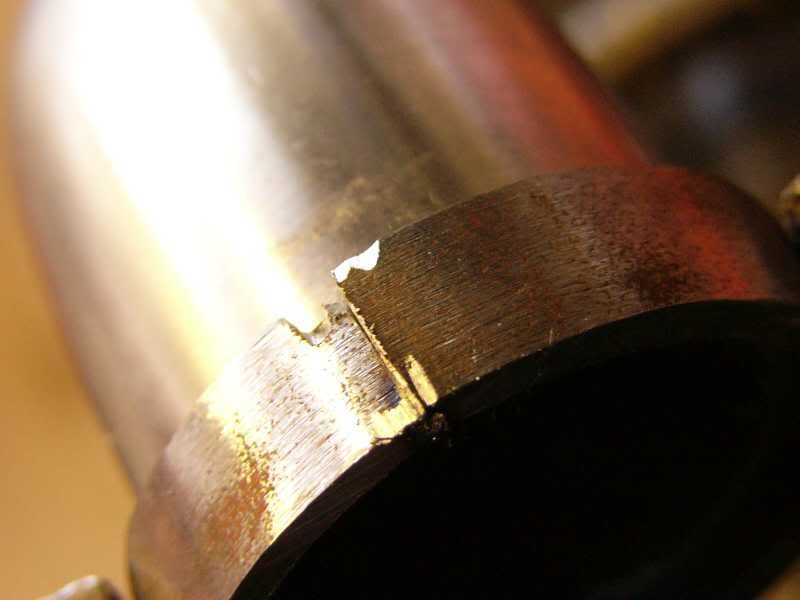
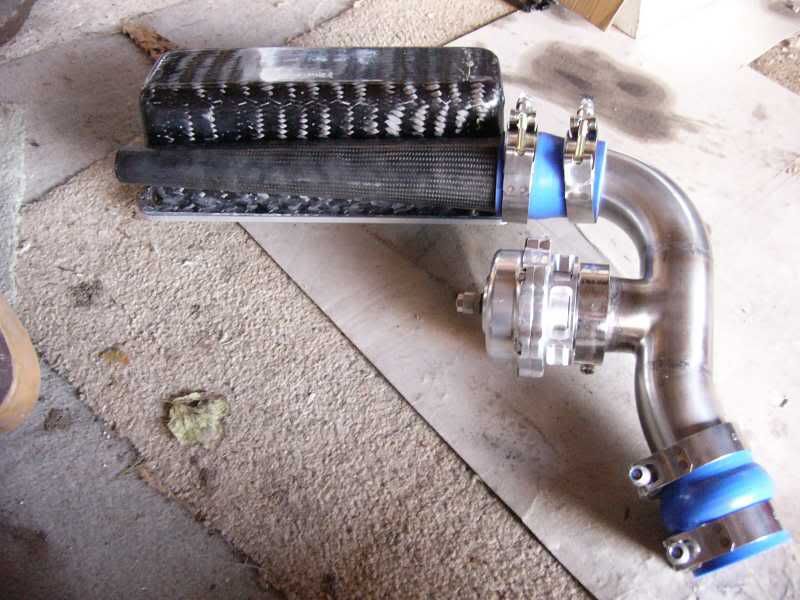
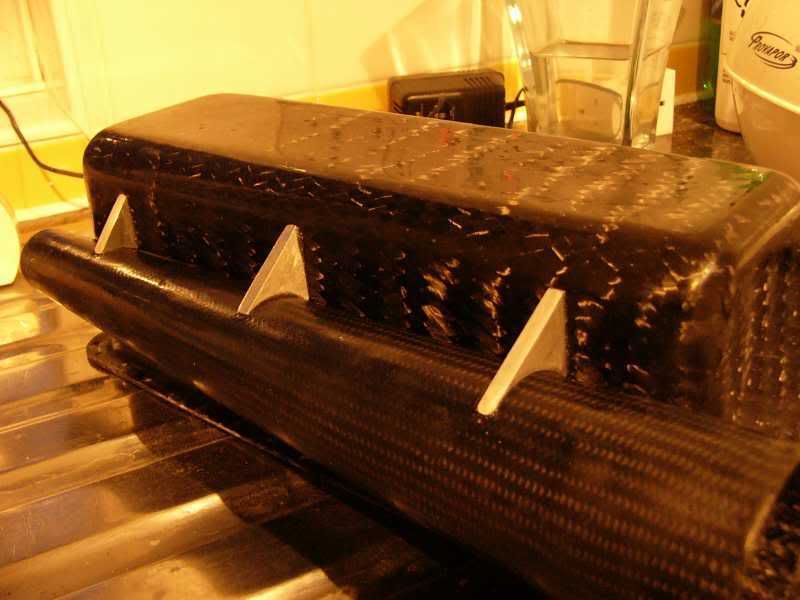
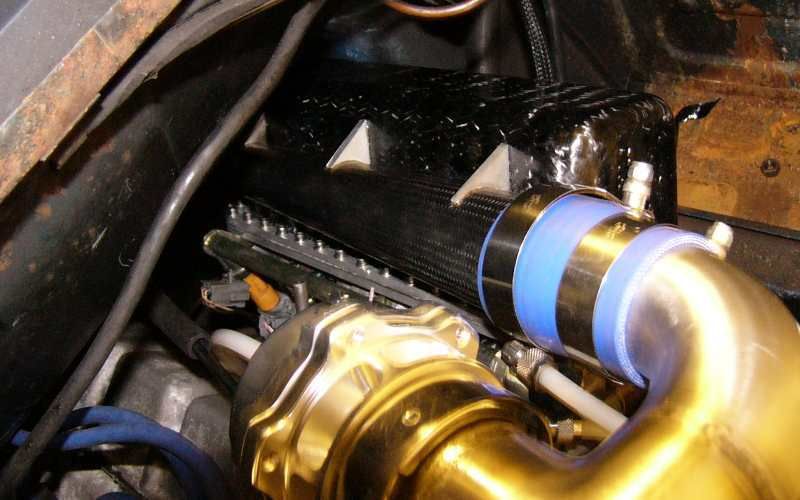
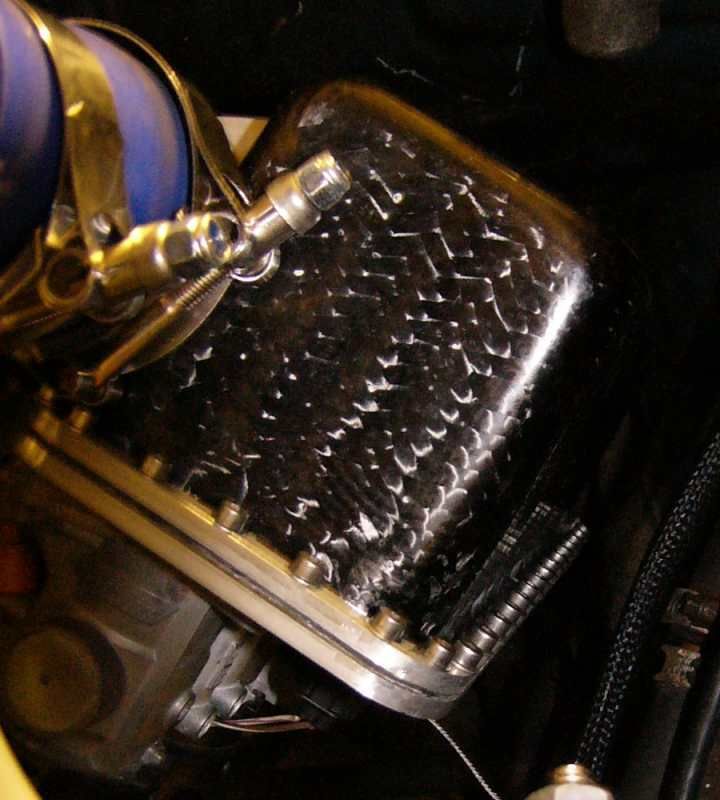
I have trimmed up the plenum and started to polish it, but before I got too far I decided to fit the taper tube onto it, first I marked out the slit that will join the two volumes –
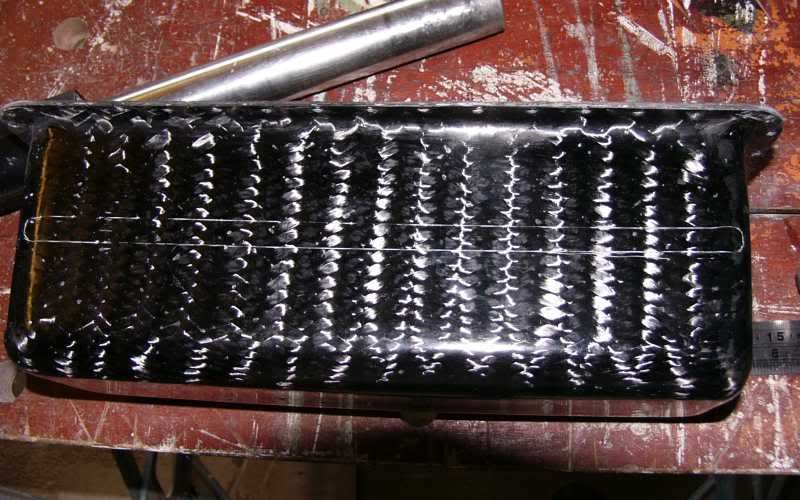
I cut both parts with a diamond wheel in my dremely thing (a very good filter mask was worn, carbon dust isn’t very nice) –
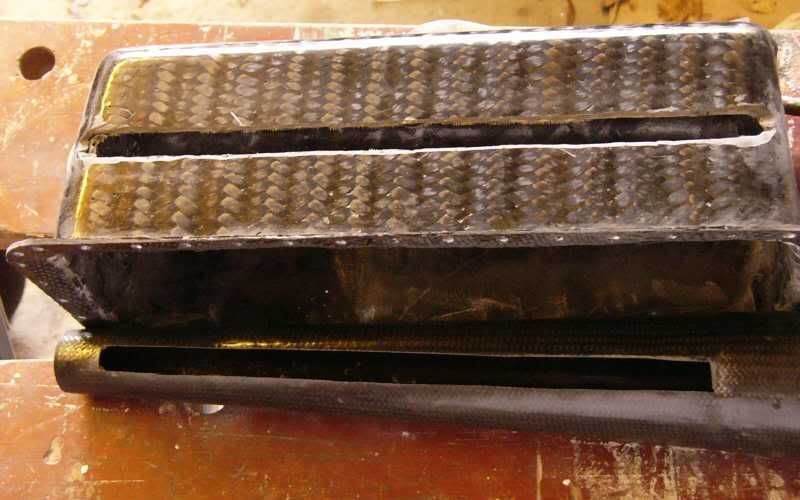
I scuffed up the two parts so that the carbon fabric was showing, this will give a good join, then I mixed some epoxy glue and put some of the carbon dust into it, partly to make it black and partly to strengthen the matrix –
Then the two parts were clamped together, a solid chunk of moulding block was put behind to ensure a straight join. It was all left over night inside in the warm to complete the join –
The block can be seen here behind the slit –
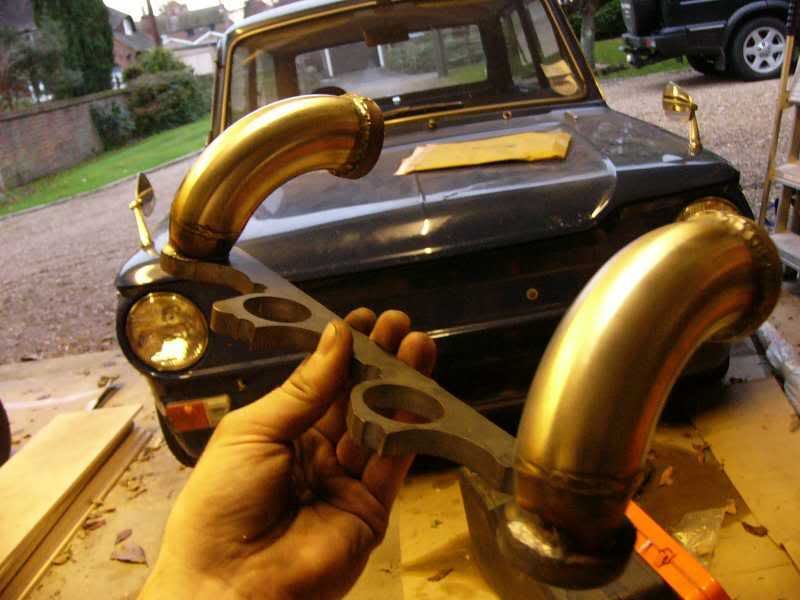
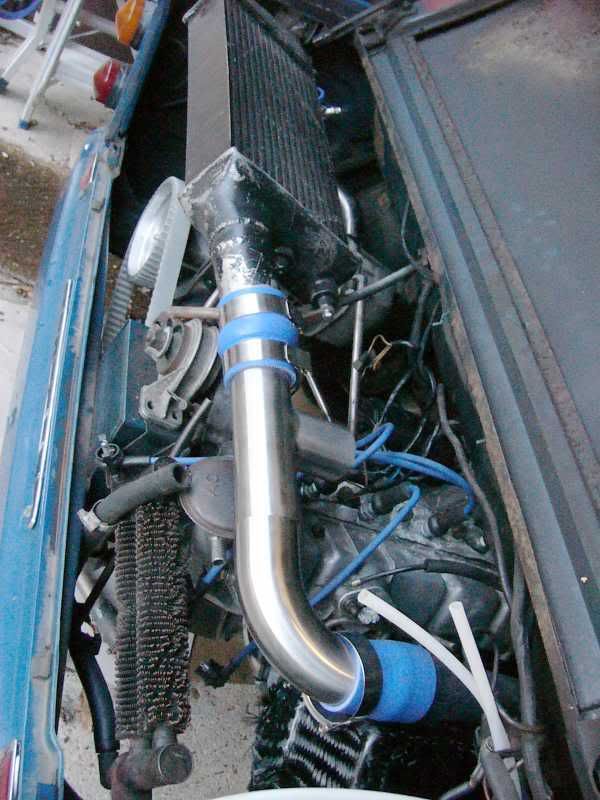
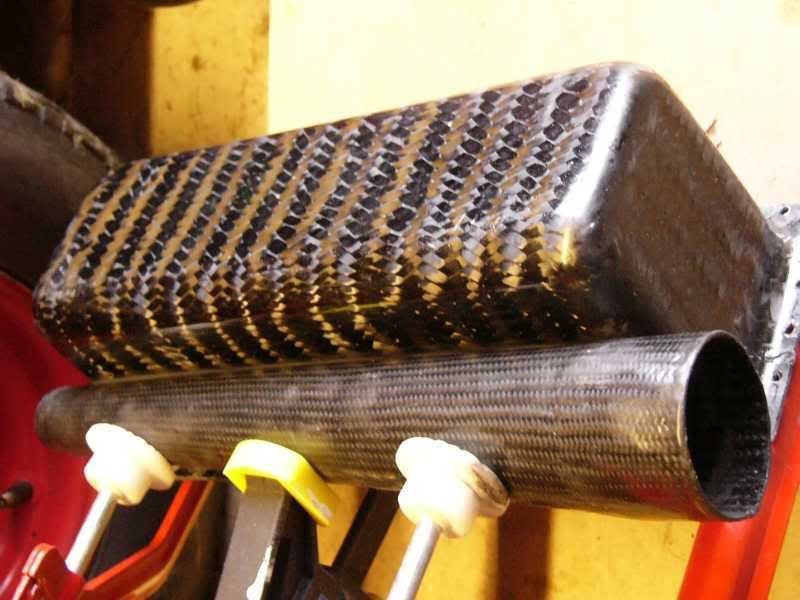
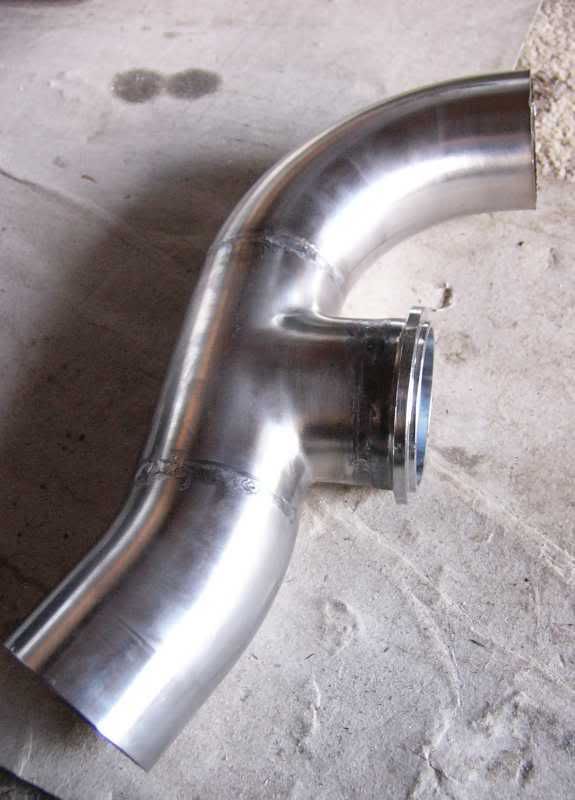
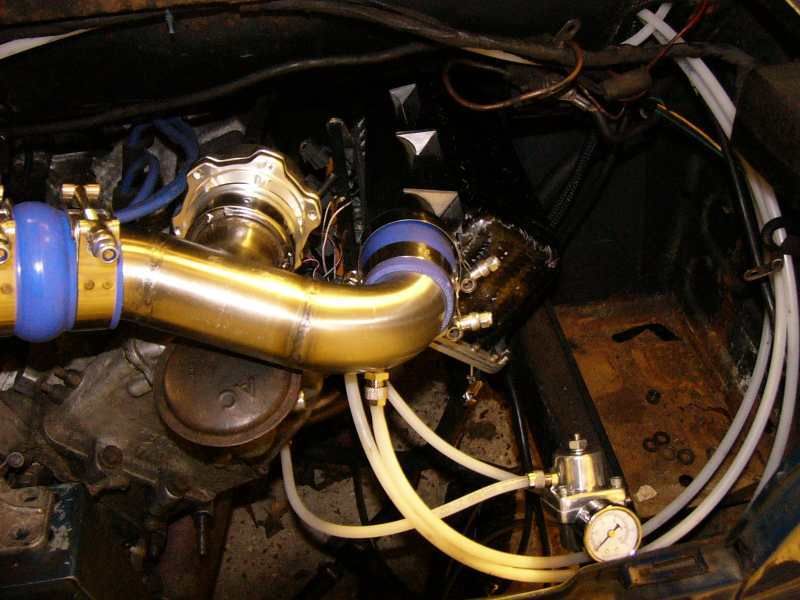
The next day once the glue had gone off, I could align the plenum and make up the final boost pipe, this was not only the most complicated one but also the most on show of all the pipes. It consists of a bend to straighten the outlet from the intercooler, into a T-piece for the bypass valve, then another 90 degree bend to go into the plenum chamber.
I started by putting the two bends onto the intercooler and plenum, I could then see how much needed to be cut from each to line up with the T-piece. I trimmed the 90 back as far as I could without ‘cheating the bend one end, and took about 25mm off the other end. The other bend was taken back to provide about 20 degrees to the T-piece, and the T-piece was taken back as far as possible.
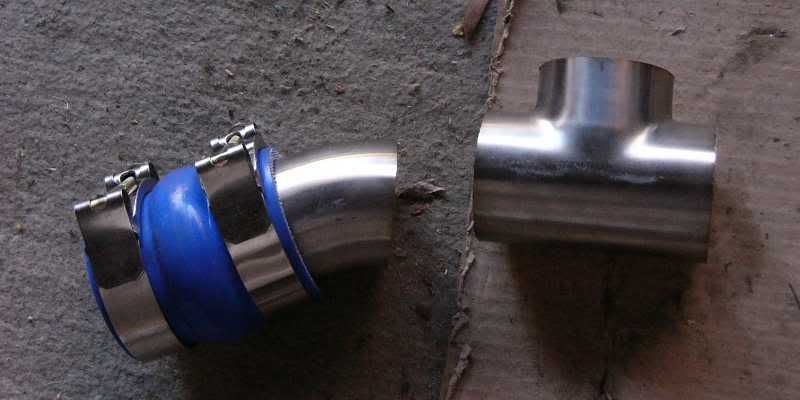
I tacked them together and checked for fit –
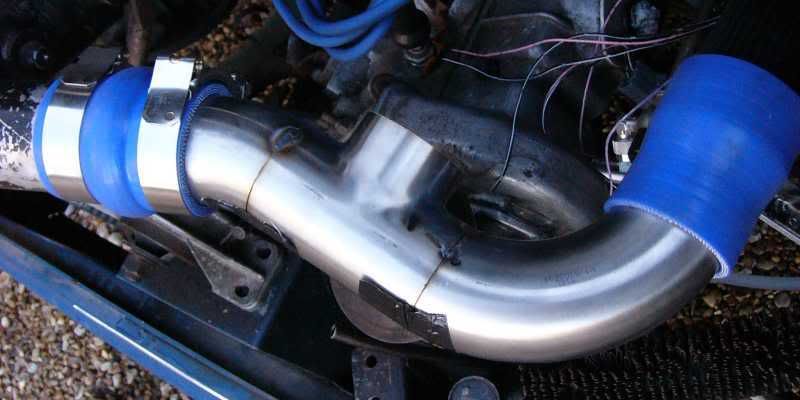
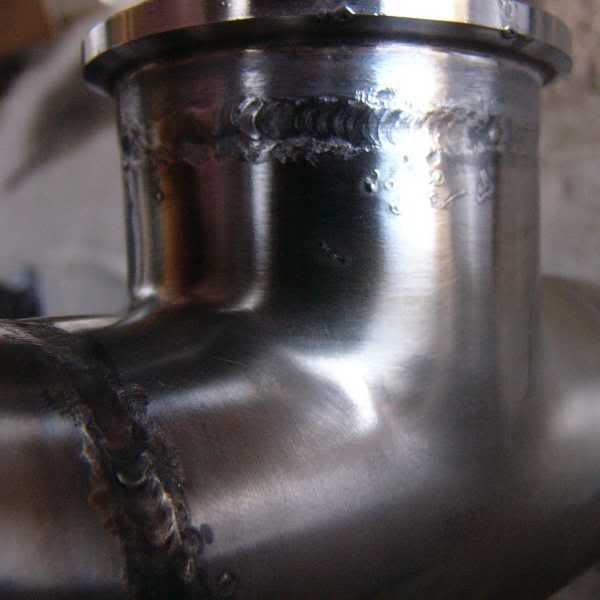
All looked fine so then it was time to TIGarinio, when Mr Cooper was last round he borrowed my TIGinadraw, I watched his technique very carefully and gleaned some knowledge. So this time I ground the tip back to a much finer point, where the join in the stainless was I ground it back so it was virgin metal, and as my machine is scratch start I started the arc on my aluminium vice jaws. All of this combined to create a beautiful weld, it was so nice to do, easy, a real pleasure!!
I also took some advice from Keefy here on Retro-rides.com, and back purged the tube to stop the crusty black stuff I get from weld penetration. I couldent keep a constant flow, but I taped up each end and filled it with gas, sealing it up before final welding.
The flange for the bypass valve was also welded on, it was chromed so I ground that back as it would have impeded the weld.
This is the outcome –
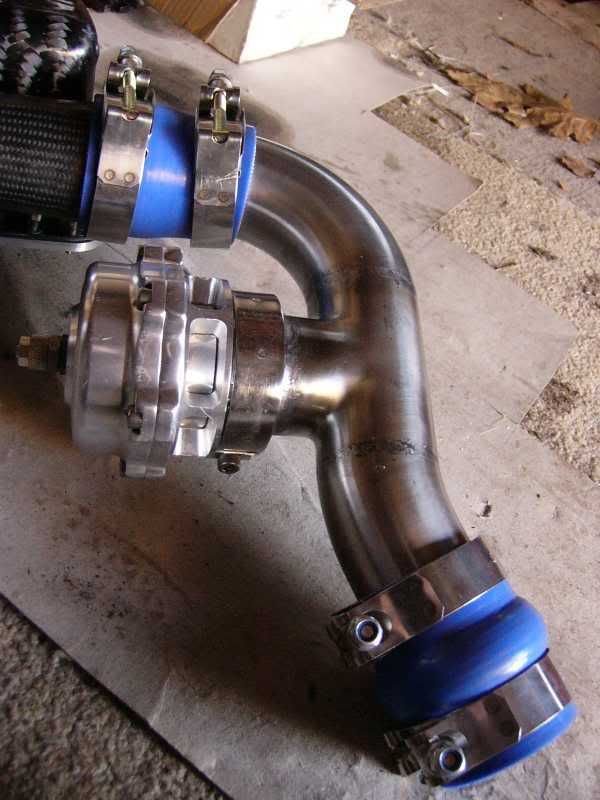
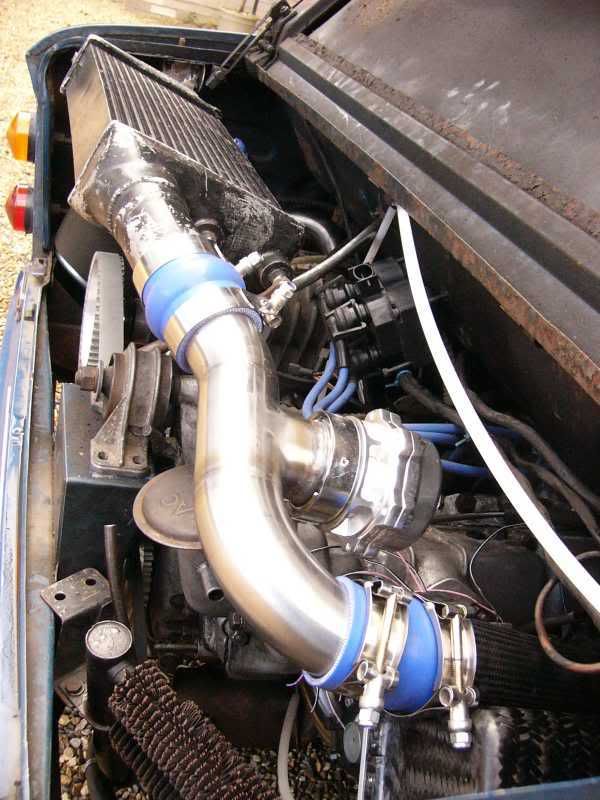
This is it on the car –
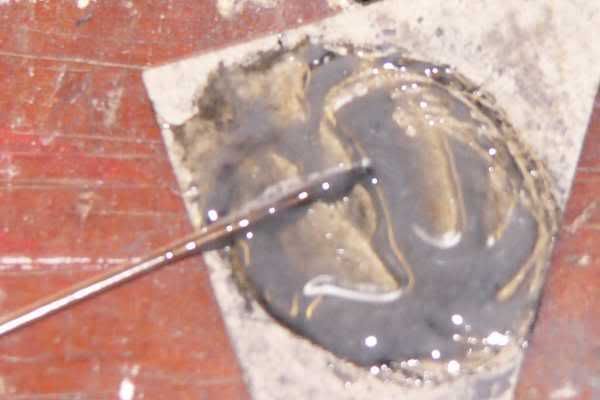
Finally today I decided to make up the supports for the taper tube on the plenum, these were to be made from 5mm aluminium and bonded onto the carbon parts. These should significantly stiffen the whole assembly, making it much more durable. I made up templates for each part, and then filed them each individually for a perfect fit. I mixed the epoxy with carbon again to strengthen the matrix and ground the plenum and tube back to carbon for a good join between the parts.
Here it is curing inside overnight, fortunately it doesn’t smell to much, otherwise my mum would go ballistic!!
Tomorrow the inlet manifold will come off so I can tap the inlet pipes for reference lines, these will be going to the bypass valve, ECU, and fuel pressure regulator. Once this is done the whole caboodle can be fitted to see how she looks!
Cheers
J
On 5th of Sep, 2006 at 05:47pm mini13 said:
I reckon if his brains were gunpowder he couldn't blow his own hat off...
|
dan
Forum Mod
1140 Posts
Member #: 93
Post Whore
Near Lincoln
|
|
great stuff, this project has great momentum!!
|
j_whizzle
28 Posts
Member #: 1397
Member
Nr. Oxford
|
|
wicked project mate
its a great read. dont know much about imps but yours is a treat.
O/T - Whats SIHE like? hopefully ill be going next september.
J
Pictures here >>> Photobucket
Build diary, No turbo... yet...,here on TMF >>> TMF - My project
|
blown_imp
223 Posts
Member #: 598
Senior Member
Gaol
|
|
SIHE was super fun, the uni was good, administration was awful but this sounds pretty normal for most unis! Get as many lectures with Owen Williams as possible, hes a great lecturer and a really nice chap!
The best thing about it is the proximitiy to some of the best beaches in the UK, the gower is incredible. Houseing is cheap too, i had an awsome place with a sea view for £240 a month!
I say do it, i enjoyed the four years i was there, woulent change it for the world.
Cheers for the kind words about the project, hopefully itll be running soon.
Cheers
J
On 5th of Sep, 2006 at 05:47pm mini13 said:
I reckon if his brains were gunpowder he couldn't blow his own hat off...
|
blown_imp
223 Posts
Member #: 598
Senior Member
Gaol
|
|
Dec 13th
Right well I’ve got a few more bits done –
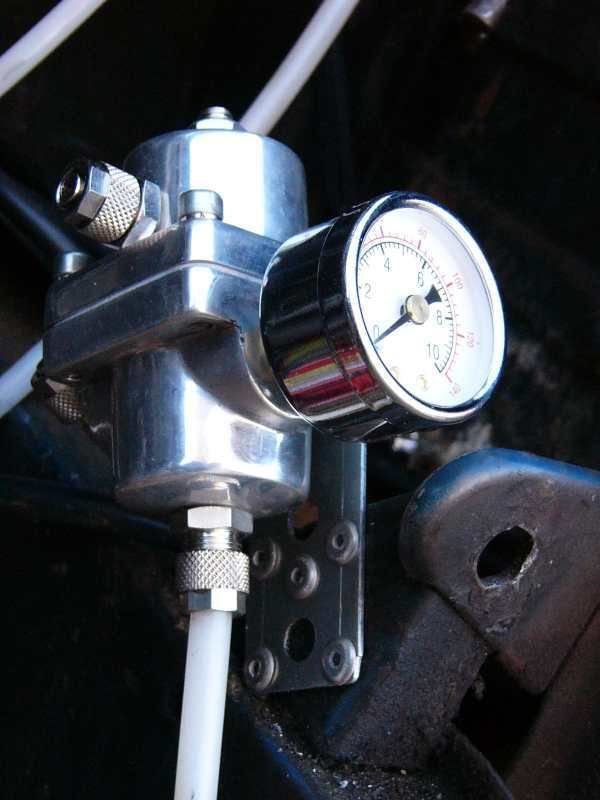
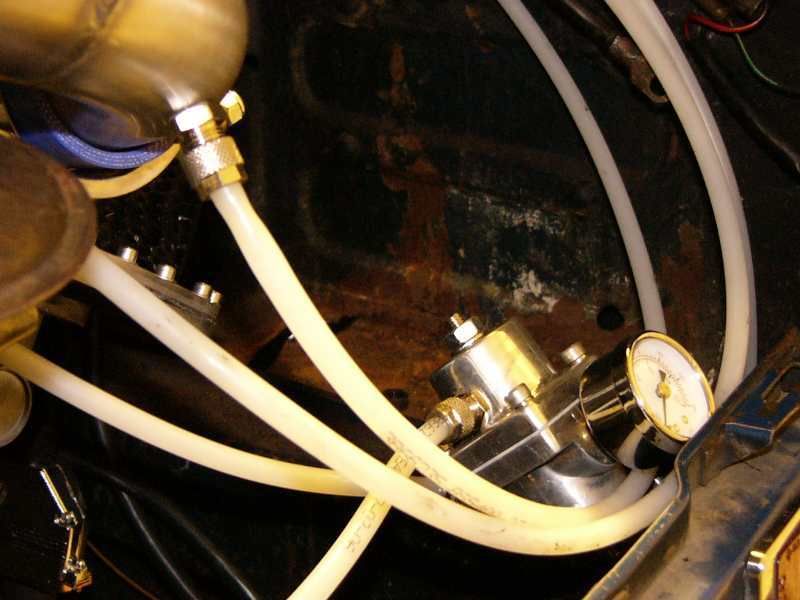
the fuel pressure regulator is in, it was difficult to find a site for this in considerations of being able to see the pressure dial, and having all of the connections accessible. I finally mounted it on the rear cross member mountings. –
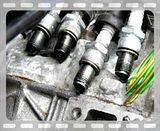
I drilled out the final few pressure taps for the boost gauge, ECU, and fuel pressure regulator. It was only once I had fitted the manifold and plenum that I’ve missed one! Ah well its got to come off to have the manifold flange milled flat anyways!
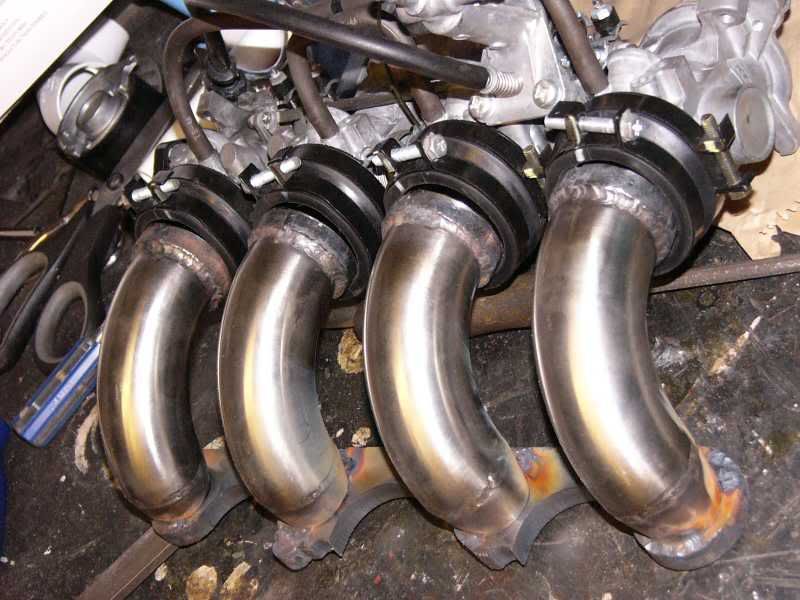
The silicone reducer arrived from Hong Kong, this meant that I could finish the intake system and fit the air filter.

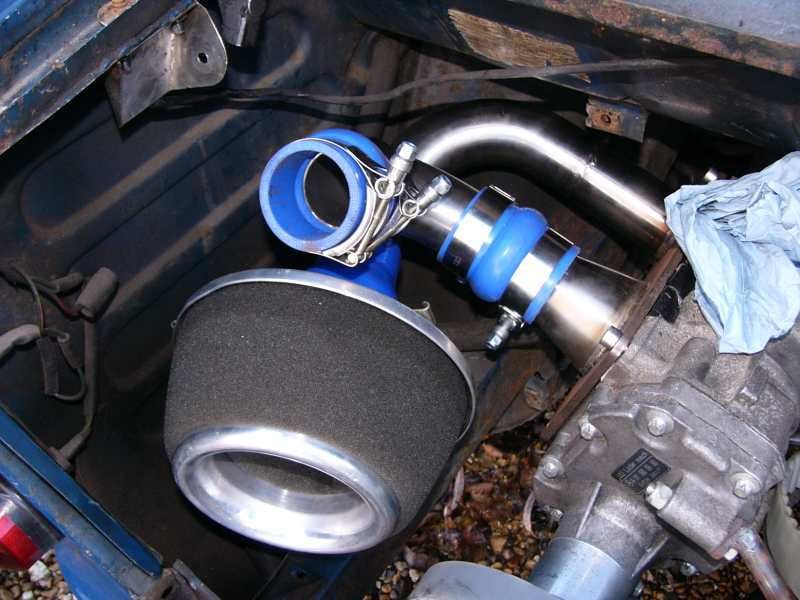
I also assembled the whole plenum assembly, this involved shortening 52 M4 stainless cap head bolts and run a die down each and every one, but it had to be done so hey ho!
Here’s a few piccies –
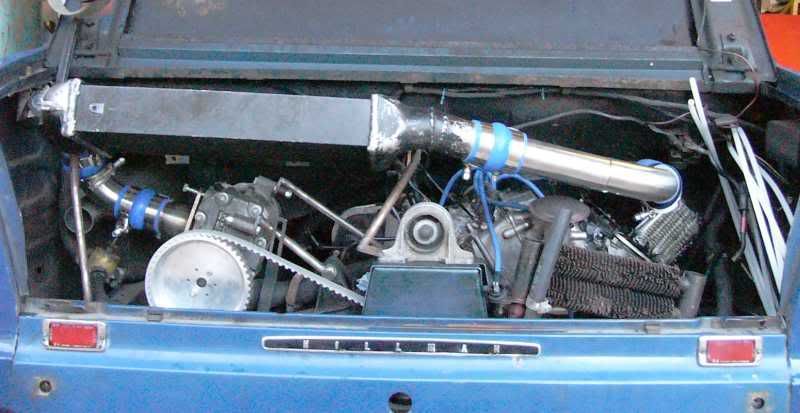
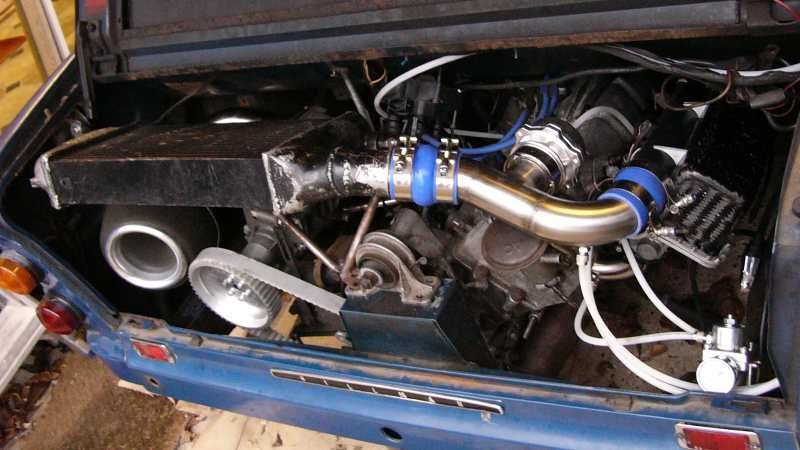
The engine bay as it is currently, all the nylon pipes make for such a neat set up, no jubilees in sight!! WhooOOOoOOOpppP!!
Cheers
J
On 5th of Sep, 2006 at 05:47pm mini13 said:
I reckon if his brains were gunpowder he couldn't blow his own hat off...
|
AlexB
Site Admin
6297 Posts
Member #: 1
The boring bloke who runs this place.
Berkshire
|
|
that looks cracking!
Cant wait to see some vids of it running 
|
blown_imp
223 Posts
Member #: 598
Senior Member
Gaol
|
|
January 20th 2007 Yay, update!!
Finally time for another update, I’ve been so busy that this was the first weekend I’ve had free since christmas!
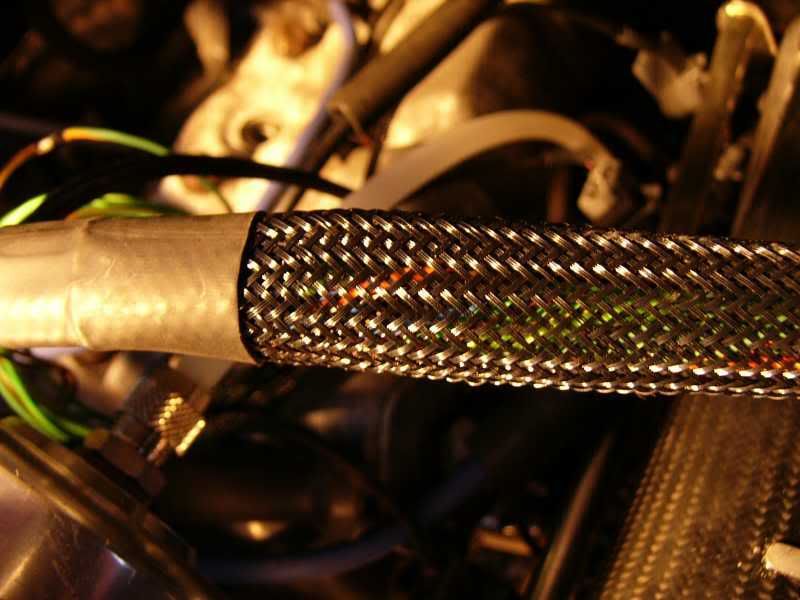
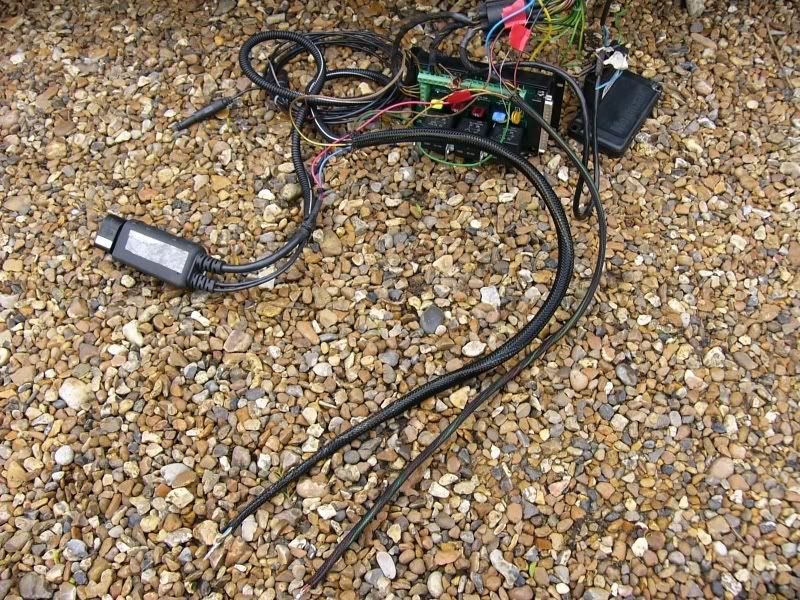
I have built the wiring loom up and it’s almost finished, I have used the combination of a loom wire kit, nylon braiding, and lots of heat shrink. I’m quite happy with the end result even though there are still a few bits to tidy up.
I have yet to attach the power wires front to back or mount the relay board, in this picture you can see the wires going to the coil pack and splitting off going to the water temperature sensor.
The nylon braiding is fantastic for covering he wires and keeping the bundled together, it’s very abrasion resistant and looks the shizzle
The past couple of weeks I have been assisting in the rebuild of a 1926 Rolls Royce phantom 1 engine, this has been super fun and a real learning experience ( now have a pretty good idea how magnetos work, crazy stuff, they don’t need a battery to make sparks!). Whilst I was there I got a little time on the mill and lathe, so the last bits of machining are done, the flange on the inlet manifold warped from the welding heat, so that’s milled flat.
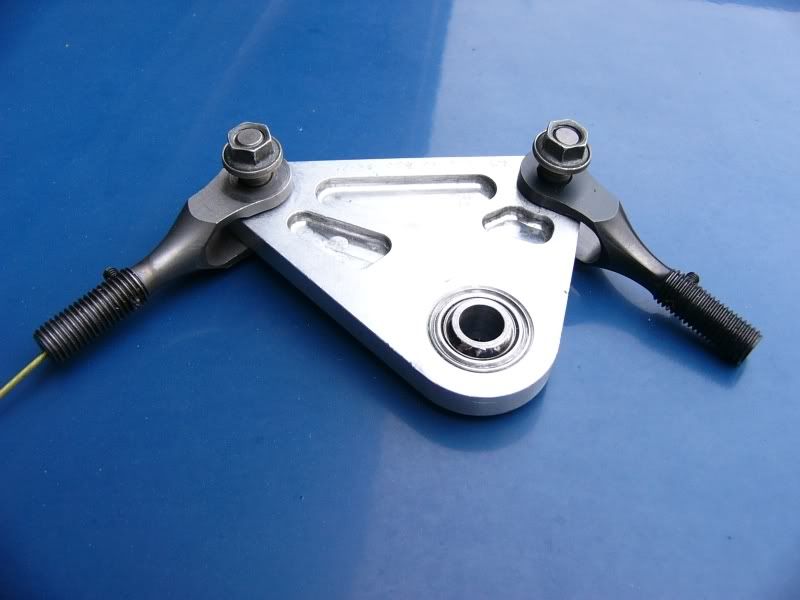
The other bit was the finishing touch for my belt tensioner, the bore of the idler wheel was about 20mm, so I needed a reducer incorporating a 5mm spacer to bring it inline with the belt.
Once it was all done I drilled out the mounting plate that I made for the tensioner and put the pulley on, the centre of the pulley is on an eccentric so I can turn it round and tension the belt very finely without drilling more holes, ace!
I also got some stainless cap head bolts for the mounting place, mmm shiny
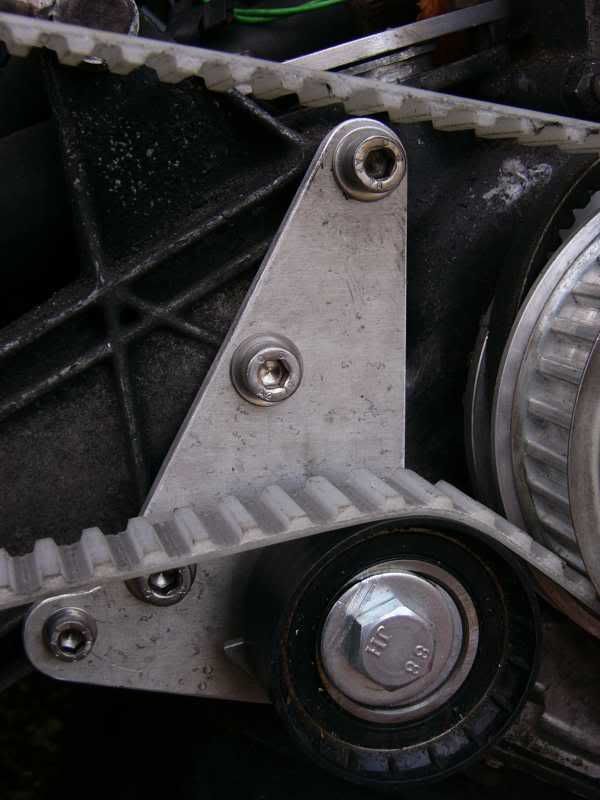
I was very apprehensive about putting the tensioner on as it will reveal if I had mounted the blower straight, fortunately when I took the plugs out and span the engine over with a socket and brace it ran straight and true, damn it I’m a genius
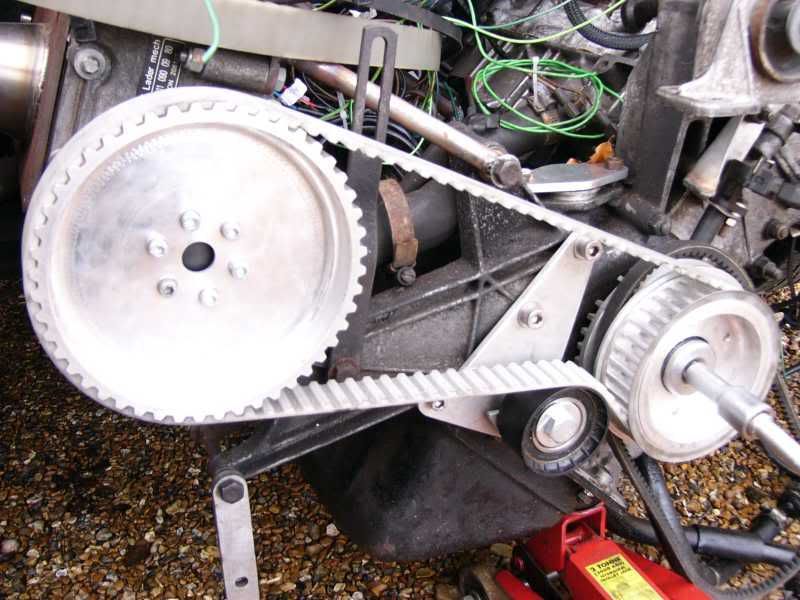
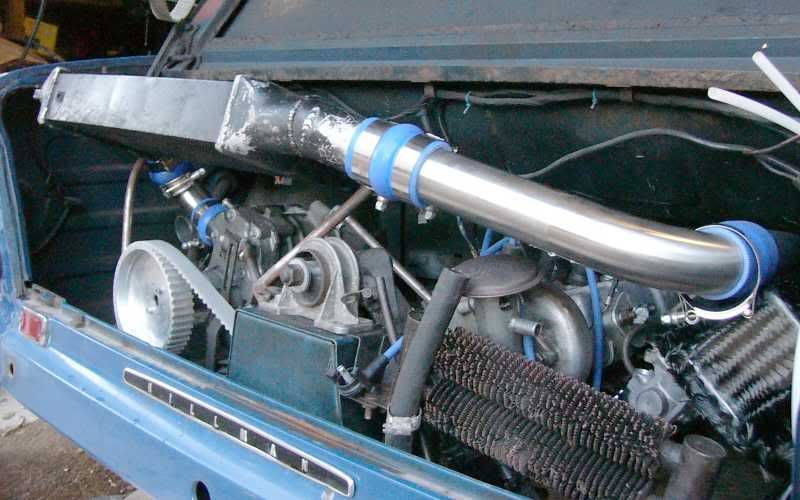
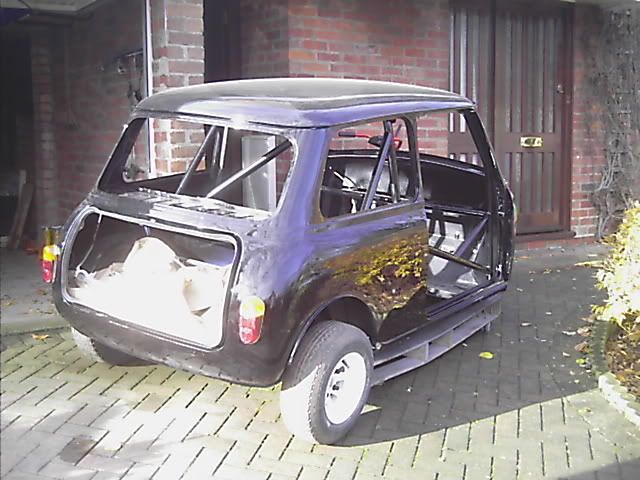
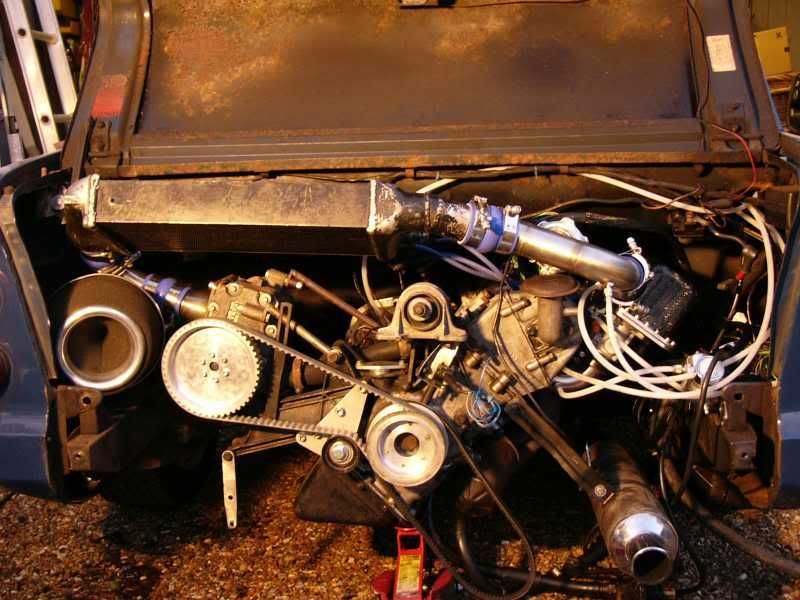
Here is the engine bay as it stands, I have to get a new manifold gasket and then that little lot can have its final fitting
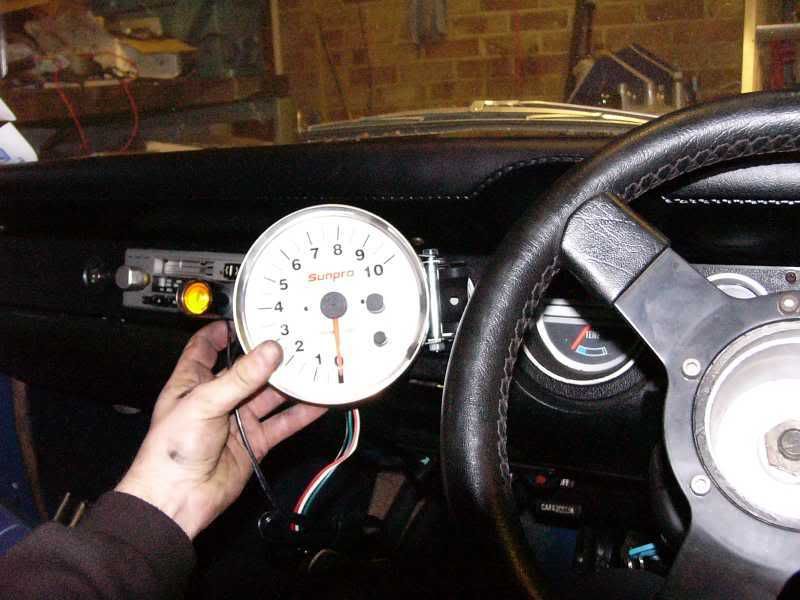
I’ve also found a place to put my new monster tach, it’s too big to fit on the dash top, but I have a redundant space to the left of the steering wheel. I shall cut a piece of carbon sheet to reinforce the dash and neaten it up, then mount the gauge through the carbon.
Tomorrow I shall fit the gauge, and sort out the radiator pipe situation, I have come up with a cunning plan as baldric would say. My water pump has 19mm inlet/outlet, and my heater hoses that run front to rear are ¾” or 19mm, this would mean no pipe inside the car and a hell of a lot neater than the current solution.
More soon
J
On 5th of Sep, 2006 at 05:47pm mini13 said:
I reckon if his brains were gunpowder he couldn't blow his own hat off...
|
danboy
715 Posts
Member #: 1381
Post Whore
Doncaster, South Yorkshire
|
|
Been waiting for this, Top project!
Regards
Dave
|
blown_imp
223 Posts
Member #: 598
Senior Member
Gaol
|
|
Jan 31st, ZaaaAAAAaaaAAAppPPPP!!!!
I’ve only got about 10days until I leave for the midlands, the imp is going to have to be laid up for a few months, so I thought id have a crack at getting the cheeky minx running!
To achieve this, I need to get fuel into the engine, a spark, oil pressure and that’s it. So today I hit up the loom to get all the wires going to their rightful homes, they are only temporarily soldered as I have run out of braiding and heat shrink.
The result is this –
BIG
FAT
WHITE
SPARKS!!!!!!!!
Holy moly this might work yet!!
Tomorrow I am going to plumb oil cooler inlet/outlet to one another so it seals up, put on the inlet/exhaust manifolds, and then wire up the O2 sensor.
Then its time for some oil and setting up my PC in the garage!!
We may have some banging tomorrow guys, ooOOOoooHHHHhhhHHh yeeeeEEEeeeaah!
J
On 5th of Sep, 2006 at 05:47pm mini13 said:
I reckon if his brains were gunpowder he couldn't blow his own hat off...
|
fastcarl
6966 Posts
Member #: 507
Fastest A Series Mini in the World
leeds/wakefield.
|
|
this in indeed a top project, i wish i had time for this stuff nowadays,
carl
WWW.FORCE-RACING.CO.UK PLEASE CLICK HERE
|
blown_imp
223 Posts
Member #: 598
Senior Member
Gaol
|
|
Hi guys and gals,
Ive had a few days off this past week, so I came home and got a little bit of work done on the imp. The wiring needed sorting out as it was a magical birds nest, with a veritable cornucopia of colourification ;D
I sat looking at it for about an hour trying to work out how I had made the bloody thing so complicated, and also why! I decided that I needed some sugar to speed my brain up a little, so a nice cold coke later I fired up the soldering iron. Wires were chopped and fluxed, there are still temporary joints as I have run out of heat shrink, but soon I shall have the finished loom.
Here it is with two nice bundles one positive and one negative -
Next up was the intercooler, as it was a nice sunny day I decided that some painting was in order, first up came the nitromors (sp?) I managed to get some on my hands and it actually hurts quite a bit! I cleaned it all up and degreased with some thinners, then out came the rattle can of wrinkle finish paint, this needs to be done in the warm so I got the heat gun out and heated up the intercooler to about 40 degrees. I then put the rattle can into hot water for about 10 mins to make sure the paint was nice and thin, two thin coats were applied, then one thick one and the finished result is here -
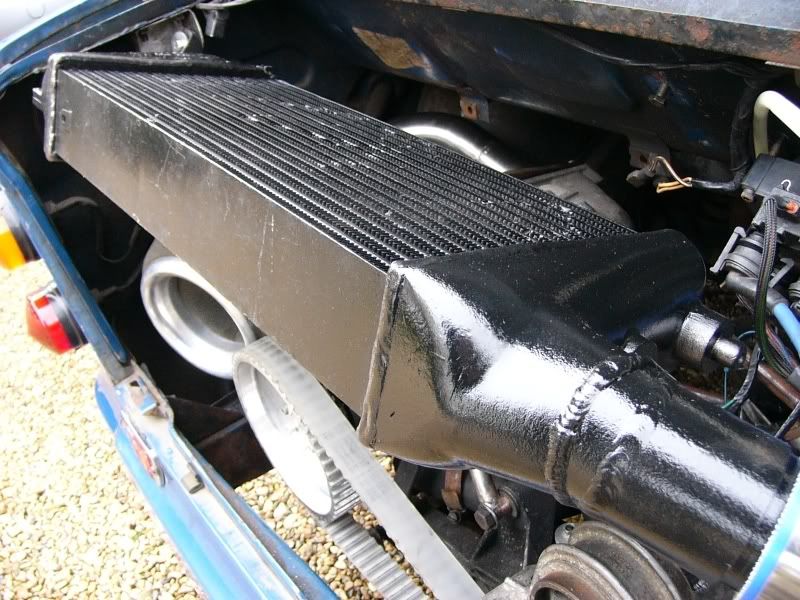
Nice!
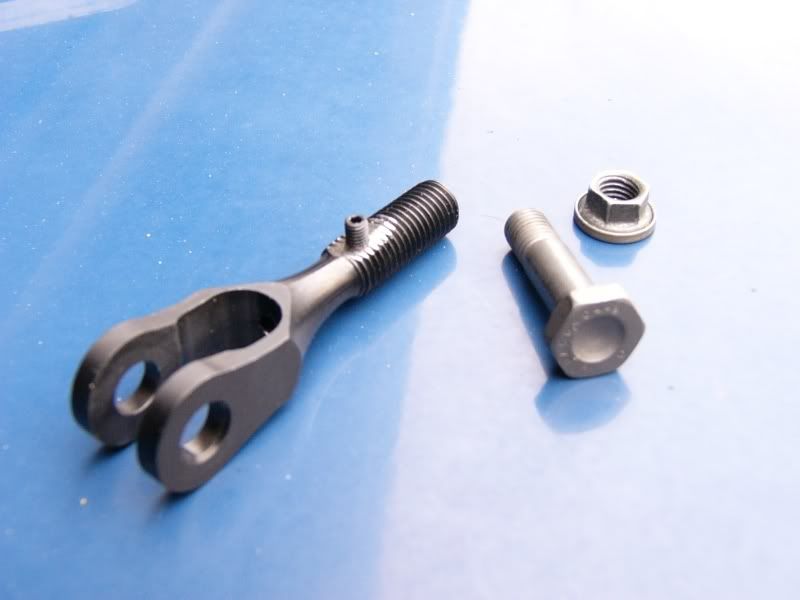
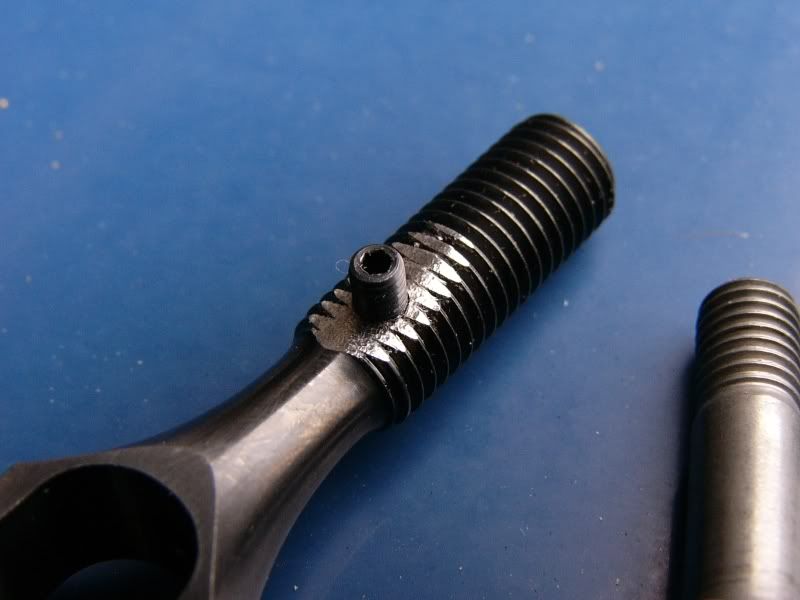
The throttle linkage was next up, I need a 3:2 ratio between the imp pedal and the CBR TB's, this has been accomplished with a few bits from the F1 box, a nice rocker arm and some berillium clevice pins -
Now to fix the cable I have drilled a small hole through the outside of the clevice pin and tapped it for an M3 grub screw, there is an axial hole through the shank of the pin that the cable will slide into. Now berillium is an absolute cnut to machine, here is the evidence -
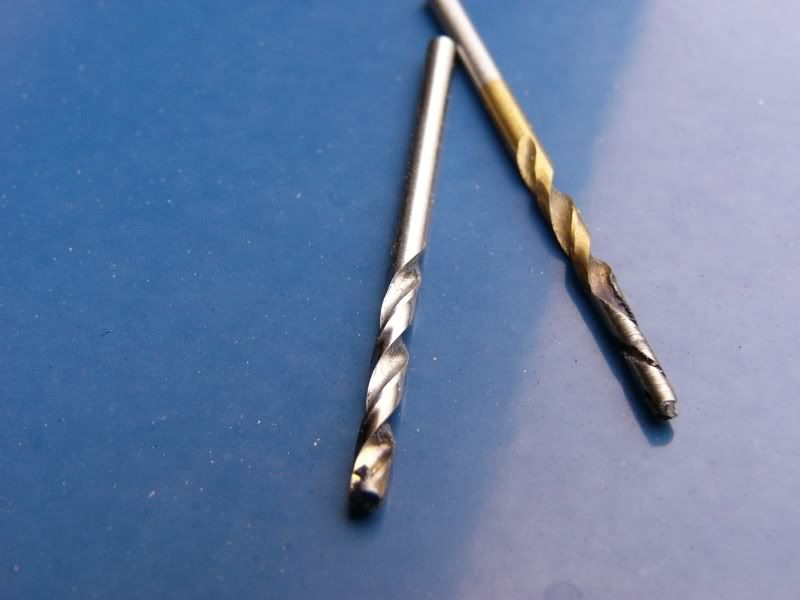
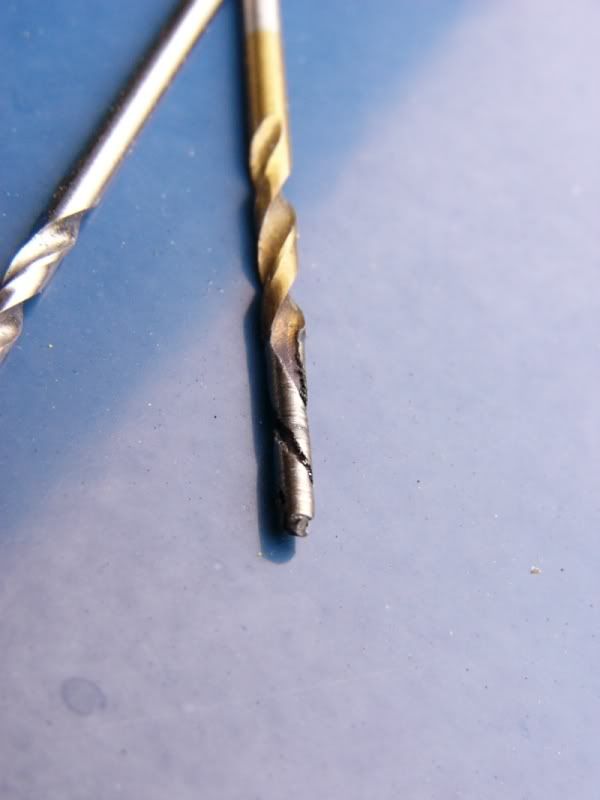
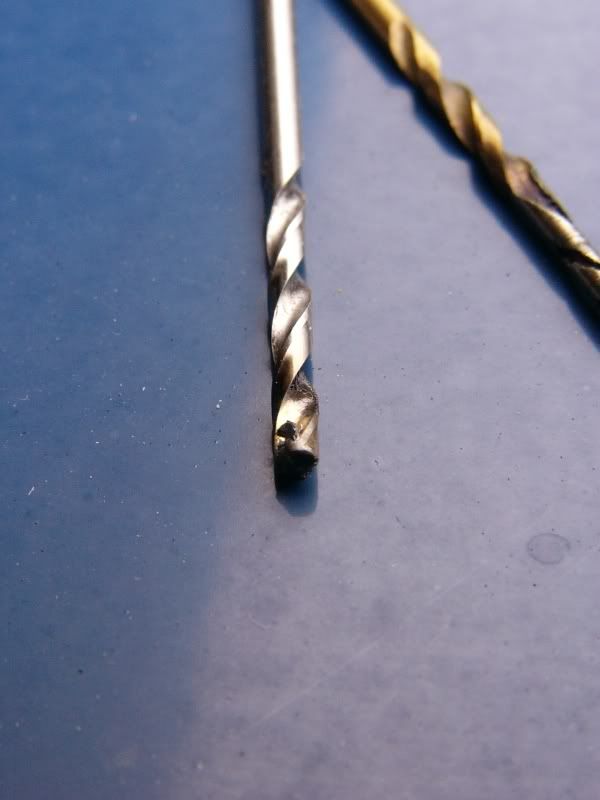
I ended up using a cobal drill and that mashed through just fine
End product -
To celerate I ran the engine up, I popped some more fuel in and realised that it was trying to run about 60psi of fuel pressure, once I had wound it down to about 40psi the engine ran much better, if a little rich still -
Hope you are all well, ill try and keep you updated as to progress.
Cheers
J
On 5th of Sep, 2006 at 05:47pm mini13 said:
I reckon if his brains were gunpowder he couldn't blow his own hat off...
|
Bat
4559 Posts
Member #: 786
Post Whore
Bermingum
|
|
Hi,
8)
Cheers,
Gavin :)
VEMs Authorised Installer / Re-seller. K head kits now available!
WB/EGT gauges. Click here for customers write-up
Visit www.doyouneedabrain.co.uk
My Mini build diary
|
Joe C
12307 Posts
Member #: 565
Carlos Fandango
Burnham-on-Crouch, Essex
|
|
YAY! another update!
On 28th Aug, 2011 Kean said:
At the risk of being sigged...
Joe, do you have a photo of your tool?
http://www.turbominis.co.uk/forums/index.p...9064&lastpost=1
https://joe1977.imgbb.com/
|
|
Home > Show Us Yours! > Supercharged and injected imp, allowed?
|
|
|
