|
Home > FAQ / Knowledge > Mirage Manifolds - An installation Guide
|
Nic

9327 Posts
Member #: 59
First mini turbo to get in the 12's & site perv
Herefordshire
|
|
Mirage Motorsport Manifold Fitting Guide
You will need: (not exhaustive)
1x Manifold kit, including down pipe
1x Turbo of the T2 variety
1x Inlet manifold (can be of the MG Metro style)
1x Actuator
1x Oil Feed
1x Turbo Manifold Gasket
At least 2x 5/16th K-Nuts
4 Large washers with a 5/16? hole
5x M8 K-Nuts
2x 14mm Banjos
2x Banjo Bolts to fit thread of water cooling points on turbo
1 length of 13mm steal pipe
2 lengths of heater water pipe hose
Length of vacuum pipe (4mm)
An adjustable top engine steady, or modify your own
1x 2? Exhaust clamp (preferably a 1 bolt fixing)
13mm 90¢ª Pipe capable of withstanding oil
2x Stainless hose clips to fit 13mm pipe
You will need to construct:
An oil drain
Actuator mounting bracket and modify actuator plate on the turbo
Down pipe stabilising bracket
1 spacer for banjos, 13mm thick with a 14mm hole through it
Ok let?s start:
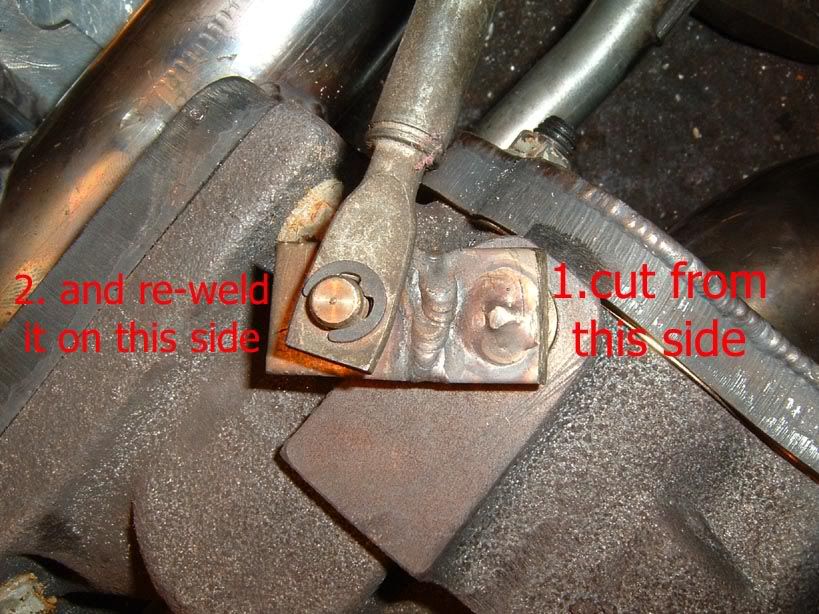
1. For your actuator to fit in and function you will need to modify the actuator tab on the turbo. This is a simple process though, cut the tab in half with a hack saw, and then weld it to the opposite side.
2. Next you want to bolt up the turbo to the manifold. Use 4 M8 K-nuts here. The K-nuts are lightweight, self locking, and more importantly very small. Fit your steel gasket between the manifold and turbo (if you are using it) and put the 4 nuts on the studs before tightening fully with a 10mm spanner.
3. Next you want to put on the turbo exhaust outlet pipe. This needs to be put on now as there is 1 bolt that is inaccessible when it is on the car. Fit your steel gasket (if used) between the turbo and outlet, the first bolt you want to put on is the one that is obscured by the exhaust pipe, again I used a M8 K-Nut here. Then fit the rest of the bolts and tighten.
4. Now you can try the manifold and turbo up against the engine. However it will probably not fit. You need to rotate the turbo so the compressor side does not fowl the block, and the exhaust side so that it is facing downwards.
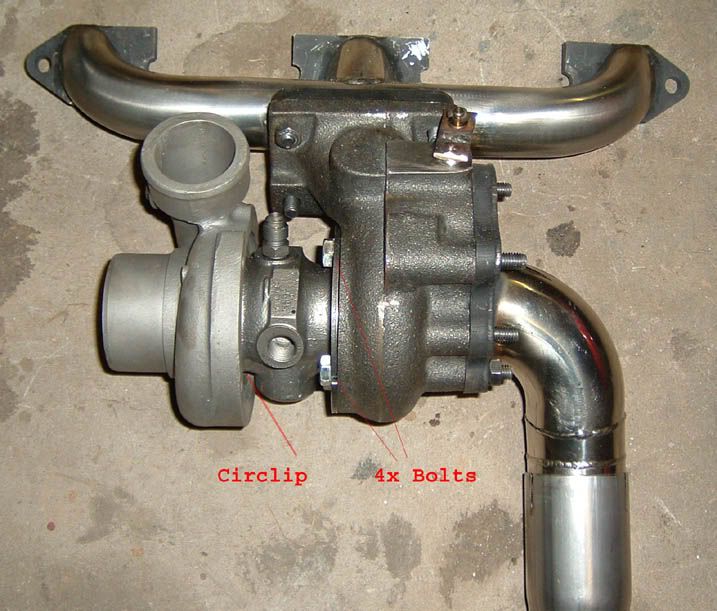
? Do the exhaust first. To do this there are 4 bolts that need to be undone. Loosen these then temporarily bolt the manifold in place, now you can rotate it so the exhaust is facing downwards.
? On the compressor side there is a large circlip. You will need a large pair of circlip pliers so you can get this undone. Then once again bolt the manifold in place, work out where is the best position and mark the housing so you know where the top is. Remove the manifold, line it up and refit the circlip.
You may need to repeat these steps a few times until the perfect positioning is found!
5. To construct your oil drain requires a little bit of skill, small hands and luck, this is how I have done it.
I went to a local hose fitting supplies; from here I obtained a fitting that screws into the oil drain and a hose can be pushed on the end. I had to machine the face of the fitting to 60¢ª so it would seal correctly. This can then be tightened into the turbo.
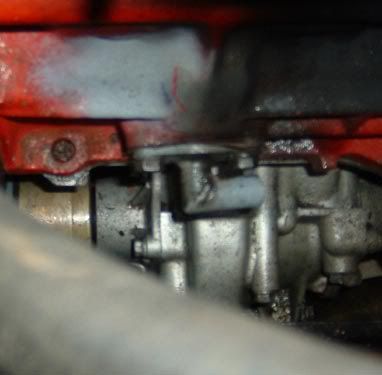
The oil needs to drain back into the block, the best place for this is the hole that is usually used for the fuel pump on N/A engines. I used a fuel pump blanking plate and drilled a 14mm hole into it. Then I had a piece of pipe with a 45¢ª cut on the end welded into this. Onto the 45¢ª end I had some more pipe welded to it (thus making 90¢ª).
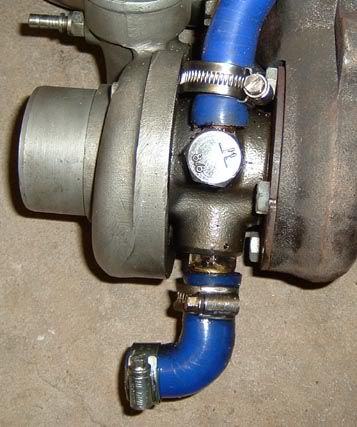
The pipe sticks out as far as the oil drain on the turbo and finishes about 15mm away from the pipe out of the turbo. Then I used a 90¢ª piece of 13mm silicone to join the 2 together, this is held on with 2 jubilee clips. I tightened the end on the turbo before it went on the car, and with some strategic positioning of the jubilee clip the end that bolts to the block can be tightened and loosened from above.
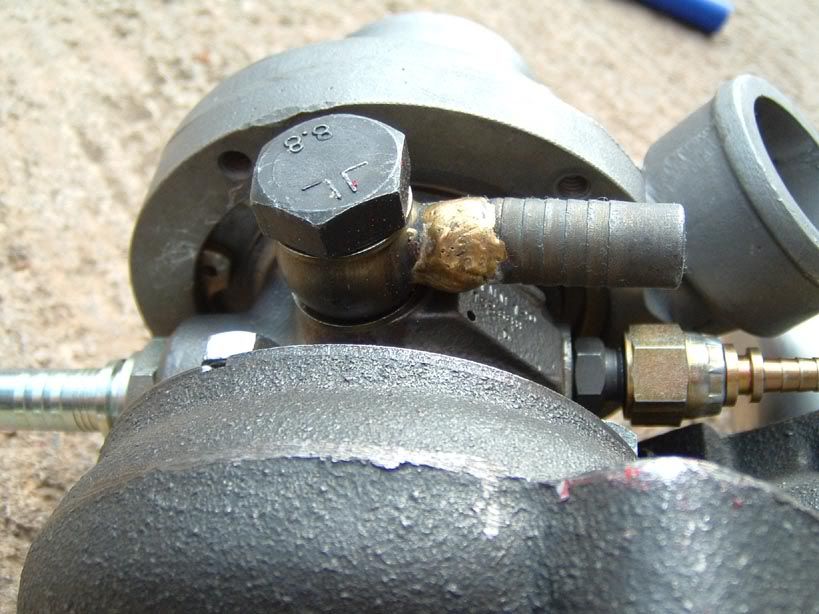
6. If your turbo has the capability for water cooling then whilst you are at the hose fitting supplies you should also obtain a few goodies so that you can plumb the system in.
? You need some 14mm banjos (with the sealing washers). I could not get the correct banjo bolts to fit the turbo so I made my own on my lathe. I acquired the correct bolts (14mm x 1.5 rings a bell but I am not sure on this) and cut them down so they were the same length as the thread in the turbo + the banjo. Then on the lathe I drilled a 10mm hole most of the way up the middle (but not through the head!!). Then in area where the flow comes from the banjo I filed a flat spot before drilling through with 8mm bit.
? On the side that is closest to the block I used a 13mm spacer so that clearance can be had over the hot exhaust side of the turbo. I found to my expense that the heat on this side is also enough to burn through the hose, in the end I used a piece of steel tube (conveniently the n/a metro has a pipe that does the job if you cut the end off it that is from the water pipes for the heated inlet manifold) that now comes out by the engine steady bar.
?
The banjos I used were for 10mm pipe; however I wanted to use 13mm so that they were the same as the original heater pipes. To do this I had to get some pipe brazed over the ends.
7. It would wise to fit all the components to the engine just to check that everything fits ok, this will also allow you to make brackets for the actuator.
It is worth checking the thicknesses of the inlet and exhaust manifolds match. Some light filing may be required on your inlet manifold.
Note: The Mirage Manifolds were designed to be used with the MG metro inlet manifold, I did try a Howley manifold first of all but it meant that the plenum chamber wouldn?t fit in the bulkhead. Also I have heard, but do not have experience that when using the Metro turbo inlet manifold it required some modifications as it fowled the mirage manifolds.
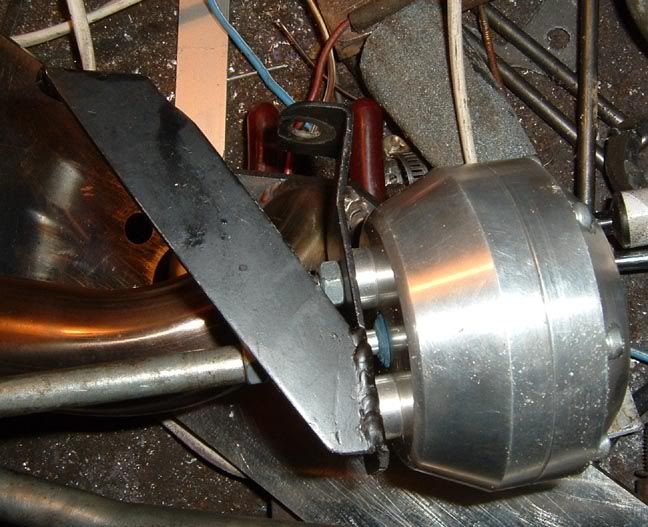
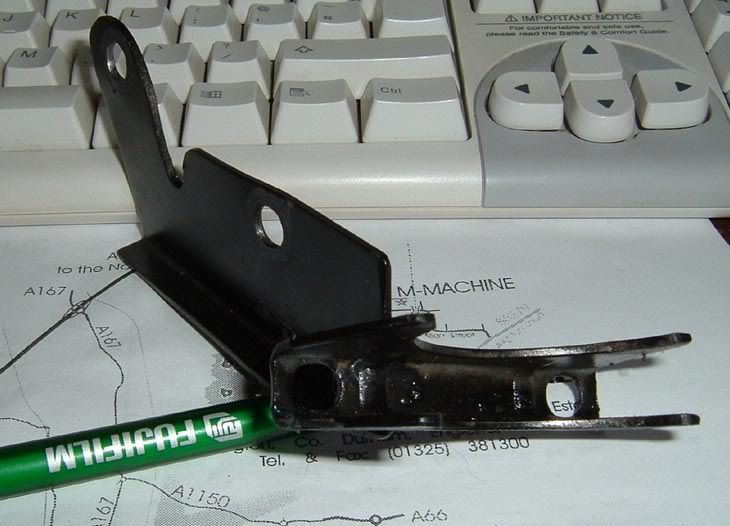
8. To mount the actuator you need to construct a bracket. After a few failed attempts by me, this is what the guys at mirage came up with. Put simply its 2 strips of metal bent so that the bracket bolts onto the 2 last manifold bolts on the clutch engine of the engine. The picture explains this better than I can.
9. Before you bolt on the manifold it would make you life much easier if you fit the oil feed pipe first. The Renault 5 T2 uses a 7/16th 24tpi thread if you are struggling to find an adapter. Firstly tighten up the adaptor then Fit your braided hose to this.
? Whilst at this stage you should fit the water cooling pipes to the banjos, as putting them on when the turbo is in place would be virtually impossible.
10. Fit your exhaust gasket on the manifold studs. Then carefully lower your manifold and turbo assembly down the back of your engine. Ask a volunteer to hold the unit whilst you slide on the oil drain pipe (but do not tighten yet), then when this is on you can offer the manifold up to the head.
11. Fit your inlet manifold with the carb and plenum already in place. It is far easier to tighten the manifolds up if you use 5/16th K-nuts as they are smaller, also a 1/4? drive socket set is handy here. Use large washers to help tighten down both manifolds and tighten up the nuts. You would be best to fit all the washers and nuts loosely before fully tightening the manifold s down as it can be a little tight for the nuts when the manifold is in its final position. Don?t forget to fit your bracket for the actuator.
Once it is tightened down you can then tighten up the oil drain pipe.
12. For the water cooling pipes connect one pipe to the heater take off on the end of the head. The other pipe then needs to go to the top of the radiator. There are a number of ways to do this.
? Cut up on old bottom hose so the heater take off can be used to run the water back into, and replace the top hose with this.
? Have a 13mm pipe brazed on the top of the radiator.
? Use a thermostat spacer plate with a take off. There are various versions of this, but a Twin point injection allows the take off to be at the back of the engine, reducing the amount of pipe work under the Bonnet.
13. Now fit your actuator, tighten to the bracket, and then preload the rod. I?ve read that 6mm of preload on it is suitable. Tighten up the locknut and pop the e-clip on the pin on the turbo to stop the rod popping off.
? The actuator needs to be connected to the compressor side of the turbo. Again another trip to your friendly hose supplier should see you coming back with the correct fitting. Fit the vacuum hose to this and the other end to the actuator (being sure to avoid putting the hose near anything hot).
? If you want to fit a bleed valve for adjustable boost simply cut this pipe in two and fit the bleed valve here.
14. You can fit the standard length engine steady to the car and everything will fit in, however it will be very tight to the bulkhead. A longer engine steady would be a good idea. You can either buy an adjustable length engine steady from minispares, or cut and weld your own so that it is longer, thus giving more clearance. It would be wise to fit extra engine steadies too.
15. Now your engine is in place you can fit the down pipe.
? Bearing in mind how tight it is down there it can be quite difficult to tighten the clamp. Handily there is an exhaust clamp available that just has the one bolt. Slide this onto the pipe coming out of the turbo and try to make sure that it stays up the top.
? Jack and support the car, get underneath with your down pipe and slide it up into position. I found that my down pipe was rubbing on the pot joint, this turned out that I was pushing the down pipe up too far.
? Once it is in position, check at the top that the slots on the pipe are over the outlet on the turbo, then slide down the exhaust clamp and tighten it up.
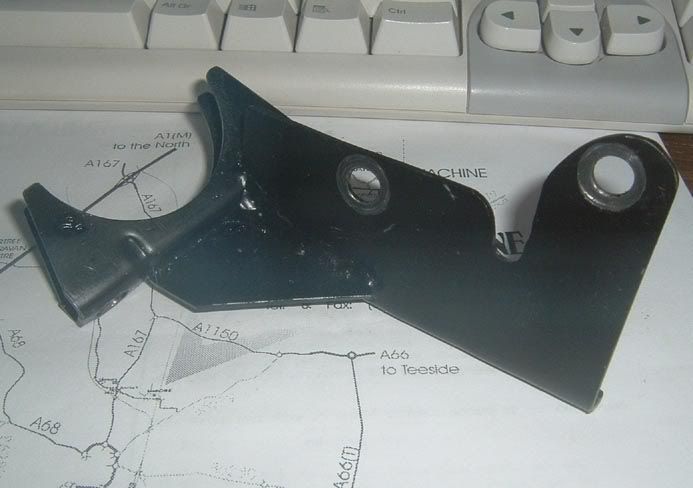
16. You need to make a bracket to support the down pipe. This could be as simple as another exhaust clamp with some steel coming off it that reaches to one or two of the bolts on the diff housing.
? This is what mirage came up with for my car, it also helps with positioning the exhaust when it comes to refitting it.
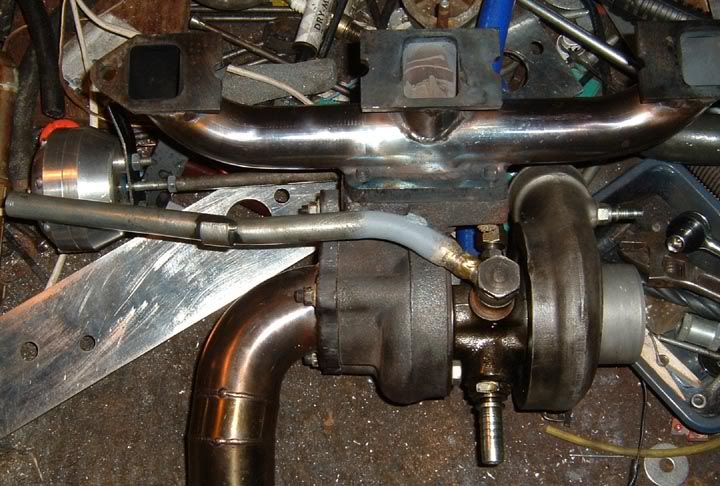
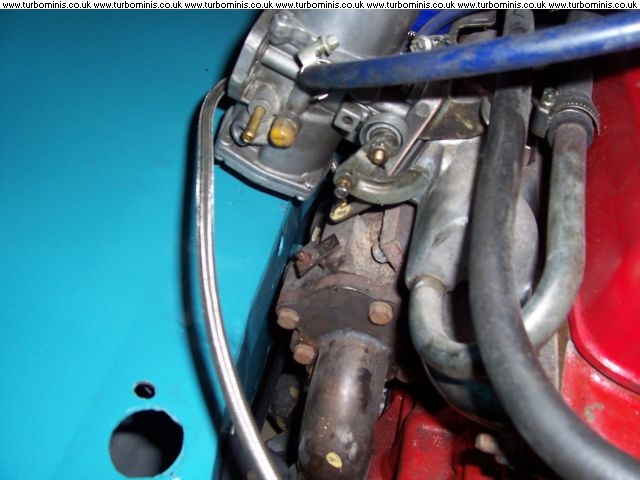
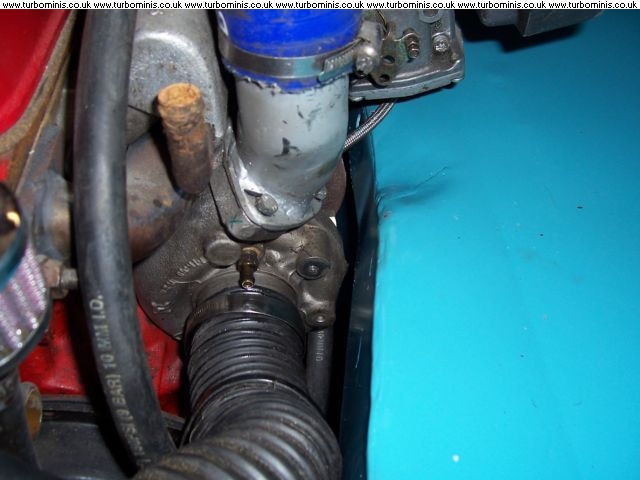
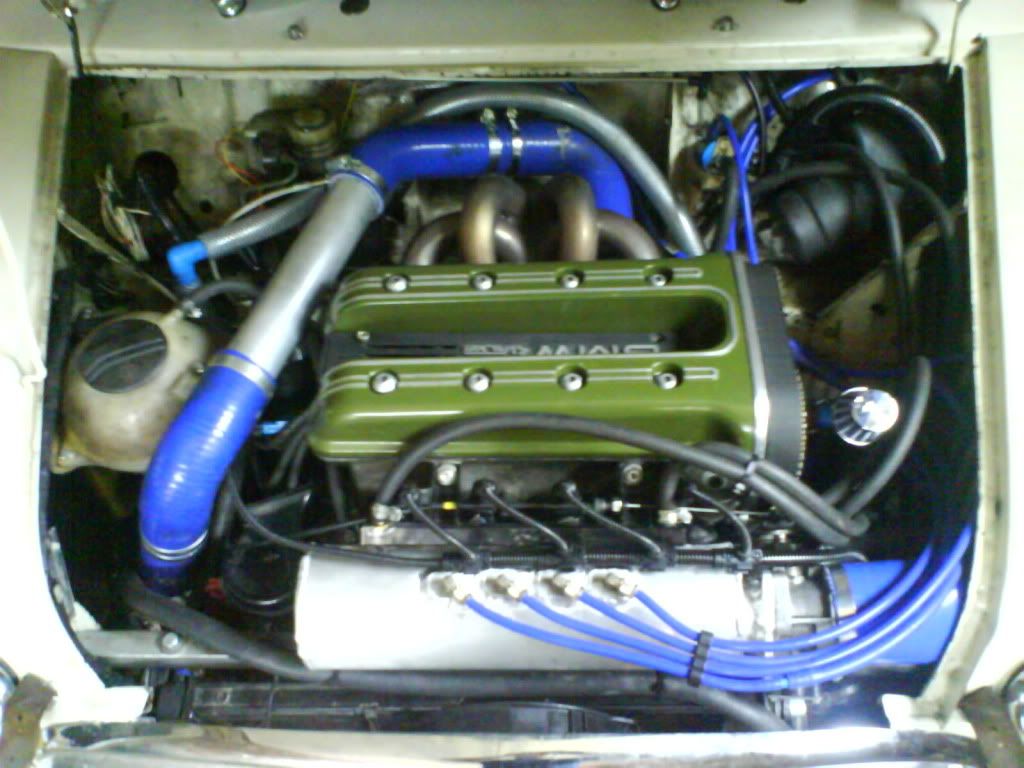
here are a couple of grubby pics of the manifolds as fitted to my car
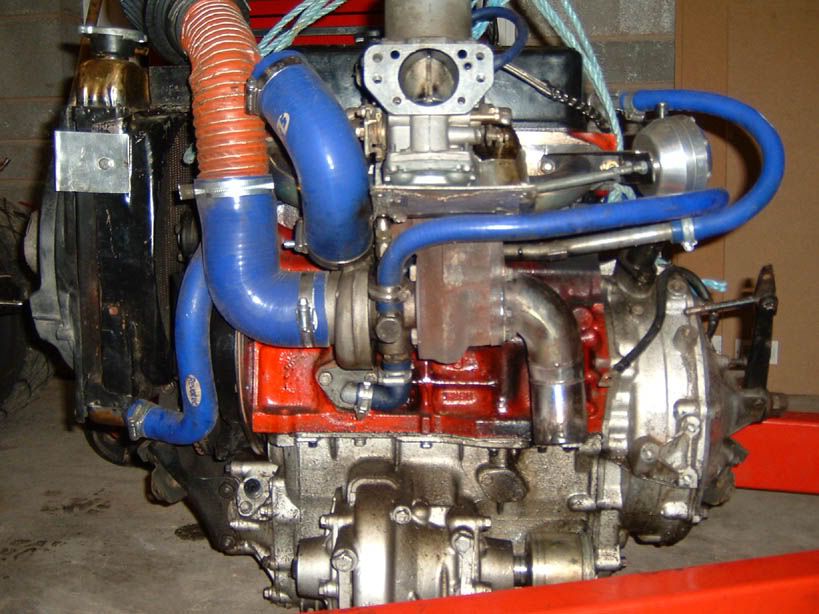
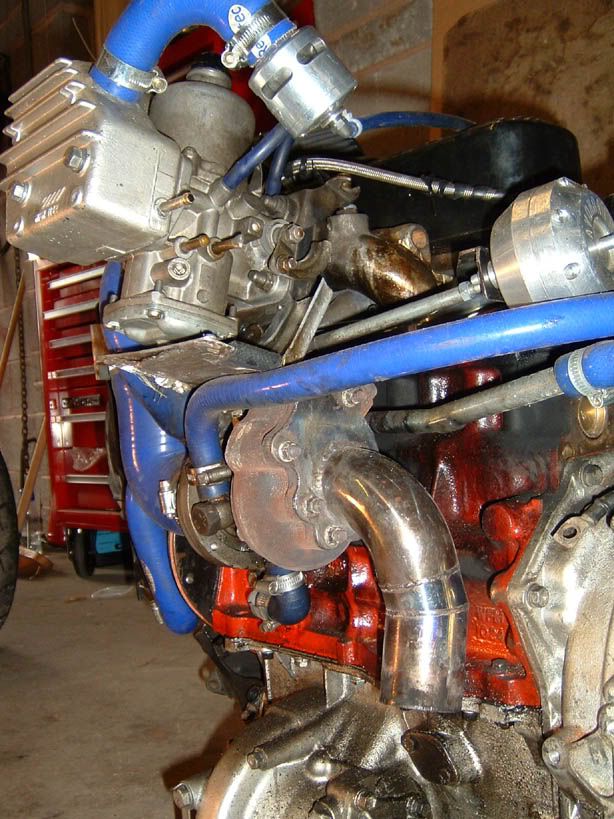
Enjoy
Edited by Nic on 4th Dec, 2005.
|
Vegard
7765 Posts
Member #: 74
I pick holes in everything..Chief ancient post excavator
Norway
|
|
Excellent write up! :)
On 13th Jul, 2012 Ben H said:
Mine gets in the way a bit, but only when it is up. If it is down it does not cause a problem.
|
Turbo Phil
4642 Posts
Member #: 20
My sister is so fit I won't show anyone her picture
Lake District
|
|
Yeah, good stuff Nic ! :cool:
WWW.TURBO-MINI.COM
|
AlexB
Site Admin

6297 Posts
Member #: 1
The boring bloke who runs this place.
Berkshire
|
|
Nice work
|
Bat

4559 Posts
Member #: 786
Post Whore
Bermingum
|
|
Hi,
Great feature. Could you add some pictures of it all mounted up on the back of the engine, so we can see where it all goes? (ie those special brackets.) Assuming you have some pictures of this, don't go taking your engine out!! 
Cheers,
Gavin. :)
VEMs Authorised Installer / Re-seller. K head kits now available!
WB/EGT gauges. Click here for customers write-up
Visit www.doyouneedabrain.co.uk
My Mini build diary
|
Bat
4559 Posts
Member #: 786
Post Whore
Bermingum
|
|
Hi,
Thanks for the extra pictures. :cool:
Cheers,
Gavin. :)
VEMs Authorised Installer / Re-seller. K head kits now available!
WB/EGT gauges. Click here for customers write-up
Visit www.doyouneedabrain.co.uk
My Mini build diary
|
benjamin

171 Posts
Member #: 621
Advanced Member
nsw austalia
|
|
i have a hint, when making the pipe for the oil drain use the pipe on the side of the turbo inlet manifold, the water heating part
1152cc turboed mini clubman, most powerful 1.1L a-series?
http://boostmini.justboard.net/
|
SumpNut
Forum Mod

1322 Posts
Member #: 28
Post Whore
Milton Keynes
|
|
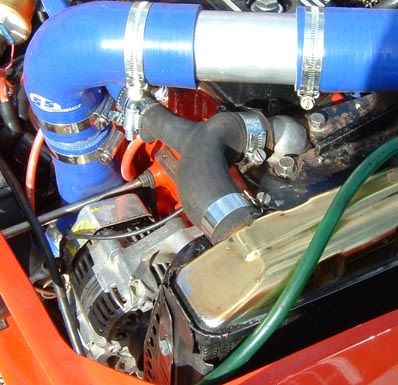
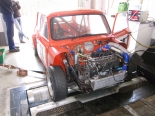
If anyone is interested I have uploaded a few pictures of my mini running a slightly larger T25 on the mirage manifolds. The engine steadys are not fitted yet - i usally tilt the engine forward slightly so once the steadys are fitted I expect the clearance to be better.
Dan
|
t3gav
2395 Posts
Member #: 229
Gavin@minispares.com
kent
|
|
how does it run on the t25 mate?
|
SumpNut
Forum Mod
1322 Posts
Member #: 28
Post Whore
Milton Keynes
|
|
Like a dream - a very fast dream......
|
jamier-2007
  " alt="User Avatar" width="100" height="100"> " alt="User Avatar" width="100" height="100">
4 Posts
Member #: 8920
Junior Member
|
|
This might sound stupid, but I am very new to this;
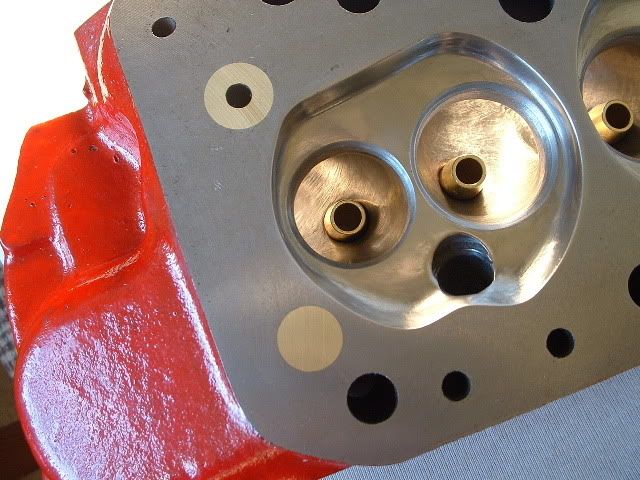
I have bought a T2 turbo off ebay, and it has 4 inlet/outlets. I thought it was only supposed to have oil in and out?!
Any help, Thanks Jamie
|
wil_h
9258 Posts
Member #: 123
Post Whore
Betwix Harrogate and York
|
|
The above turbo also has 4 inlets'outlets, take a look. water in and out, oil in and out
Fastest 998 mini in the world? 13.05 1/4 mile 106mph
On 2nd Jan, 2013 fastcarl said:
the design shows a distinct lack of imagination,
talk about starting off with a clean sheet of paper, then not bothering to fucking draw on it,lol
On 20th Apr, 2012 Paul S said:
I'm mainly concerned about swirl in the runners caused by the tangential entry.
|
jamier-2007
" alt="User Avatar" width="100" height="100">
4 Posts
Member #: 8920
Junior Member
|
|
Thanks for the reply. How do you know which is which? It already has all the connectors?! Thanks Jamie
|
rubicon

3756 Posts
Member #: 1709
I like granny porn.
LONDONSHIRE
|
|
the ones with te rust will be water...
On 2nd Oct, 2009 Vegard said:
On 1st Oct, 2009 Jimster said:
I bet my first wank came quicker than your first mini turbo
These new modern turbos with their quick spool up time, would make the competition harder.
On 15th Aug, 2011 robert said:
phew!!! thank you brett for smashing in my back doors .( not something i imagined writing... EVER)
|
GaryOS

1424 Posts
Member #: 2810
Formally spanner181187
Dublin, Ireland
|
|
Not if the turbo has been used in a coolant system that used anti-freeze for its life 
On 12th Nov, 2009 Paul S said:
I think Gary OS has taken over my role as the forum smart arse 
On 30th Apr, 2010 Rod S said:
Gary's description is best
|
rubicon
3756 Posts
Member #: 1709
I like granny porn.
LONDONSHIRE
|
|
On 23rd May, 2010 GaryOS said:
Not if the turbo has been used in a coolant system that used anti-freeze for its life
ok vegard...lol
On 2nd Oct, 2009 Vegard said:
On 1st Oct, 2009 Jimster said:
I bet my first wank came quicker than your first mini turbo
These new modern turbos with their quick spool up time, would make the competition harder.
On 15th Aug, 2011 robert said:
phew!!! thank you brett for smashing in my back doors .( not something i imagined writing... EVER)
|
jamier-2007
" alt="User Avatar" width="100" height="100">
4 Posts
Member #: 8920
Junior Member
|
|
Hi, do you need to use the water cooling? Or would the oil be sufficient enough?
|
Joe C

12307 Posts
Member #: 565
Carlos Fandango
Burnham-on-Crouch, Essex
|
|
no you can leave it disconected.
On 28th Aug, 2011 Kean said:
At the risk of being sigged...
Joe, do you have a photo of your tool?
http://www.turbominis.co.uk/forums/index.p...9064&lastpost=1
https://joe1977.imgbb.com/
|
jamier-2007
" alt="User Avatar" width="100" height="100">
4 Posts
Member #: 8920
Junior Member
|
|
Does it matter which way the oil goes in or out of the turbo? If it does, then how do you know which one is which? Thanks Jamie
|
matty
8297 Posts
Member #: 408
Turbo Love Palace Fool
Aylesbury
|
|
There should be one pipe significantly larger than the others (about 20mm dia) this will be the oil drain. On the opposite side will be the oil feed.
The body of the turbo needs to be positioned so the oil feed is at the top and drain at the bottom, as it relies on gravity to drain.
https://www.facebook.com/pages/Fusion-Fabri..._homepage_panel
www.fusionfabs.co.uk

1/4mile in 13.2sec @ 111 terminal on 15psi
|
|
Home > FAQ / Knowledge > Mirage Manifolds - An installation Guide
|
|
Users viewing this thread:
none. (+ 1 Guests)
|
|
|

