
| Page: |
| Home > A-Series EFI / Injection > EFI Testing - Dyno Day 6: 1.5:1 Ratio rockers | |||||||
 (2)[/url] by [url=https://www.flickr.com/photos/150672766@N03/]Rod Sugden[/url], on Fli) 5988 Posts Member #: 2024 Formally Retired Rural Suffolk |
18th Sep, 2019 at 06:10:12am
Looking at the earlier photo of how far the ball was out of the socket, I wonder if - at some point in the winding back of the thread - the ball was able to momentarily sit on the edge of the cup and actually open the valve too far.
Schrödinger's cat - so which one am I ??? |
||||||
 604 Posts Member #: 1106 Post Whore Hungerford, Berks |
18th Sep, 2019 at 07:41:31am
On 17th Sep, 2019 Joe C said:
Doh! Obviously, check if the valve is bent, also check guide clearance. Yes, valve straightness was in the list to do, but I had not thought of guide clearance. On 18th Sep, 2019 Rod S said:
Looking at the earlier photo of how far the ball was out of the socket, I wonder if - at some point in the winding back of the thread - the ball was able to momentarily sit on the edge of the cup and actually open the valve too far. This was my thinking also, hence thinking there would be a need to checking the push rod for straightness. I will have to double check now, but I think I estimated the valve stem to rocker clearance at 6.1mm measuring the photo using PDF viewer of course thats a very wild guess at best. On 18th Sep, 2019 Rod S said:
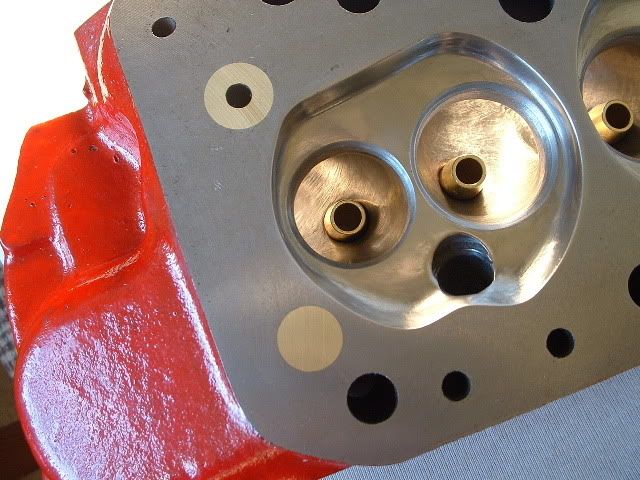
I wouldn't be surprised if the valve is now slightly bent - have you turned the head upside down and poured some paraffin or petrol into the chamber to see if any leaks out down the exhaust runner ? A tight stem clearance (Joe's suggestion) is certainly another possibility but if the valve is now slightly bent it will be hard to say cause or effect. The most weird thing is the three very distinct patterns on the valve head. Unlike cam followers, the valves aren't usually going to rotate because the collets are always locked in place under pressure whether the valve is being opened or static closed. And I certainly wouldn't expect it to rotate to three very obvious and different positions and stay there for three different periods of time (none of which match the piston for where the valve is now...). I had literally only just got the head off last night when I gave up and came in and posted, so no checks done at all yet. But I do have a spare exhaust valve I bought one in February last after the head gasket failure, when I thought the valve was bent (same valve). I decided it was not, so the valve went into stock. 77 Clubman build thread
|
||||||
|
109 Posts Member #: 10368 Advanced Member Australia |
19th Sep, 2019 at 12:33:18am
Hi Graham , keep up this good work..
|
||||||
|
604 Posts Member #: 1106 Post Whore Hungerford, Berks |
19th Sep, 2019 at 06:51:56pm
On 19th Sep, 2019 Earwax said:
Hi Graham , keep up this good work.. Just for clarity, is it cylinder 4 exhaust valve lash issue and cyl 4 intake oil leak? Apart from losing exhaust lift , and possibly valve seat pressure over time, is there any potential threat to the cam lobe- from the valve movement essentially not using the approach ramp. It is cylinder 4 that the rocker adjuster loosened on. Not sure about the intake oil leak though. There is a lot of oil in the photo, but mainly due to me making a mess when I took it apart. I guess there is no harm in trying to check the cam profile once I have the head back on. I already have a graph of the profile I did a year or so ago, so I could take more readings and compare old with new. Leak test: I put some petrol in the chamber at lunch time and left it until around 8pm. No leakage at all. I have check the valve for straightness: In the lathe chuck with a DTI I was getting around 0.01 0.02mm off true. The valve slides up and down the guide OK. With the valve pulled out of the guide about 15mm As close as I could get in with the DTI - I measured 0.09mm sideways movement and 0.12mm front to back. I did this a few times, turning the valve in the guide each time, so the quoted figures are average. Push rod seems pretty straight also. Ive checked the installed height as best I can without the proper kit: Reassembled each valve with only the centre spring and made up a sleeve to replace the outer spring, but only 28mm tall, then measure from the top of the sleeve to the underside of the valve cap with a Vernier caliper, adding the 28mm to the caliper measurement. Measurements are all over the place. I wonder if it could be down to me lapping the valves in when I rebuilt after the head gasket failure? Cylinder 1 = 1.424 Cylinder 2 = 1.427 Cylinder 3 = 1.454 Cylinder 4 = 1.440 Cylinder 5 = 1.440 Cylinder 6 = 1.432 Cylinder 7 = 1.429 Cylinder 8 = 1.454 Parts ordered for a hopeful weekend rebuild (with lots of valve spring shims) Edited by Graham T on 21st Sep, 2019. 77 Clubman build thread
|
||||||
|
109 Posts Member #: 10368 Advanced Member Australia |
20th Sep, 2019 at 11:30:26pm
thanks for clearing up my questions. Onto shims.... if referring to rocker pedestal shims i had to trim the shim angled ends to get everything to fit. I think there may be individual differences on pushrod bore placement etc,as well as some left rocker /right rocker differences. It does make a big difference in rocker geometry. If referring to spring shims, then ignore the above......keep going , this is great reading. |
||||||
|
604 Posts Member #: 1106 Post Whore Hungerford, Berks |
21st Sep, 2019 at 08:08:59am
On 20th Sep, 2019 Earwax said:
thanks for clearing up my questions. Onto shims.... if referring to rocker pedestal shims i had to trim the shim angled ends to get everything to fit. I think there may be individual differences on pushrod bore placement etc,as well as some left rocker /right rocker differences. It does make a big difference in rocker geometry. If referring to spring shims, then ignore the above......keep going , this is great reading. Should have made it clearer shims I was referring to were valve spring shims to get the valve spring fitted height close to where they should be. Yesterday I did some measuring to try to understand which the valve spring fitted heights were so different. Granted I am only using a Vernier for this so the measurements are not going to be exact but, I thought they would be closer than what they are. So I measured the valve spring pocket depth from the rocker cover gasket face to the spring seat and I measured the valve guide height from the spring seat to the top of the guide. 
How critical is the valve guide height? Mini Spares suggest: Fitted height from the top of the guide to the spring seat surface should be 0.590 (14.98mm) in old style 12G940 heads and all pre A+ small bore heads; 0.540 (13.71mm) in later A+ type and A+ small bore heads. These are guidelines only, although fine for most road use. The casting is machined on the top of the head, but I am pretty sure the number in the cast was once upon a time 12G940. Should the valve height fitted length be exact? In order to get the valve spring fitted height to where it needs to be for the Swiftune springs, I need 1.380, so thats a fair amount of shimming, and as only 60 and 30 shims are available, the height will never be right. So how critical will the valve spring fitted height be? Also, If I shim the valve spring seat to make up the valve spring fitted height, the reduces the valve guide fitted height, in some cases substantially will this be a problem? I have never got involve in anything like this before now, so excuse the possibly basic questions. I just want to make sure I have this right this time. Are we talking replacing guides and machining the valve spring seat to get it right? 77 Clubman build thread
|
||||||
|
109 Posts Member #: 10368 Advanced Member Australia |
22nd Sep, 2019 at 02:18:45am
a couple of well respected mini 'race motor ' specialists i know say mixing and matching heights and spring pressures makes a difference in smoothness- each cylinder sees the same openings. Read http://russellengineering.com.au/project-small-bore-pt3/ for ideas - may need to read back as well. |
||||||
|
5988 Posts Member #: 2024 Formally Retired Rural Suffolk |
22nd Sep, 2019 at 09:07:14am
More comments / questions rather than definitive answers...
Edited by Rod S on 22nd Sep, 2019. Schrödinger's cat - so which one am I ??? |
||||||
|
604 Posts Member #: 1106 Post Whore Hungerford, Berks |
22nd Sep, 2019 at 02:35:00pm
On 22nd Sep, 2019 Earwax said:
a couple of well respected mini 'race motor ' specialists i know say mixing and matching heights and spring pressures makes a difference in smoothness- each cylinder sees the same openings. Read http://russellengineering.com.au/project-small-bore-pt3/ for ideas - may need to read back as well. Interesting comments in pt2 of that link, with regard to setting clearances to counter any variation in valve timing per cylinder. Thanks Rod theres a lot to go through there On 22nd Sep, 2019 Rod S said:
It would be interesting to actually take measurements from the head face to the valve head with them installed to see how much is down to different seat depths Measurements of valve length and valve head face to cylinder head face added. 
Be mindful this is with a straightedge on the cylinder head face and a Vernier caliper, so allow for a little variance So the valve seats are pretty consistent in depth down from the head face. On 22nd Sep, 2019 Rod S said:
Does the Swiftune figure you have quoted takes into account all possible cam lift, cam profile, and rocker ratio possibilities otherwise, shimming to get a shorter initial compressed length may lead to coil binding (or hitting the top of the guide) when fully open with your cam and rocker combination. Or do they have different figures for different cam or rocker scenarios ??? The Swiftune figure for valve spring fitted length of 1.380 is what they suggest there is little information. Other than: Double valve springs designed for high lift cams including the SW5 and SW10. Fitted at 1.380" these springs give 80lb seat pressure and 180lb pressure at 0.500" lift. I called Swiftune before I bought the springs last week to get an idea of the pressure on the nose, because the quoted 180Lbs is at 0.500, where as I make my max lift with the 1.5: ratio rockers: 0.286 Cam lift x 1.5 = 0.429 - 0.017 exhaust = 0.412 -0.016 Inlet = 0.413 They estimated 166Lbs on the nose for the SW5-07B with 1.5:1 ratio rockers. (And I have measured the rocker to make sure that they are 1.5:1) The other thing Swiftune told me is that they would have expected harden seats to be fitted to eliminate/ reduce any wear to the cast valve spring seat from the valve spring. I am assuming the currently fitted valves are from Minispares and are the C-AEA526 DUAL VALVE SPRING. I have no details to back that up though. That said, there is a lot of information on the C-AEA526 and even detailed calculations for the seat pressure and nose pressures at different fitted length included with the fitting instructions on the minispares web site. Based on their details and the pressure measurements I took before I dismantled the engine, Im sure these are the springs. Calculating the fitted length I measured and using their calculations My measurements for pressure were ~10 Lbs under what the calculations work out at. I would have bought the C-AEA526 but for the fact that the nose pressure seems too much for the cam profile, based on Swiftunes estimated nose pressure for the lift I have. I am just wondering if the current valve spring fitted lengths were in an effort to reduce nose pressure based on cam profile when the engine was originally built. though it does not explain why the valve spring pockets are random depths when you look at the head face to the valve head measurements I took earlier. That said, the Minispares fitting instructions also specify: It is ABSOLUTELY ESSENTIAL that the fitted height is NOT MORE than 1.42. This will give a seat pressure of approximately 75-psi the absolute minimum advised for fast road use, and where spring shuffle is to be avoided. For my question about how critical the valve spring fitted length is, I was thinking more along the lines of effort v reward. The Spring fitted length difference for 1.380 column above is what I need to shim the valve springs by to get to the recommended fitted height, but how critical in regard to say: within 0.010 or even within 0.005 is what you should be aiming for. Based on the minispares figures the spring rate is 3.23Lbs per 0.010. I have not yet tried to work out the Swiftune rate. And also I was thinking can I get these 0.060 and 0.030 shims ground to get to an exact valve spring installed length or should I machine the valve spring pockets to get to the correct depths to use the shims, and then replace the valve guides. But that decision depends on what sort of tolerance is generally acceptable for the valve spring fitted length and how critical the Valve guide height is 77 Clubman build thread
|
||||||
|
604 Posts Member #: 1106 Post Whore Hungerford, Berks |
22nd Sep, 2019 at 02:36:56pm
On 22nd Sep, 2019 Rod S said:
And in terms of the guide fitted height, it will be the height above the appropriate shim pack that needs to be equal (along with the compressed spring lengths being equal) that determines which part of the stem is supported as the valve moves. I would think that the main reason a height is specified is just to determine which part of the valve stem sees the side load as the valve travels but there is also the issue of clearance between the underside of the valve cap/collets and the top of the guide when the valve is fully open, especially if you run with stem seals and have a high lift cam and/or high ratio rockers. When I installed the 1/.5:1 ratio rockers I was mindful of the valve cap/collets to the top of the guide clearance, and that is good, so my concern was really around your comment: On 22nd Sep, 2019 Rod S said:
I would think that the main reason a height is specified is just to determine which part of the valve stem sees the side load as the valve Even if the new valve spring fitted length is different than it was by 0.076, using the exhaust valve on No4 cylinder for example (ie the valve seat essentially being lifted by 0.076 using shims), the valve would still be running in the same place in the guide as it was before. So is it wrong that the valve guide was fitted at this height and that all the others are slightly out, or does it really not make that much difference in the grand scheme of things? If the valve guide height is critical for any side load or guide/stem clearance related reason, then it stands to reason that installing new guides to the exact height above the valve spring seats, after having machined all valve spring pockets to a standard height would be the right way to proceed, but then the question is what is actually the right valve guide height? Again from the Minispares fitting instructions, this time for the valve guides: Fitted height from the top of the guide to the spring seat surface should be 0.590 (14.98mm) in old style 12G940 heads and all pre A+ small bore heads; 0.540 (13.71mm) in later A+ type and A+ small bore heads. These are guidelines only, although fine for most road use. The fitted length may need reducing further for race use dependent on cam lift/rocker ratio/valve seat machine work etc. Your chosen engineer should be able to assist with establishing this. Presumable those heights quoted are for a cylinder head which was standard from factory? Because if I now fit valve guides for the exhaust valve on number 4 cylinder, with what I assume is a modified valve spring pocket then the guide would actually be at a different height to that of a standard cylinder head? 77 Clubman build thread
|
||||||
 6743 Posts Member #: 828 Post Whore uranus |
22nd Sep, 2019 at 06:06:22pm
I think i would just set the springs to be between 80 and 90 lbs on the seat graham ,and leave everything else as it is and get it back together. Medusa + injection = too much torque for the dyno ..https://youtu.be/qg5o0_tJxYM |
||||||
|
109 Posts Member #: 10368 Advanced Member Australia |
24th Sep, 2019 at 10:57:13am
I'll throw my point of view in here Graham ( but it isn't based on lots of evidence or possibly even common sense), so take caution.
|
||||||
 4619 Posts Member #: 20 My sister is so fit I won't show anyone her picture Lake District |
24th Sep, 2019 at 11:43:02pm
Youll find the spring seat heights can vary considerably from the factory, its unlikely theyve been machined since, thats just how poor the tolerances are.
|
||||||
|
604 Posts Member #: 1106 Post Whore Hungerford, Berks |
25th Sep, 2019 at 05:02:39pm
OK, thanks all for your input.
77 Clubman build thread
|
||||||
|
604 Posts Member #: 1106 Post Whore Hungerford, Berks |
28th Sep, 2019 at 04:22:44pm
Today's bargain find at Castle Combe...
77 Clubman build thread
|
||||||
|
6743 Posts Member #: 828 Post Whore uranus |
28th Sep, 2019 at 04:32:36pm
bargin ! Medusa + injection = too much torque for the dyno ..https://youtu.be/qg5o0_tJxYM |
||||||
 1030 Posts Member #: 1291 Post Whore Suffolk / Birmingham |
30th Sep, 2019 at 04:14:05pm
Interesting speedo drive too? |
||||||
 12307 Posts Member #: 565 Carlos Fandango Burnham-on-Crouch, Essex |
30th Sep, 2019 at 04:23:44pm
thats for a mechanical rev counter On 28th Aug, 2011 Kean said:
At the risk of being sigged... Joe, do you have a photo of your tool? http://www.turbominis.co.uk/forums/index.p...9064&lastpost=1 https://joe1977.imgbb.com/ |
||||||
|
5988 Posts Member #: 2024 Formally Retired Rural Suffolk |
1st Oct, 2019 at 03:17:40am
On 30th Sep, 2019 Joe C said:
that's for a mechanical rev counter How does it pick up the drive from the cam ? Nothing obvious on the toothed pulley/wheel and the plate the right angle drive is mounted on is sitting flat on the worktop so there must be another part to it that goes behind the plate that isn't shown in the photo. Schrödinger's cat - so which one am I ??? |
||||||
|
604 Posts Member #: 1106 Post Whore Hungerford, Berks |
1st Oct, 2019 at 08:11:54am
My above photo is a bit deceiving, it is not flat on the work top in that photo.
77 Clubman build thread
|
||||||
|
12307 Posts Member #: 565 Carlos Fandango Burnham-on-Crouch, Essex |
1st Oct, 2019 at 02:33:02pm
they connect with an oldham coupling, it used to be a thing from minispares using a stewart warner mechanical tacho
On 28th Aug, 2011 Kean said:
At the risk of being sigged... Joe, do you have a photo of your tool? http://www.turbominis.co.uk/forums/index.p...9064&lastpost=1 https://joe1977.imgbb.com/ |
||||||
|
604 Posts Member #: 1106 Post Whore Hungerford, Berks |
5th Oct, 2019 at 10:21:42am
So, I have finally got the valve spring heights set to within what I have measured as 5 thou of each other and a fairly consistent 85lbs seat pressure across all the valves measure with my crude test setup.
Edited by Graham T on 5th Oct, 2019. 77 Clubman build thread
|
||||||
|
6743 Posts Member #: 828 Post Whore uranus |
5th Oct, 2019 at 04:46:42pm
i would have a look at the fpr internals to see if there an obvious sticking scuffing point .a rising rate reg would work as long as your pump and piping can cope and it flows enough internally . Medusa + injection = too much torque for the dyno ..https://youtu.be/qg5o0_tJxYM |
||||||
|
8604 Posts Member #: 573 Formerly Axel Podland |
5th Oct, 2019 at 07:01:15pm
It does look like your FPR is sticking but are you sure that the pressure transducer output is reliable? Saul Bellow - "A great deal of intelligence can be invested in ignorance when the need for illusion is deep."
|
||||||
|
604 Posts Member #: 1106 Post Whore Hungerford, Berks |
5th Oct, 2019 at 07:34:54pm
On 5th Oct, 2019 robert said:
i would have a look at the fpr internals to see if there an obvious sticking scuffing point .a rising rate reg would work as long as your pump and piping can cope and it flows enough internally . Ok, Ill pull it apart tomorrow and take a look. On 5th Oct, 2019 Paul S said:
It does look like your FPR is sticking but are you sure that the pressure transducer output is reliable? Good point Paul, they are fairly cheap transducers one for fuel pressure and one for Oil pressure. Oil pressure shows a nice smooth trace, but I guess that means nothing really. Ill think about how I can do some testing on it tomorrow before I pull the FPR apart. 77 Clubman build thread
|
||||||
| Home > A-Series EFI / Injection > EFI Testing - Dyno Day 6: 1.5:1 Ratio rockers | |||||||
|
|||||||


| Page: |